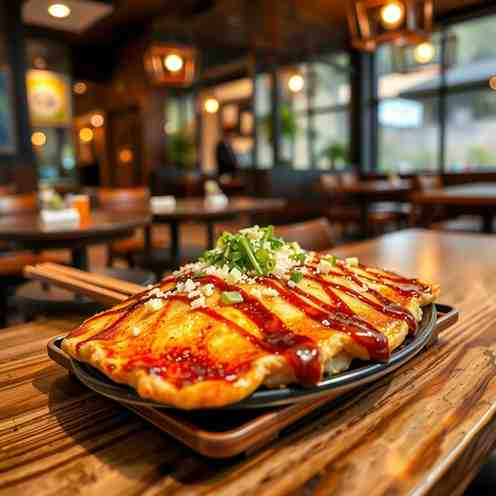
Fluffy Okonomiyaki - Japanese Meal Prep
Fluffy Okonomiyaki - Japanese Meal Prep
- Serves: 4 People
- Prepare Time: 20 minutes
- Cooking Time: 25 minutes
- Calories: -
- Difficulty: Easy
Craving a taste of Japan that’s both comforting and incredibly delicious? Get ready to dive into the world of Fluffy Okonomiyaki, a savory Japanese pancake that’s about to become your new favorite Japanese meal prep staple! Hailing from Osaka, this delightful dish is a hearty cabbage pancake pan-fried to golden perfection, then topped with an irresistible medley of sauces and garnishes. Our version isn't just authentic; it's designed to be extra fluffy and super weeknight-friendly, making it a perfect fit for busy schedules.
Whether you're a beginner cook looking for an exciting new recipe, cooking for one and want smart meal prep lunches, or feeding a whole family, this Okonomiyaki recipe has got you covered. It's packed with flavor, surprisingly easy to make, and offers fantastic options for cooking for one or prepping ahead. Say goodbye to boring dinners and hello to a vibrant, satisfying meal that’s both quick and healthy!
Ingredients
Directions
- Make Dashi Fast: In a small bowl, dissolve the dashi powder in hot water. Stir well and set aside to cool slightly. This forms the flavorful base for our batter!
- Mix Base Batter: In a large mixing bowl, whisk together the flour, baking powder, and salt. Add the egg and the cooled dashi. Whisk until just combined and smooth, ensuring there are no dry flour pockets. The consistency should be like a thick pancake batter. If it seems too thick, add the additional 1/4 cup water a tablespoon at a time until it reaches the desired consistency.
- Rest the Batter: Cover the bowl with plastic wrap and let the batter rest at room temperature for at least 15-20 minutes. A longer rest (up to an hour) can make the pancakes even fluffier.
- Prep Cabbage the Right Way: Finely mince the cabbage. This is crucial for texture! Wash the minced cabbage thoroughly, then drain it well. For best results, use a salad spinner to remove as much moisture as possible. Excess water makes for a soggy pancake.
- Fold Batter + Cabbage: To the rested batter, add the grated nagaimo, tenkasu, minced cabbage, sliced scallions, and pickled ginger. Using a spatula, gently fold everything together until the cabbage is evenly coated with batter. Don't overmix; you want to preserve some air. The mixture should be thick and chunky, not runny.
- Cook on Medium Heat: Heat a large nonstick skillet or cast-iron pan over medium heat. Add a tablespoon of neutral oil. For each pancake, scoop about 1/2 to 3/4 cup of the mixture into the pan, forming a round mound about 1-inch thick. Don't press it down too much; we want that fluffiness!
- Add Pork Belly: Arrange 2-3 slices of pork belly on top of each pancake. The fat from the pork will render down, adding incredible flavor and helping to crisp up the pancake.
- Steam-Cook with a Lid: Cook for 4-5 minutes, until the bottom is golden brown. Then, pour about 1-2 tablespoons of water around the edge of the pancake (not directly on top) and immediately cover the skillet with a lid. Reduce the heat slightly to medium-low and steam-cook for another 5-7 minutes. This step is key to ensuring the center cooks through without burning the outside.
- Flip Like a Pro: Carefully remove the lid. Using two spatulas (one wide, one regular), swiftly flip the pancake. It takes a bit of practice, but you'll get the hang of it!
- Final Cook + Doneness Test: Cook uncovered for another 5-7 minutes, or until the second side is golden brown and the pork belly is crisp. To check for doneness, gently press on the center of the pancake; it should feel firm, not jiggly. You can also insert a skewer into the center; if it comes out clean, it’s done.
- Sauce + Toppings: Transfer the cooked Okonomiyaki to a plate. Generously brush with Okonomiyaki sauce, then drizzle with Kewpie mayonnaise (a classic zigzag pattern is easy to achieve by snipping a tiny corner off the mayo packet). Finish with a sprinkle of aonori and a generous shower of katsuobushi. Serve immediately and enjoy the dancing bonito flakes!
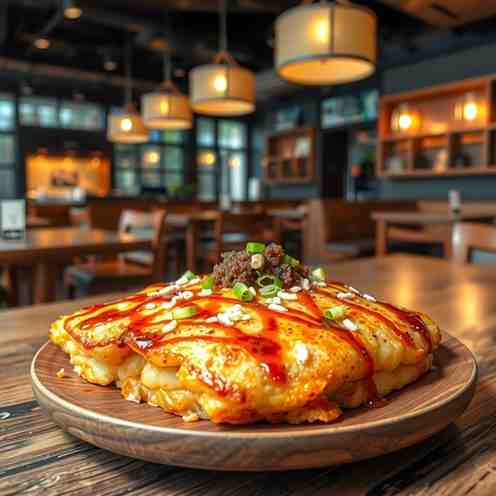
Fluffy Okonomiyaki - Japanese Meal Prep

- Serves: 4 People
- Prepare Time: 20 minutes
- Cooking Time: 25 minutes
- Calories: -
- Difficulty: Easy
Craving a taste of Japan that’s both comforting and incredibly delicious? Get ready to dive into the world of Fluffy Okonomiyaki, a savory Japanese pancake that’s about to become your new favorite Japanese meal prep staple! Hailing from Osaka, this delightful dish is a hearty cabbage pancake pan-fried to golden perfection, then topped with an irresistible medley of sauces and garnishes. Our version isn't just authentic; it's designed to be extra fluffy and super weeknight-friendly, making it a perfect fit for busy schedules.
Whether you're a beginner cook looking for an exciting new recipe, cooking for one and want smart meal prep lunches, or feeding a whole family, this Okonomiyaki recipe has got you covered. It's packed with flavor, surprisingly easy to make, and offers fantastic options for cooking for one or prepping ahead. Say goodbye to boring dinners and hello to a vibrant, satisfying meal that’s both quick and healthy!
Ingredients
Directions
- Make Dashi Fast: In a small bowl, dissolve the dashi powder in hot water. Stir well and set aside to cool slightly. This forms the flavorful base for our batter!
- Mix Base Batter: In a large mixing bowl, whisk together the flour, baking powder, and salt. Add the egg and the cooled dashi. Whisk until just combined and smooth, ensuring there are no dry flour pockets. The consistency should be like a thick pancake batter. If it seems too thick, add the additional 1/4 cup water a tablespoon at a time until it reaches the desired consistency.
- Rest the Batter: Cover the bowl with plastic wrap and let the batter rest at room temperature for at least 15-20 minutes. A longer rest (up to an hour) can make the pancakes even fluffier.
- Prep Cabbage the Right Way: Finely mince the cabbage. This is crucial for texture! Wash the minced cabbage thoroughly, then drain it well. For best results, use a salad spinner to remove as much moisture as possible. Excess water makes for a soggy pancake.
- Fold Batter + Cabbage: To the rested batter, add the grated nagaimo, tenkasu, minced cabbage, sliced scallions, and pickled ginger. Using a spatula, gently fold everything together until the cabbage is evenly coated with batter. Don't overmix; you want to preserve some air. The mixture should be thick and chunky, not runny.
- Cook on Medium Heat: Heat a large nonstick skillet or cast-iron pan over medium heat. Add a tablespoon of neutral oil. For each pancake, scoop about 1/2 to 3/4 cup of the mixture into the pan, forming a round mound about 1-inch thick. Don't press it down too much; we want that fluffiness!
- Add Pork Belly: Arrange 2-3 slices of pork belly on top of each pancake. The fat from the pork will render down, adding incredible flavor and helping to crisp up the pancake.
- Steam-Cook with a Lid: Cook for 4-5 minutes, until the bottom is golden brown. Then, pour about 1-2 tablespoons of water around the edge of the pancake (not directly on top) and immediately cover the skillet with a lid. Reduce the heat slightly to medium-low and steam-cook for another 5-7 minutes. This step is key to ensuring the center cooks through without burning the outside.
- Flip Like a Pro: Carefully remove the lid. Using two spatulas (one wide, one regular), swiftly flip the pancake. It takes a bit of practice, but you'll get the hang of it!
- Final Cook + Doneness Test: Cook uncovered for another 5-7 minutes, or until the second side is golden brown and the pork belly is crisp. To check for doneness, gently press on the center of the pancake; it should feel firm, not jiggly. You can also insert a skewer into the center; if it comes out clean, it’s done.
- Sauce + Toppings: Transfer the cooked Okonomiyaki to a plate. Generously brush with Okonomiyaki sauce, then drizzle with Kewpie mayonnaise (a classic zigzag pattern is easy to achieve by snipping a tiny corner off the mayo packet). Finish with a sprinkle of aonori and a generous shower of katsuobushi. Serve immediately and enjoy the dancing bonito flakes!
You may also like


Hey there! I’m just someone who seriously loves good food and believes that cooking doesn’t have to be complicated to be amazing. Whether it’s a quick weeknight dinner or a cozy weekend meal, I’m all about sharing easy, tasty recipes that actually work.