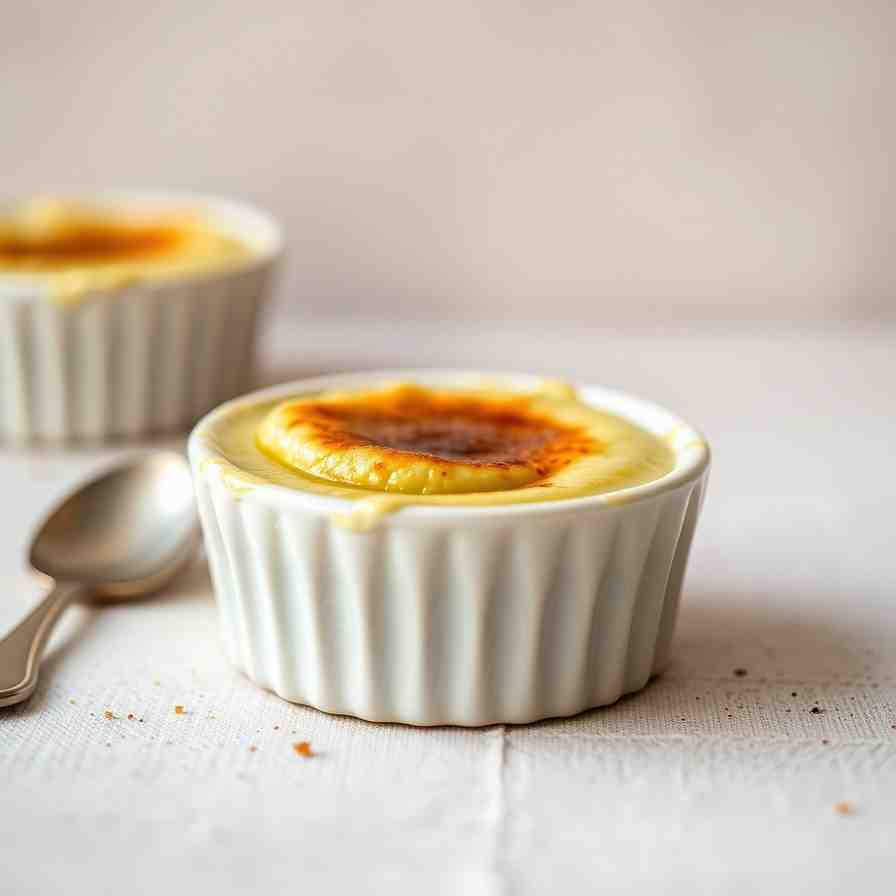
Matcha Crème Brûlée - Easy Green Tea Dessert Recipe
Matcha Crème Brûlée - Easy Green Tea Dessert Recipe
- Serves: 4 People
- Prepare Time: 25 minutes
- Cooking Time: 40 minutes
- Calories: -
- Difficulty: Medium
Get ready to experience dessert magic with our Matcha Crème Brûlée! This isn't just any crème brûlée; it's a creamy, dreamy green tea custard with a perfectly crisp, crackly sugar top that's absolutely irresistible. If you love the unique, earthy notes of matcha green tea desserts, you're in for a treat. This recipe takes a classic French dessert and infuses it with vibrant Japanese flavors, creating something truly special.
Making crème brûlée might sound fancy, but we've broken it down into simple, easy-to-follow steps. You'll need about 25 minutes of active prep time, 40 minutes for baking, and then some chill time for the custard to set up beautifully. It's a medium-skill recipe, perfect for both beginners eager to impress and experienced bakers looking for new matcha powder recipes. All you really need are some ramekins, a roasting pan for the water bath, and an optional kitchen torch to get that signature crackly top (we'll show you a broiler alternative too!). This is one of the best matcha recipes you'll add to your repertoire, promising a bold matcha flavor without any bitterness. Ready to jump in?
Ingredients
Directions
- Prep Your Oven and Water BathFirst things first, preheat your oven to 325°F (160°C). This lower temperature is key for a silky-smooth custard that bakes gently without scrambling. Position an oven rack in the middle of your oven. Grab a large roasting pan (one that your ramekins will fit into without touching each other) and set it aside. You'll also want to have a kettle of hot water ready for the water bath.
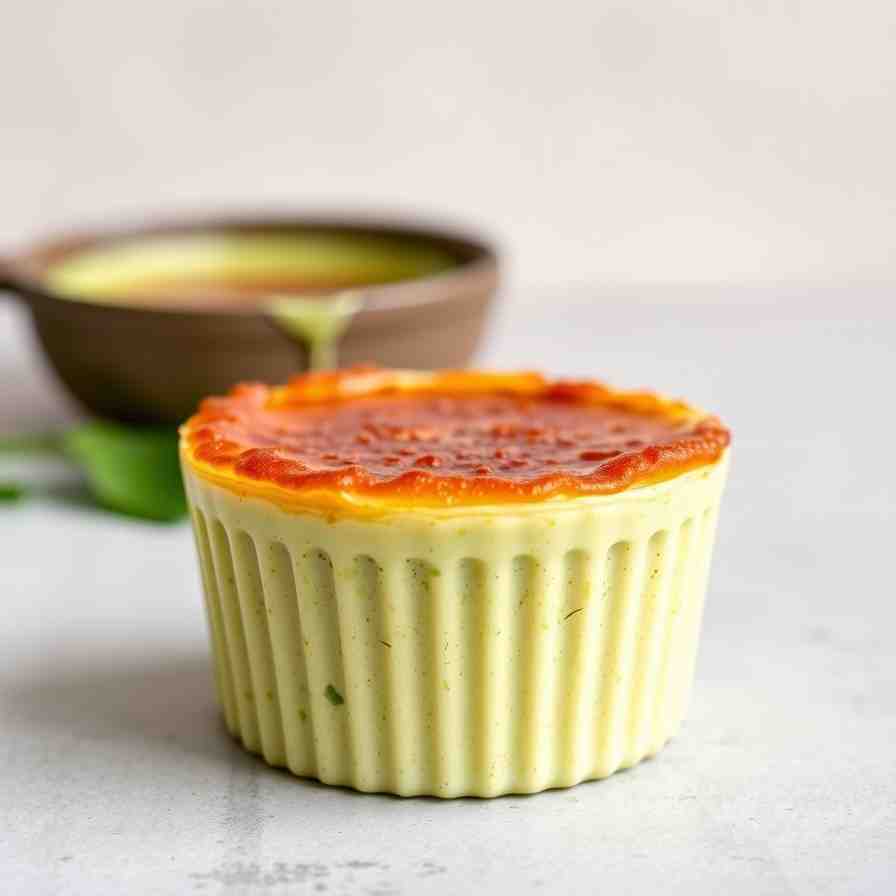
- Craft a Smooth Matcha Cream BaseTime to get that beautiful green color and flavor! In a small bowl, sift your matcha powder to break up any clumps – this is crucial for a smooth custard.Next, in a medium saucepan, gently warm the heavy cream and milk over medium-low heat. You want it hot, with small bubbles forming around the edges, but don't let it boil. Once warm, remove it from the heat.Add the sifted matcha powder to the warm cream mixture. Whisk vigorously until the matcha is fully dissolved and the mixture is smooth and evenly green. For extra insurance against any tiny clumps, strain the matcha cream through a fine-mesh sieve into a clean bowl.
- Temper Those Yolks (No Scrambling Allowed!)In a separate large bowl, whisk together the egg yolks, 1/2 cup granulated sugar, vanilla extract (if using), and a pinch of salt until pale yellow and well combined.Now for the tempering! Slowly, in a thin stream, pour about half of the warm matcha cream mixture into the egg yolk mixture while continuously whisking. This gradually brings the yolks up to temperature without cooking them. Once combined, pour the tempered yolk mixture back into the remaining matcha cream in the saucepan. Whisk gently until everything is fully incorporated.
- Bake Until Perfectly SetCarefully pour the custard base into your ramekins, filling them almost to the top. Place the filled ramekins into your roasting pan. Now, carefully pour hot water from your kettle into the roasting pan, ensuring it comes about halfway up the sides of the ramekins. This water bath (or bain-marie) creates a gentle, even heat, preventing the custards from cracking and keeping them wonderfully creamy.Carefully transfer the roasting pan to your preheated oven. Bake for 35-45 minutes. You'll know they're done when the edges are set, but the center still has a slight jiggle when you gently shake the pan. For absolute precision, an instant-read thermometer inserted into the center should register 170-175°F (77-79°C).
- Chill Out, Crème Brûlée!Once baked, carefully remove the roasting pan from the oven. Let the ramekins cool in the water bath for about 15-20 minutes. Then, carefully remove the ramekins from the water bath, pat their bottoms dry, and place them on a wire rack to cool completely at room temperature.Once cool, cover each ramekin tightly with plastic wrap and refrigerate for at least 4 hours, or ideally, overnight. This chilling time is essential for the custard to fully set and for the flavors to meld.
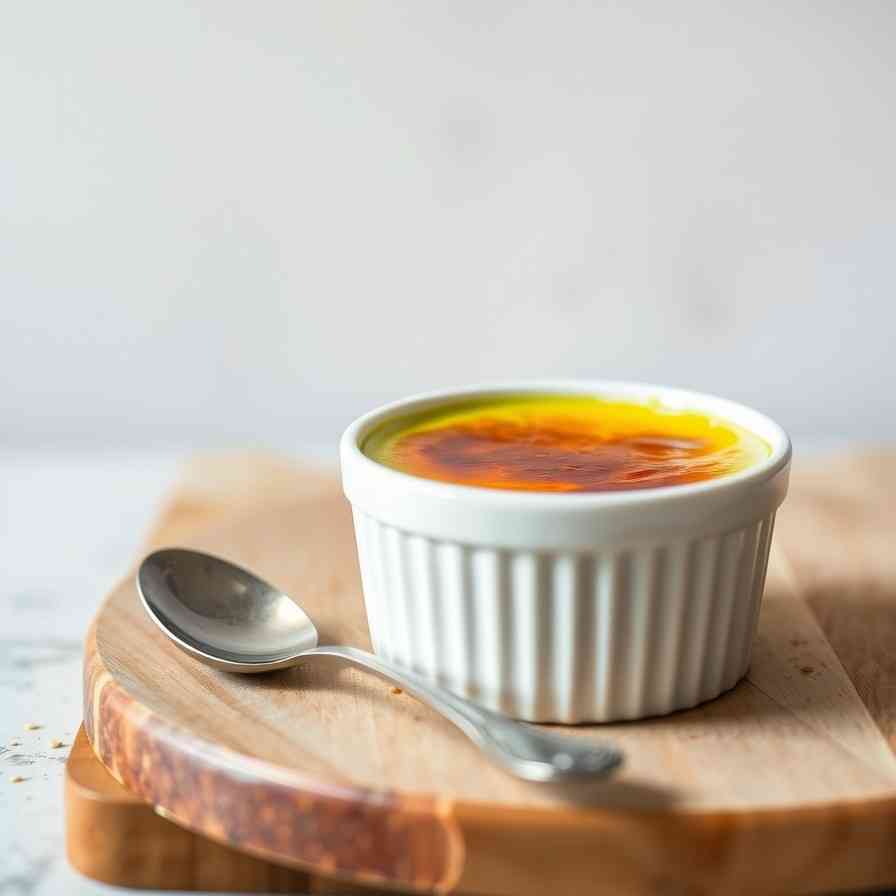
- Brûlée the Top (Torch or Broiler)This is where the magic happens! Just before serving, uncover the chilled custards. Sprinkle about 1-2 teaspoons of granulated sugar evenly over the top of each crème brûlée.
- Torch Technique: If you have a kitchen torch, hold it a few inches above the sugar and move it in a circular motion. The sugar will melt, bubble, and then caramelize into a beautiful, amber-colored, crackly crust. Keep the flame moving to prevent burning.
- Broiler Fallback: No torch? No problem! Place your oven rack about 6 inches from the broiler element. Preheat your broiler. Place the sugared ramekins on a baking sheet and slide them under the broiler. Watch very carefully – this happens fast! As soon as the sugar melts and caramelizes to a deep amber, remove them immediately. Over-broiling will burn the sugar and potentially overheat the custard.
Matcha Crème Brûlée - Easy Green Tea Dessert Recipe
- Serves: 4 People
- Prepare Time: 25 minutes
- Cooking Time: 40 minutes
- Calories: -
- Difficulty: Medium
Get ready to experience dessert magic with our Matcha Crème Brûlée! This isn't just any crème brûlée; it's a creamy, dreamy green tea custard with a perfectly crisp, crackly sugar top that's absolutely irresistible. If you love the unique, earthy notes of matcha green tea desserts, you're in for a treat. This recipe takes a classic French dessert and infuses it with vibrant Japanese flavors, creating something truly special.
Making crème brûlée might sound fancy, but we've broken it down into simple, easy-to-follow steps. You'll need about 25 minutes of active prep time, 40 minutes for baking, and then some chill time for the custard to set up beautifully. It's a medium-skill recipe, perfect for both beginners eager to impress and experienced bakers looking for new matcha powder recipes. All you really need are some ramekins, a roasting pan for the water bath, and an optional kitchen torch to get that signature crackly top (we'll show you a broiler alternative too!). This is one of the best matcha recipes you'll add to your repertoire, promising a bold matcha flavor without any bitterness. Ready to jump in?
Ingredients
Directions
- Prep Your Oven and Water BathFirst things first, preheat your oven to 325°F (160°C). This lower temperature is key for a silky-smooth custard that bakes gently without scrambling. Position an oven rack in the middle of your oven. Grab a large roasting pan (one that your ramekins will fit into without touching each other) and set it aside. You'll also want to have a kettle of hot water ready for the water bath.
- Craft a Smooth Matcha Cream BaseTime to get that beautiful green color and flavor! In a small bowl, sift your matcha powder to break up any clumps – this is crucial for a smooth custard.Next, in a medium saucepan, gently warm the heavy cream and milk over medium-low heat. You want it hot, with small bubbles forming around the edges, but don't let it boil. Once warm, remove it from the heat.Add the sifted matcha powder to the warm cream mixture. Whisk vigorously until the matcha is fully dissolved and the mixture is smooth and evenly green. For extra insurance against any tiny clumps, strain the matcha cream through a fine-mesh sieve into a clean bowl.
- Temper Those Yolks (No Scrambling Allowed!)In a separate large bowl, whisk together the egg yolks, 1/2 cup granulated sugar, vanilla extract (if using), and a pinch of salt until pale yellow and well combined.Now for the tempering! Slowly, in a thin stream, pour about half of the warm matcha cream mixture into the egg yolk mixture while continuously whisking. This gradually brings the yolks up to temperature without cooking them. Once combined, pour the tempered yolk mixture back into the remaining matcha cream in the saucepan. Whisk gently until everything is fully incorporated.
- Bake Until Perfectly SetCarefully pour the custard base into your ramekins, filling them almost to the top. Place the filled ramekins into your roasting pan. Now, carefully pour hot water from your kettle into the roasting pan, ensuring it comes about halfway up the sides of the ramekins. This water bath (or bain-marie) creates a gentle, even heat, preventing the custards from cracking and keeping them wonderfully creamy.Carefully transfer the roasting pan to your preheated oven. Bake for 35-45 minutes. You'll know they're done when the edges are set, but the center still has a slight jiggle when you gently shake the pan. For absolute precision, an instant-read thermometer inserted into the center should register 170-175°F (77-79°C).
- Chill Out, Crème Brûlée!Once baked, carefully remove the roasting pan from the oven. Let the ramekins cool in the water bath for about 15-20 minutes. Then, carefully remove the ramekins from the water bath, pat their bottoms dry, and place them on a wire rack to cool completely at room temperature.Once cool, cover each ramekin tightly with plastic wrap and refrigerate for at least 4 hours, or ideally, overnight. This chilling time is essential for the custard to fully set and for the flavors to meld.
- Brûlée the Top (Torch or Broiler)This is where the magic happens! Just before serving, uncover the chilled custards. Sprinkle about 1-2 teaspoons of granulated sugar evenly over the top of each crème brûlée.
- Torch Technique: If you have a kitchen torch, hold it a few inches above the sugar and move it in a circular motion. The sugar will melt, bubble, and then caramelize into a beautiful, amber-colored, crackly crust. Keep the flame moving to prevent burning.
- Broiler Fallback: No torch? No problem! Place your oven rack about 6 inches from the broiler element. Preheat your broiler. Place the sugared ramekins on a baking sheet and slide them under the broiler. Watch very carefully – this happens fast! As soon as the sugar melts and caramelizes to a deep amber, remove them immediately. Over-broiling will burn the sugar and potentially overheat the custard.
You may also like


Hey there! I’m just someone who seriously loves good food and believes that cooking doesn’t have to be complicated to be amazing. Whether it’s a quick weeknight dinner or a cozy weekend meal, I’m all about sharing easy, tasty recipes that actually work.