
Fresh Fruit Tart Recipe - Easy French Dessert
Fresh Fruit Tart Recipe - Easy French Dessert
- Serves: 8 People
- Prepare Time: 45 minutes
- Cooking Time: 30 minutes
- Calories: -
- Difficulty: Medium
Ever dreamt of creating that stunning, bakery-case fresh fruit tart you see in patisseries, but thought it was too complicated? Good news: you absolutely can! This definitive fresh fruit tart recipe brings together a crisp, sweet crust, a silky smooth pastry cream, and a vibrant crown of fresh fruit, making for an impressive yet surprisingly achievable French dessert. We're talking about a tart that's not just beautiful but also boasts the natural goodness of Vitamin C & Antioxidants from its fruity topping.
What makes this version your new go-to? We've built in smart strategies to tackle common tart troubles: an anti-soggy crust defense, a pastry cream that sets up perfectly firm (no runny mess here!), and a simple system for decorating that makes you look like a pro. Plus, almost all the components are make-ahead friendly, so you can assemble your masterpiece right before serving for peak freshness and flavor. Get ready to bake a tart that tastes as incredible as it looks, perfect for any occasion!
Ingredients
Directions
- Combine Dry Ingredients: In a large bowl or food processor, whisk together the flour, powdered sugar, and salt.
- Cut in Butter: Add the cold, cubed butter. If using a food processor, pulse until the mixture resembles coarse meal with some pea-sized butter pieces remaining. If doing by hand, use a pastry blender or your fingertips to cut the butter into the flour until similar texture is achieved.
- Add Wet Ingredients: In a small bowl, lightly whisk the cold egg yolk and vanilla extract. Add this to the flour mixture. Pulse or mix until the dough just starts to come together. Be careful not to overwork the dough, as this can lead to a tough crust.
- Form and Chill Dough: Turn the dough out onto a lightly floured surface. Gently gather it into a cohesive disk, flatten slightly, wrap tightly in plastic wrap, and chill in the refrigerator for at least 30 minutes (or up to 2 days). Chilling is crucial as it allows the butter to firm up, preventing shrinkage, and lets the gluten relax for a tender crust.
- Roll or Press Dough: On a lightly floured surface, roll the chilled dough into a 12-inch circle, about ⅛-inch thick. Carefully transfer it to a 9-inch tart pan with a removable bottom. Gently press the dough into the bottom and up the sides of the pan. Trim any excess dough, leaving a slight overhang. Alternatively, for a press-in method, simply press small pieces of dough evenly into the bottom and up the sides of the tart pan.
- Dock and Chill/Freeze: Use a fork to "dock" the bottom of the crust (prick holes all over it). This prevents the crust from puffing up during baking. Chill or freeze the lined tart shell for at least 15-20 minutes. This second chill helps maintain the crust's shape.
- Blind-Bake: Preheat your oven to 375°F (190°C). Line the chilled tart shell with parchment paper or foil and fill with pie weights, dried beans, or rice. Bake for 15-20 minutes, or until the edges are lightly golden.
- Second Bake (Uncovered): Carefully remove the parchment paper and weights. Return the tart shell to the oven and bake for another 10-15 minutes, or until the crust is evenly golden brown and dry.
- Cool Completely: Remove the tart shell from the oven and let it cool completely on a wire rack before filling. A warm crust will make your pastry cream runny and potentially soggy.
- Pastry Cream Ingredients
- 2 cups (480ml) whole milk (or a mix of milk and heavy cream for richer flavor)
- ½ cup (100g) granulated sugar, divided
- 4 large egg yolks
- ¼ cup (30g) cornstarch
- 2 tablespoons (28g) unsalted butter, cold and cut into small pieces
- 1 ½ teaspoons pure vanilla extract
- Pastry Cream Step-by-Step Instructions
- Warm Dairy & Sugar: In a medium saucepan, combine the milk (and cream, if using) with half of the granulated sugar. Heat over medium heat until the mixture just begins to simmer and steam, and the sugar is dissolved. Do not boil.
- Temper Yolks & Cornstarch: While the milk heats, in a separate medium bowl, whisk together the egg yolks, remaining granulated sugar, and cornstarch until smooth and pale yellow.
- Temper the Yolks: Slowly ladle about half of the warm milk mixture into the egg yolk mixture, whisking constantly to temper the yolks. This prevents the eggs from scrambling.
- Combine & Cook: Pour the tempered yolk mixture back into the saucepan with the remaining warm milk. Whisk continuously over medium heat. The cream will begin to thicken quite suddenly. Continue to cook, whisking vigorously, for 1-2 minutes after it thickens, ensuring it reaches a full boil (you'll see large bubbles breaking the surface). This activates the cornstarch and cooks out any starchy taste. The cream should be thick enough to coat the back of a spoon. An optional thermometer will read 180-190°F (82-88°C).
- Strain & Finish: Immediately remove from heat. Pour the hot pastry cream through a fine-mesh strainer into a clean bowl. This ensures a perfectly smooth, lump-free cream. Whisk in the cold butter until fully melted and incorporated, then stir in the vanilla extract.
- Chill Correctly: To prevent a skin from forming, immediately press a piece of plastic wrap directly onto the surface of the pastry cream. Chill in the refrigerator for at least 3-4 hours, or preferably overnight, until completely cold and firm.
- Fruit Tart Assembly & Glaze Ingredients
- 3-4 cups mixed fresh fruit (e.g., strawberries, blueberries, raspberries, kiwi, mandarins, grapes)
- 1-2 ounces (28-56g) good quality white chocolate or dark chocolate, melted (optional, for moisture barrier)
- ¼ cup apricot jam or apple jelly
- 1-2 tablespoons hot water
- Fruit Tart Assembly & Glaze Step-by-Step Instructions
- Build Anti-Soggy Barrier (Optional): Once the blind-baked crust is completely cool, if desired, brush a very thin layer of melted white or dark chocolate onto the bottom of the crust. Let it set completely before filling. This creates a delicious moisture barrier, keeping your crust crisp, especially if making ahead.
- Fill with Pastry Cream: Remove the chilled pastry cream from the refrigerator. Give it a good whisk until it's smooth and spreadable. Spoon the pastry cream into the cooled tart shell, spreading it evenly to the edges.
- Prepare Fruit: Wash and thoroughly dry all your fresh fruit. Slice larger fruits (like strawberries, kiwi) into uniform pieces. Aim for pieces that are easy to eat and arrange.
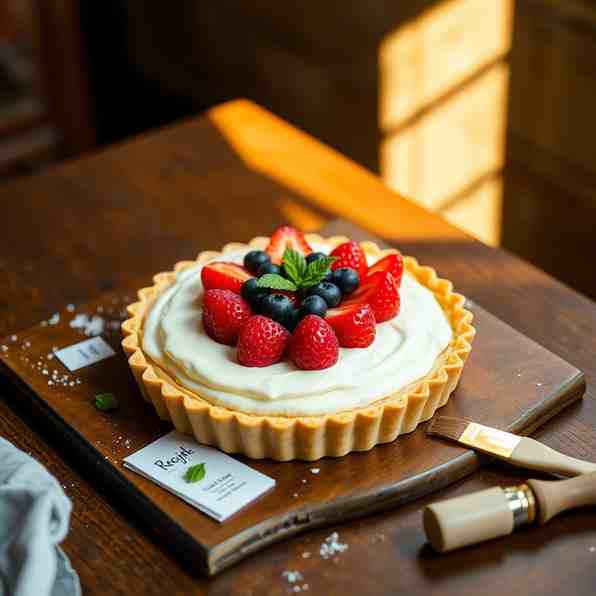
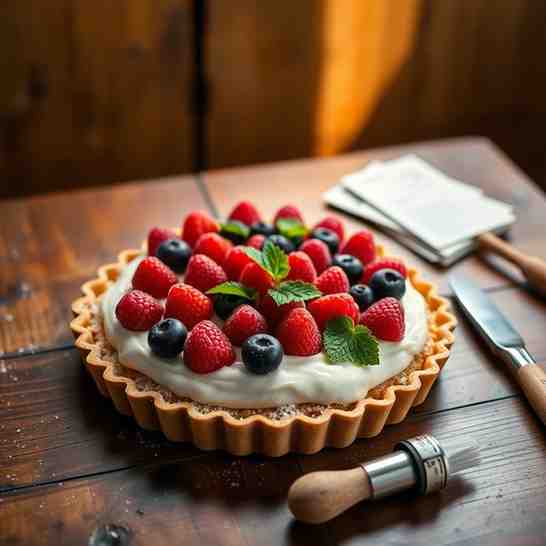
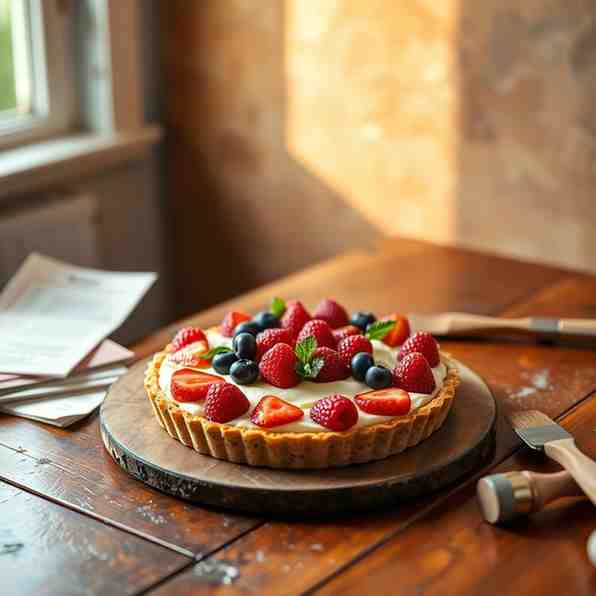
- Decorate with Fruit: Arrange the fruit decoratively on top of the pastry cream. A classic method is to start with a "hero" fruit (like sliced strawberries) around the outer edge, then create concentric rings with other fruits, filling in gaps with smaller berries. Aim for a pattern that will look good when sliced.
- Prepare Glaze (Optional): In a small microwave-safe bowl, combine the apricot jam (or apple jelly) with 1-2 tablespoons of hot water. Microwave for 15-30 seconds, then stir until smooth and liquid. If needed, strain through a fine-mesh sieve for a perfectly clear glaze.
- Glaze & Chill: Gently brush the warmed glaze over the arranged fruit. This adds a beautiful shine and helps preserve the fruit's freshness.
- Final Chill: Chill the assembled fruit tart in the refrigerator for at least 30 minutes before slicing and serving. This allows everything to set firmly for clean, beautiful slices.
Fresh Fruit Tart Recipe - Easy French Dessert
- Serves: 8 People
- Prepare Time: 45 minutes
- Cooking Time: 30 minutes
- Calories: -
- Difficulty: Medium
Ever dreamt of creating that stunning, bakery-case fresh fruit tart you see in patisseries, but thought it was too complicated? Good news: you absolutely can! This definitive fresh fruit tart recipe brings together a crisp, sweet crust, a silky smooth pastry cream, and a vibrant crown of fresh fruit, making for an impressive yet surprisingly achievable French dessert. We're talking about a tart that's not just beautiful but also boasts the natural goodness of Vitamin C & Antioxidants from its fruity topping.
What makes this version your new go-to? We've built in smart strategies to tackle common tart troubles: an anti-soggy crust defense, a pastry cream that sets up perfectly firm (no runny mess here!), and a simple system for decorating that makes you look like a pro. Plus, almost all the components are make-ahead friendly, so you can assemble your masterpiece right before serving for peak freshness and flavor. Get ready to bake a tart that tastes as incredible as it looks, perfect for any occasion!
Ingredients
Directions
- Combine Dry Ingredients: In a large bowl or food processor, whisk together the flour, powdered sugar, and salt.
- Cut in Butter: Add the cold, cubed butter. If using a food processor, pulse until the mixture resembles coarse meal with some pea-sized butter pieces remaining. If doing by hand, use a pastry blender or your fingertips to cut the butter into the flour until similar texture is achieved.
- Add Wet Ingredients: In a small bowl, lightly whisk the cold egg yolk and vanilla extract. Add this to the flour mixture. Pulse or mix until the dough just starts to come together. Be careful not to overwork the dough, as this can lead to a tough crust.
- Form and Chill Dough: Turn the dough out onto a lightly floured surface. Gently gather it into a cohesive disk, flatten slightly, wrap tightly in plastic wrap, and chill in the refrigerator for at least 30 minutes (or up to 2 days). Chilling is crucial as it allows the butter to firm up, preventing shrinkage, and lets the gluten relax for a tender crust.
- Roll or Press Dough: On a lightly floured surface, roll the chilled dough into a 12-inch circle, about ⅛-inch thick. Carefully transfer it to a 9-inch tart pan with a removable bottom. Gently press the dough into the bottom and up the sides of the pan. Trim any excess dough, leaving a slight overhang. Alternatively, for a press-in method, simply press small pieces of dough evenly into the bottom and up the sides of the tart pan.
- Dock and Chill/Freeze: Use a fork to "dock" the bottom of the crust (prick holes all over it). This prevents the crust from puffing up during baking. Chill or freeze the lined tart shell for at least 15-20 minutes. This second chill helps maintain the crust's shape.
- Blind-Bake: Preheat your oven to 375°F (190°C). Line the chilled tart shell with parchment paper or foil and fill with pie weights, dried beans, or rice. Bake for 15-20 minutes, or until the edges are lightly golden.
- Second Bake (Uncovered): Carefully remove the parchment paper and weights. Return the tart shell to the oven and bake for another 10-15 minutes, or until the crust is evenly golden brown and dry.
- Cool Completely: Remove the tart shell from the oven and let it cool completely on a wire rack before filling. A warm crust will make your pastry cream runny and potentially soggy.
- Pastry Cream Ingredients
- 2 cups (480ml) whole milk (or a mix of milk and heavy cream for richer flavor)
- ½ cup (100g) granulated sugar, divided
- 4 large egg yolks
- ¼ cup (30g) cornstarch
- 2 tablespoons (28g) unsalted butter, cold and cut into small pieces
- 1 ½ teaspoons pure vanilla extract
- Pastry Cream Step-by-Step Instructions
- Warm Dairy & Sugar: In a medium saucepan, combine the milk (and cream, if using) with half of the granulated sugar. Heat over medium heat until the mixture just begins to simmer and steam, and the sugar is dissolved. Do not boil.
- Temper Yolks & Cornstarch: While the milk heats, in a separate medium bowl, whisk together the egg yolks, remaining granulated sugar, and cornstarch until smooth and pale yellow.
- Temper the Yolks: Slowly ladle about half of the warm milk mixture into the egg yolk mixture, whisking constantly to temper the yolks. This prevents the eggs from scrambling.
- Combine & Cook: Pour the tempered yolk mixture back into the saucepan with the remaining warm milk. Whisk continuously over medium heat. The cream will begin to thicken quite suddenly. Continue to cook, whisking vigorously, for 1-2 minutes after it thickens, ensuring it reaches a full boil (you'll see large bubbles breaking the surface). This activates the cornstarch and cooks out any starchy taste. The cream should be thick enough to coat the back of a spoon. An optional thermometer will read 180-190°F (82-88°C).
- Strain & Finish: Immediately remove from heat. Pour the hot pastry cream through a fine-mesh strainer into a clean bowl. This ensures a perfectly smooth, lump-free cream. Whisk in the cold butter until fully melted and incorporated, then stir in the vanilla extract.
- Chill Correctly: To prevent a skin from forming, immediately press a piece of plastic wrap directly onto the surface of the pastry cream. Chill in the refrigerator for at least 3-4 hours, or preferably overnight, until completely cold and firm.
- Fruit Tart Assembly & Glaze Ingredients
- 3-4 cups mixed fresh fruit (e.g., strawberries, blueberries, raspberries, kiwi, mandarins, grapes)
- 1-2 ounces (28-56g) good quality white chocolate or dark chocolate, melted (optional, for moisture barrier)
- ¼ cup apricot jam or apple jelly
- 1-2 tablespoons hot water
- Fruit Tart Assembly & Glaze Step-by-Step Instructions
- Build Anti-Soggy Barrier (Optional): Once the blind-baked crust is completely cool, if desired, brush a very thin layer of melted white or dark chocolate onto the bottom of the crust. Let it set completely before filling. This creates a delicious moisture barrier, keeping your crust crisp, especially if making ahead.
- Fill with Pastry Cream: Remove the chilled pastry cream from the refrigerator. Give it a good whisk until it's smooth and spreadable. Spoon the pastry cream into the cooled tart shell, spreading it evenly to the edges.
- Prepare Fruit: Wash and thoroughly dry all your fresh fruit. Slice larger fruits (like strawberries, kiwi) into uniform pieces. Aim for pieces that are easy to eat and arrange.
- Decorate with Fruit: Arrange the fruit decoratively on top of the pastry cream. A classic method is to start with a "hero" fruit (like sliced strawberries) around the outer edge, then create concentric rings with other fruits, filling in gaps with smaller berries. Aim for a pattern that will look good when sliced.
- Prepare Glaze (Optional): In a small microwave-safe bowl, combine the apricot jam (or apple jelly) with 1-2 tablespoons of hot water. Microwave for 15-30 seconds, then stir until smooth and liquid. If needed, strain through a fine-mesh sieve for a perfectly clear glaze.
- Glaze & Chill: Gently brush the warmed glaze over the arranged fruit. This adds a beautiful shine and helps preserve the fruit's freshness.
- Final Chill: Chill the assembled fruit tart in the refrigerator for at least 30 minutes before slicing and serving. This allows everything to set firmly for clean, beautiful slices.
You may also like

Hey there! I’m just someone who seriously loves good food and believes that cooking doesn’t have to be complicated to be amazing. Whether it’s a quick weeknight dinner or a cozy weekend meal, I’m all about sharing easy, tasty recipes that actually work.


