
Gluten-Free Johnny Cakes
Gluten-Free Johnny Cakes

- Serves: 8 People
- Prepare Time: 20 minutes
- Cooking Time: 25 minutes
- Calories: -
- Difficulty: Easy
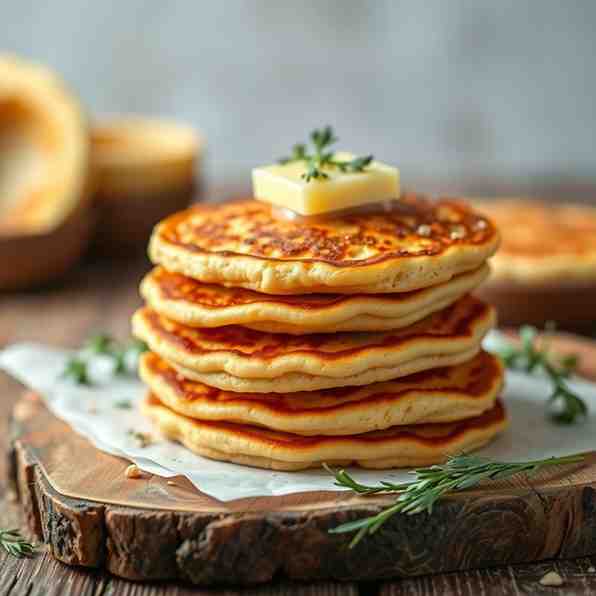
Craving a taste of the Caribbean but need to keep it gluten-free? You're in luck! Get ready to whip up a batch of authentic Gluten-Free Johnny Cakes, those crispy, golden fried breads that are a staple across the islands. Forget dry, crumbly imitations – our recipe is designed to deliver that perfect soft interior and delightful crunch, all while being completely gluten-free. This isn't just another cake recipe easy to follow; it's a passport to island flavors, made accessible for everyone.
So, what exactly are Johnny Cakes, really? In the Caribbean, these beloved treats are small, often savory, fried breads or rolls. They’re quite different from the baked cornmeal cakes you might find in North America. Their history is as rich as their flavor, evolving from indigenous cornmeal cookery to "journey cakes" (perfect for travelers!) and eventually becoming the "Johnny cakes" we know and love today. While some versions might remind you of cornbread or pancakes, our recipe focuses on the classic Caribbean-inspired fried bread texture, adapted to be fully gluten-free. This means a satisfying chew, a golden crust, and a flavor that transports you straight to a sunny beach.
Why go gluten-free with such a classic? Traditional Johnny Cakes often rely on wheat flour, making them a no-go for those with celiac disease or gluten sensitivity. Our recipe changes that! We've carefully crafted a version that brings this comfort food to your table, ensuring that families where at least one person needs gluten-free options can all enjoy the same delicious treat. This recipe isn't just about avoiding gluten; it's about making classic comfort foods accessible, often being easier on digestion for those who don’t tolerate gluten, and letting you serve one amazing bread everyone can enjoy. Just remember, while delicious, gluten-free doesn’t automatically mean healthier, so always check labels for GF certification and cross-contamination wording if you have strict dietary needs. Let's get baking (or rather, frying)!
Ingredients
Directions
- Mix the Dry Ingredients In a large mixing bowl, whisk together your gluten-free 1:1 baking flour blend, cornmeal, baking powder, salt, and sugar (if using). Make sure to whisk well until the mixture looks evenly yellow and fine, with no lumps of baking powder. This ensures even distribution of leavening.
- Add the Wet Ingredients Pour in the milk (or non-dairy milk) and the melted oil or butter. Stir with a spatula until everything comes together. The dough should be softer than a biscuit dough but definitely not pourable like pancake batter. It should come together in a cohesive ball but still feel soft and slightly tacky to the touch, not gluey or overly stiff.
- Rest the Dough Cover the bowl with a clean kitchen towel or plastic wrap and let the dough rest at room temperature for 10-15 minutes. This step is crucial for gluten-free doughs! It allows the cornmeal to fully hydrate and the GF flour blend to absorb moisture, leading to a more pliable and less crumbly final product. After resting, the dough should feel slightly firmer and much easier to handle.
- Shape the Johnny Cakes Lightly flour your hands and a clean work surface with a little extra gluten-free flour. Divide the dough into 8-10 equal pieces. Gently shape each piece into a round disc, about 3-4 inches wide and ½ inch thick. Aim for smooth edges and even thickness across all discs so they cook uniformly.
- Fry Until Crisp and Golden Pour 3-4 cups of neutral oil into a heavy skillet or shallow frying pan (cast iron works wonderfully for extra crispness) to a depth of about 1 inch. Heat the oil over medium-high heat until it reaches 350-360°F (175-180°C). If you don’t have a thermometer, a small scrap of dough dropped into the oil should sizzle briskly and immediately, but not darken instantly.
- Carefully place 3-4 Johnny Cakes into the hot oil, being careful not to crowd the pan. Fry for 3-5 minutes per side, or until they are deep golden brown and crispy. Watch for the edges to turn a rich golden color and the centers to puff slightly. For a quick internal check, if you tear one open, the crumb should be cooked through and not doughy.
- Drain, Cool Slightly, and Serve Using tongs or a slotted spoon, transfer the fried Johnny Cakes to a wire rack lined with paper towels to drain any excess oil. Let them sit for about 5 minutes before serving. This brief resting period helps the steam finish cooking the interior and improves the overall texture, ensuring they stay crisp on the outside and soft inside. Serve warm!
Gluten-Free Johnny Cakes
- Serves: 8 People
- Prepare Time: 20 minutes
- Cooking Time: 25 minutes
- Calories: -
- Difficulty: Easy
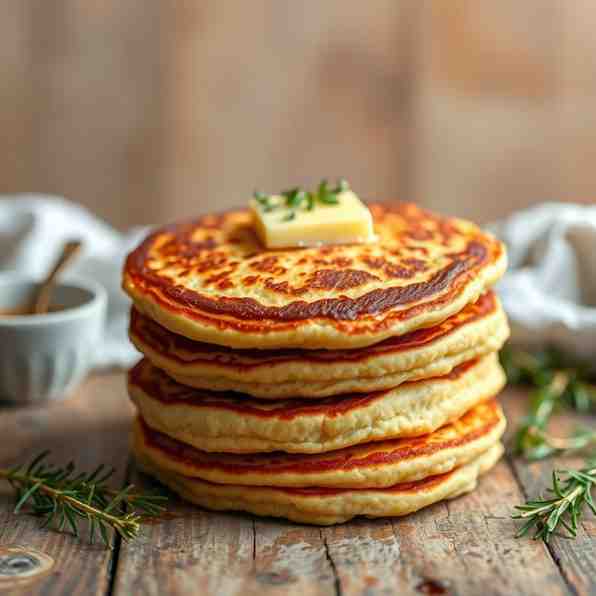
Craving a taste of the Caribbean but need to keep it gluten-free? You're in luck! Get ready to whip up a batch of authentic Gluten-Free Johnny Cakes, those crispy, golden fried breads that are a staple across the islands. Forget dry, crumbly imitations – our recipe is designed to deliver that perfect soft interior and delightful crunch, all while being completely gluten-free. This isn't just another cake recipe easy to follow; it's a passport to island flavors, made accessible for everyone.
So, what exactly are Johnny Cakes, really? In the Caribbean, these beloved treats are small, often savory, fried breads or rolls. They’re quite different from the baked cornmeal cakes you might find in North America. Their history is as rich as their flavor, evolving from indigenous cornmeal cookery to "journey cakes" (perfect for travelers!) and eventually becoming the "Johnny cakes" we know and love today. While some versions might remind you of cornbread or pancakes, our recipe focuses on the classic Caribbean-inspired fried bread texture, adapted to be fully gluten-free. This means a satisfying chew, a golden crust, and a flavor that transports you straight to a sunny beach.
Why go gluten-free with such a classic? Traditional Johnny Cakes often rely on wheat flour, making them a no-go for those with celiac disease or gluten sensitivity. Our recipe changes that! We've carefully crafted a version that brings this comfort food to your table, ensuring that families where at least one person needs gluten-free options can all enjoy the same delicious treat. This recipe isn't just about avoiding gluten; it's about making classic comfort foods accessible, often being easier on digestion for those who don’t tolerate gluten, and letting you serve one amazing bread everyone can enjoy. Just remember, while delicious, gluten-free doesn’t automatically mean healthier, so always check labels for GF certification and cross-contamination wording if you have strict dietary needs. Let's get baking (or rather, frying)!
Ingredients
Directions
- Mix the Dry Ingredients In a large mixing bowl, whisk together your gluten-free 1:1 baking flour blend, cornmeal, baking powder, salt, and sugar (if using). Make sure to whisk well until the mixture looks evenly yellow and fine, with no lumps of baking powder. This ensures even distribution of leavening.
- Add the Wet Ingredients Pour in the milk (or non-dairy milk) and the melted oil or butter. Stir with a spatula until everything comes together. The dough should be softer than a biscuit dough but definitely not pourable like pancake batter. It should come together in a cohesive ball but still feel soft and slightly tacky to the touch, not gluey or overly stiff.
- Rest the Dough Cover the bowl with a clean kitchen towel or plastic wrap and let the dough rest at room temperature for 10-15 minutes. This step is crucial for gluten-free doughs! It allows the cornmeal to fully hydrate and the GF flour blend to absorb moisture, leading to a more pliable and less crumbly final product. After resting, the dough should feel slightly firmer and much easier to handle.
- Shape the Johnny Cakes Lightly flour your hands and a clean work surface with a little extra gluten-free flour. Divide the dough into 8-10 equal pieces. Gently shape each piece into a round disc, about 3-4 inches wide and ½ inch thick. Aim for smooth edges and even thickness across all discs so they cook uniformly.
- Fry Until Crisp and Golden Pour 3-4 cups of neutral oil into a heavy skillet or shallow frying pan (cast iron works wonderfully for extra crispness) to a depth of about 1 inch. Heat the oil over medium-high heat until it reaches 350-360°F (175-180°C). If you don’t have a thermometer, a small scrap of dough dropped into the oil should sizzle briskly and immediately, but not darken instantly.
- Carefully place 3-4 Johnny Cakes into the hot oil, being careful not to crowd the pan. Fry for 3-5 minutes per side, or until they are deep golden brown and crispy. Watch for the edges to turn a rich golden color and the centers to puff slightly. For a quick internal check, if you tear one open, the crumb should be cooked through and not doughy.
- Drain, Cool Slightly, and Serve Using tongs or a slotted spoon, transfer the fried Johnny Cakes to a wire rack lined with paper towels to drain any excess oil. Let them sit for about 5 minutes before serving. This brief resting period helps the steam finish cooking the interior and improves the overall texture, ensuring they stay crisp on the outside and soft inside. Serve warm!
You may also like


Hey there! I’m just someone who seriously loves good food and believes that cooking doesn’t have to be complicated to be amazing. Whether it’s a quick weeknight dinner or a cozy weekend meal, I’m all about sharing easy, tasty recipes that actually work.


