 | CulinaryCreationss alt=")
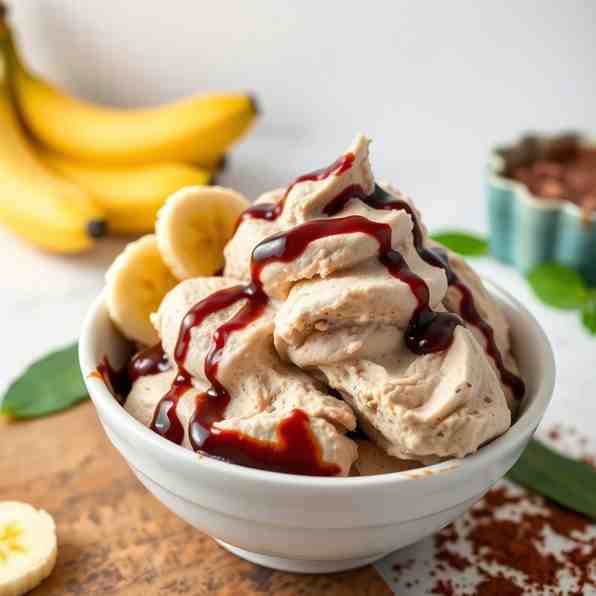
Healthy Chocolate Banana Nice Cream (4-Ingredient, No-Churn)
Healthy Chocolate Banana Nice Cream (4-Ingredient, No-Churn)
- Serves: 2 People
- Prepare Time: 10 minutes
- Cooking Time: 0 minutes
- Calories: -
- Difficulty: Easy
Ever wished you could enjoy a rich, creamy chocolate ice cream without the guilt, the dairy, or the endless churning? Well, get ready for your new favorite dessert: nice cream ice cream! This healthy chocolate banana ice cream is a game-changer, proving that you don't need a fancy machine or a long ingredient list to create something truly delicious.
We're talking about a luscious, no-churn ice cream that comes together with just 4 simple ingredients and a blender or food processor. It's perfect for anyone craving a frozen chocolate banana treat that's both nutritious ice cream and incredibly satisfying. Whether you're a beginner in the kitchen or a seasoned pro, this recipe is designed to be super easy to follow and delivers amazing results every time.
So, if you're looking for an easy homemade ice cream that's naturally sweet, packed with flavor, and ready when you are, you've found it. You'll spend about 10 minutes of active prep time, then just let your freezer do the rest of the work. Let's dive in and make some magic!
Ingredients
Directions
- Equipment You'll Need:
- Food processor or high-speed blender: This is essential for breaking down the frozen bananas into that creamy consistency.
- Sheet pan + parchment paper: For freezing your banana slices without them clumping together.
- Spatula: You'll use this a lot for scraping down the sides of your blender/processor.
- A regular blender can work; you’ll just need to pause and scrape the sides more frequently.
- Before You Start — Freeze Bananas the Right Way:This is the most crucial prep step for perfect nice cream ice cream!
- Slice Thickness: Peel your ripe (brown-spotted!) bananas and slice them into roughly 1/2 to 1-inch thick rounds. Smaller pieces blend more easily.
- Single-Layer Freezing: Arrange the banana slices in a single layer on a parchment-lined sheet pan. This prevents them from freezing into one giant clump.
- How Long to Freeze: Freeze for a minimum of 2-3 hours, but ideally 4-6 hours, or even overnight. They need to be solid rock-hard for the best results.
- Storage Tip: Once completely frozen solid, transfer the banana slices to a freezer-safe bag or airtight container. This way, you can grab them anytime you're ready to make homemade chocolate ice cream!
- Mini Timeline Box:
- Prep now, blend later: Freeze bananas (4+ hours) → Blend (5-10 minutes) → Enjoy!
- How to Make Chocolate Banana Ice Cream (Step-by-Step):
- Add ingredients in the best order.
- Place your frozen banana slices into your food processor or high-speed blender first.
- Next, add the unsweetened cocoa powder and your chosen nut butter.
- Crucially: Start with just the smallest splash of milk (about 1-2 tablespoons). You can always add more, but you can't take it away!
- Blend/pulse and scrape (what to expect).
- Stage 1: Crumbly Pebbles. Begin blending or pulsing. The mixture will look like frozen crumbs or pebbles, and it might seem like it'll never come together. This is normal! Stop and scrape down the sides frequently with your spatula. If the blades are struggling, add another teaspoon of milk.
- Stage 2: Thick, Doughy Clumps. As you continue to blend and scrape, the mixture will start to clump together, resembling a thick, sticky dough or a very thick milkshake. Keep blending and scraping.
- Stage 3: Smooth Soft-Serve. Finally, after persistent blending and scraping (be patient, it can take 3-7 minutes depending on your machine), the mixture will transform into a gloriously smooth, creamy, soft serve chocolate ice cream consistency.
- Serve soft-serve OR freeze to scoop.
- Soft-serve: For an instant, dreamy treat, scoop the nice cream directly into bowls and enjoy immediately.
- Scoopable: If you prefer a firmer, more traditional scoopable texture, spread the nice cream into an airtight, freezer-safe container. Press a piece of parchment paper directly onto the surface of the nice cream to prevent ice crystals, then freeze for 1-2 hours.
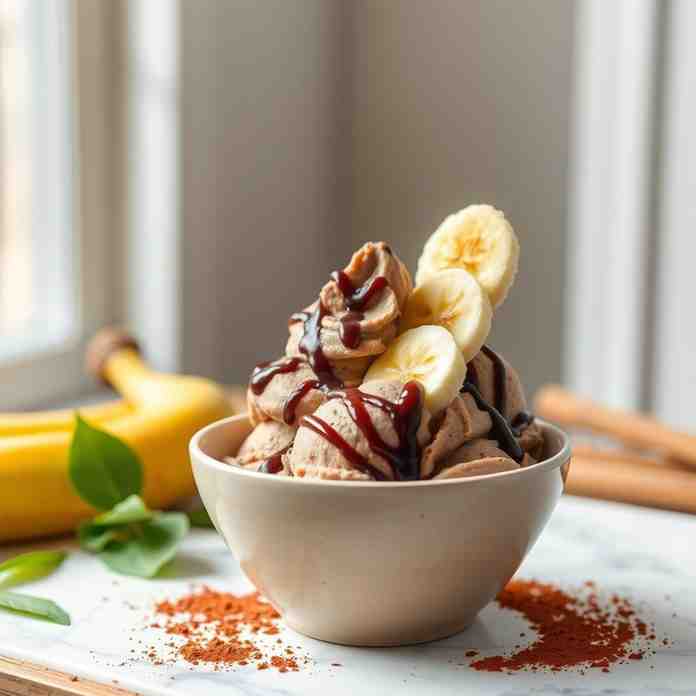
Healthy Chocolate Banana Nice Cream (4-Ingredient, No-Churn)
.jpg)
- Serves: 2 People
- Prepare Time: 10 minutes
- Cooking Time: 0 minutes
- Calories: -
- Difficulty: Easy
Ever wished you could enjoy a rich, creamy chocolate ice cream without the guilt, the dairy, or the endless churning? Well, get ready for your new favorite dessert: nice cream ice cream! This healthy chocolate banana ice cream is a game-changer, proving that you don't need a fancy machine or a long ingredient list to create something truly delicious.
We're talking about a luscious, no-churn ice cream that comes together with just 4 simple ingredients and a blender or food processor. It's perfect for anyone craving a frozen chocolate banana treat that's both nutritious ice cream and incredibly satisfying. Whether you're a beginner in the kitchen or a seasoned pro, this recipe is designed to be super easy to follow and delivers amazing results every time.
So, if you're looking for an easy homemade ice cream that's naturally sweet, packed with flavor, and ready when you are, you've found it. You'll spend about 10 minutes of active prep time, then just let your freezer do the rest of the work. Let's dive in and make some magic!
Ingredients
Directions
- Equipment You'll Need:
- Food processor or high-speed blender: This is essential for breaking down the frozen bananas into that creamy consistency.
- Sheet pan + parchment paper: For freezing your banana slices without them clumping together.
- Spatula: You'll use this a lot for scraping down the sides of your blender/processor.
- A regular blender can work; you’ll just need to pause and scrape the sides more frequently.
- Before You Start — Freeze Bananas the Right Way:This is the most crucial prep step for perfect nice cream ice cream!
- Slice Thickness: Peel your ripe (brown-spotted!) bananas and slice them into roughly 1/2 to 1-inch thick rounds. Smaller pieces blend more easily.
- Single-Layer Freezing: Arrange the banana slices in a single layer on a parchment-lined sheet pan. This prevents them from freezing into one giant clump.
- How Long to Freeze: Freeze for a minimum of 2-3 hours, but ideally 4-6 hours, or even overnight. They need to be solid rock-hard for the best results.
- Storage Tip: Once completely frozen solid, transfer the banana slices to a freezer-safe bag or airtight container. This way, you can grab them anytime you're ready to make homemade chocolate ice cream!
- Mini Timeline Box:
- Prep now, blend later: Freeze bananas (4+ hours) → Blend (5-10 minutes) → Enjoy!
- How to Make Chocolate Banana Ice Cream (Step-by-Step):
- Add ingredients in the best order.
- Place your frozen banana slices into your food processor or high-speed blender first.
- Next, add the unsweetened cocoa powder and your chosen nut butter.
- Crucially: Start with just the smallest splash of milk (about 1-2 tablespoons). You can always add more, but you can't take it away!
- Blend/pulse and scrape (what to expect).
- Stage 1: Crumbly Pebbles. Begin blending or pulsing. The mixture will look like frozen crumbs or pebbles, and it might seem like it'll never come together. This is normal! Stop and scrape down the sides frequently with your spatula. If the blades are struggling, add another teaspoon of milk.
- Stage 2: Thick, Doughy Clumps. As you continue to blend and scrape, the mixture will start to clump together, resembling a thick, sticky dough or a very thick milkshake. Keep blending and scraping.
- Stage 3: Smooth Soft-Serve. Finally, after persistent blending and scraping (be patient, it can take 3-7 minutes depending on your machine), the mixture will transform into a gloriously smooth, creamy, soft serve chocolate ice cream consistency.
- Serve soft-serve OR freeze to scoop.
- Soft-serve: For an instant, dreamy treat, scoop the nice cream directly into bowls and enjoy immediately.
- Scoopable: If you prefer a firmer, more traditional scoopable texture, spread the nice cream into an airtight, freezer-safe container. Press a piece of parchment paper directly onto the surface of the nice cream to prevent ice crystals, then freeze for 1-2 hours.
You may also like


Hey there! I’m just someone who seriously loves good food and believes that cooking doesn’t have to be complicated to be amazing. Whether it’s a quick weeknight dinner or a cozy weekend meal, I’m all about sharing easy, tasty recipes that actually work.


