
Hearty Grey Peas with Bacon - Easy Latvian Pea Meal Bacon Recipe
Hearty Grey Peas with Bacon - Easy Latvian Pea Meal Bacon Recipe
- Serves: 4 People
- Prepare Time: 20 minutes
- Cooking Time: 1 hour 30 m
- Calories: -
- Difficulty: Easy
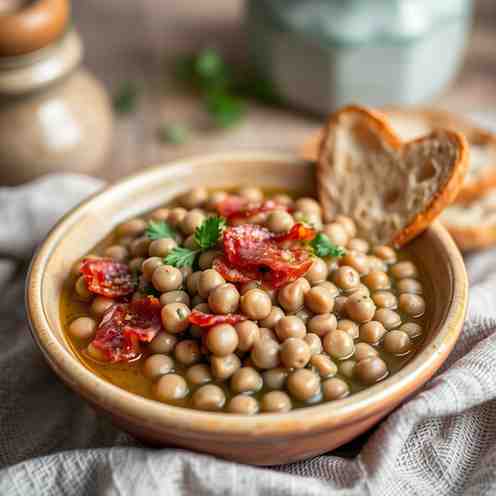
Craving a dish that’s both wonderfully hearty and incredibly simple to make? Get ready to fall in love with ``Hearty Grey Peas with Bacon`` – a cherished Latvian classic! Known as Pelēkie zirņi ar speķi, this comforting pea meal bacon dish combines tender, nutty grey peas with crispy, smoky bacon and sweet caramelized onions. It’s the ultimate comfort food, especially perfect for chilly days or festive holiday gatherings around Christmas and New Year. Whether you're a beginner looking for ``easy recipes to make`` or an experienced cook seeking authentic European flavors, this recipe delivers big on taste with minimal fuss.
Ingredients
Directions
- Equipment You'll Need:
- Large pot or Dutch oven
- Skillet
- Colander
- Soak (The Success Starter)
- Rinse: Place your dried grey peas in a colander and rinse them thoroughly under cold running water. This removes any dust or debris.
- Soak: Transfer the rinsed peas to your large pot or Dutch oven. Cover them with plenty of cold water – aim for about 3-4 inches (7-10 cm) of water above the peas. Let them soak overnight, for 8 to 12 hours. Soaking significantly reduces cooking time and helps ensure even cooking.
- Drain & Rinse Again: Once soaked, drain the peas in a colander and rinse them one more time under cold water. Discard the soaking water.
- Simmer Until Truly Tender
- Add to Pot: Return the drained and rinsed peas to the clean pot or Dutch oven. Cover them with fresh cold water, again ensuring the water level is about 2-3 inches (5-7 cm) above the peas.
- Boil & Simmer: Bring the water to a rolling boil over high heat. Once boiling, immediately reduce the heat to a gentle simmer. The peas should be bubbling softly, not violently.
- Skim (If Needed): As the peas simmer, you might see some foam rise to the surface. Skim this off with a spoon if desired; it helps keep the broth clearer.
- Cook Until Tender: Continue to simmer the peas, uncovered, for about 60-90 minutes, or until they are truly tender. They should be soft and creamy when squeezed between your fingers, but still hold their shape. Don't let them get mushy!
- Salt Guidance: Hold off on adding salt until the peas are almost fully tender (around the 45-60 minute mark). Adding salt too early can toughen the skins and prevent them from softening properly. Add a good pinch of salt once they're soft, then taste and adjust later.
- Bacon + Onions (Smoky-Sweet Base)
- Render Bacon: While the peas are simmering, heat a skillet over medium heat. Add the diced smoked bacon or speķis and cook slowly, stirring occasionally. This allows the fat to render out gradually and the bacon to become beautifully crisp around the edges.
- Spoon Off Fat: Once the bacon is crisp, use a slotted spoon to transfer it to a plate lined with paper towels, leaving most of the rendered bacon fat in the skillet. You'll want to keep about 1-2 tablespoons of fat in the skillet for cooking the onions; spoon off and discard any excess.
- Cook Onions: Add the chopped yellow onion to the skillet with the reserved bacon fat. Cook over medium-low heat, stirring frequently, for about 10-15 minutes. You want the onions to soften, turn golden brown, and become lightly caramelized and sweet.
- Combine and Finish
- Drain Peas: Once the peas are tender, drain them thoroughly in a colander. If you prefer a slightly juicier dish, reserve and add back a spoonful or two of the cooking liquid.
- Toss Together: Transfer the drained peas to the skillet with the caramelized onions and bacon fat. Add the crispy bacon back to the skillet.
- Season: Toss everything together gently to combine. Season generously with freshly ground black pepper and additional salt to taste. Give it a good stir and taste again, adjusting seasonings as needed.
- Serve
- Classic Style: Serve your ``Hearty Grey Peas with Bacon`` warm, traditionally topped with a dollop of sour cream or a splash of kefir for a tangy contrast.
- Make it a Meal: For a heartier meal, enjoy it with a slice of dark rye bread and some pickles. Leftovers are fantastic topped with a fried egg for a rustic breakfast or lunch!
Hearty Grey Peas with Bacon - Easy Latvian Pea Meal Bacon Recipe

- Serves: 4 People
- Prepare Time: 20 minutes
- Cooking Time: 1 hour 30 m
- Calories: -
- Difficulty: Easy
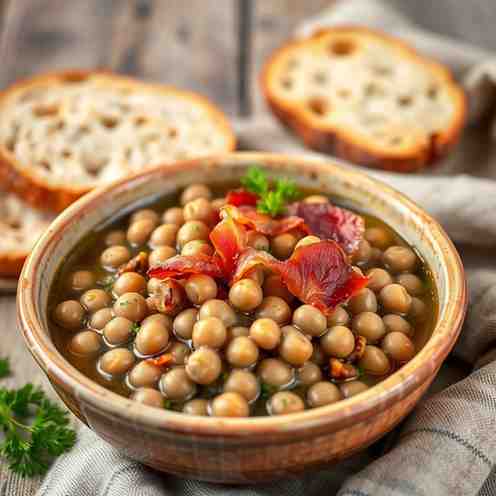
Craving a dish that’s both wonderfully hearty and incredibly simple to make? Get ready to fall in love with ``Hearty Grey Peas with Bacon`` – a cherished Latvian classic! Known as Pelēkie zirņi ar speķi, this comforting pea meal bacon dish combines tender, nutty grey peas with crispy, smoky bacon and sweet caramelized onions. It’s the ultimate comfort food, especially perfect for chilly days or festive holiday gatherings around Christmas and New Year. Whether you're a beginner looking for ``easy recipes to make`` or an experienced cook seeking authentic European flavors, this recipe delivers big on taste with minimal fuss.
Ingredients
Directions
- Equipment You'll Need:
- Large pot or Dutch oven
- Skillet
- Colander
- Soak (The Success Starter)
- Rinse: Place your dried grey peas in a colander and rinse them thoroughly under cold running water. This removes any dust or debris.
- Soak: Transfer the rinsed peas to your large pot or Dutch oven. Cover them with plenty of cold water – aim for about 3-4 inches (7-10 cm) of water above the peas. Let them soak overnight, for 8 to 12 hours. Soaking significantly reduces cooking time and helps ensure even cooking.
- Drain & Rinse Again: Once soaked, drain the peas in a colander and rinse them one more time under cold water. Discard the soaking water.
- Simmer Until Truly Tender
- Add to Pot: Return the drained and rinsed peas to the clean pot or Dutch oven. Cover them with fresh cold water, again ensuring the water level is about 2-3 inches (5-7 cm) above the peas.
- Boil & Simmer: Bring the water to a rolling boil over high heat. Once boiling, immediately reduce the heat to a gentle simmer. The peas should be bubbling softly, not violently.
- Skim (If Needed): As the peas simmer, you might see some foam rise to the surface. Skim this off with a spoon if desired; it helps keep the broth clearer.
- Cook Until Tender: Continue to simmer the peas, uncovered, for about 60-90 minutes, or until they are truly tender. They should be soft and creamy when squeezed between your fingers, but still hold their shape. Don't let them get mushy!
- Salt Guidance: Hold off on adding salt until the peas are almost fully tender (around the 45-60 minute mark). Adding salt too early can toughen the skins and prevent them from softening properly. Add a good pinch of salt once they're soft, then taste and adjust later.
- Bacon + Onions (Smoky-Sweet Base)
- Render Bacon: While the peas are simmering, heat a skillet over medium heat. Add the diced smoked bacon or speķis and cook slowly, stirring occasionally. This allows the fat to render out gradually and the bacon to become beautifully crisp around the edges.
- Spoon Off Fat: Once the bacon is crisp, use a slotted spoon to transfer it to a plate lined with paper towels, leaving most of the rendered bacon fat in the skillet. You'll want to keep about 1-2 tablespoons of fat in the skillet for cooking the onions; spoon off and discard any excess.
- Cook Onions: Add the chopped yellow onion to the skillet with the reserved bacon fat. Cook over medium-low heat, stirring frequently, for about 10-15 minutes. You want the onions to soften, turn golden brown, and become lightly caramelized and sweet.
- Combine and Finish
- Drain Peas: Once the peas are tender, drain them thoroughly in a colander. If you prefer a slightly juicier dish, reserve and add back a spoonful or two of the cooking liquid.
- Toss Together: Transfer the drained peas to the skillet with the caramelized onions and bacon fat. Add the crispy bacon back to the skillet.
- Season: Toss everything together gently to combine. Season generously with freshly ground black pepper and additional salt to taste. Give it a good stir and taste again, adjusting seasonings as needed.
- Serve
- Classic Style: Serve your ``Hearty Grey Peas with Bacon`` warm, traditionally topped with a dollop of sour cream or a splash of kefir for a tangy contrast.
- Make it a Meal: For a heartier meal, enjoy it with a slice of dark rye bread and some pickles. Leftovers are fantastic topped with a fried egg for a rustic breakfast or lunch!
You may also like


Hey there! I’m just someone who seriously loves good food and believes that cooking doesn’t have to be complicated to be amazing. Whether it’s a quick weeknight dinner or a cozy weekend meal, I’m all about sharing easy, tasty recipes that actually work.


