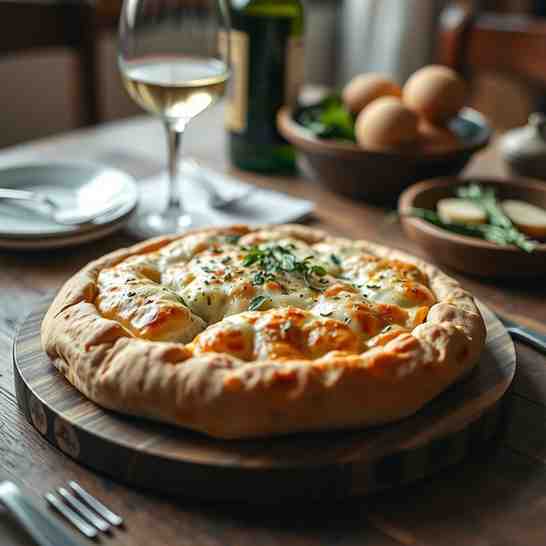
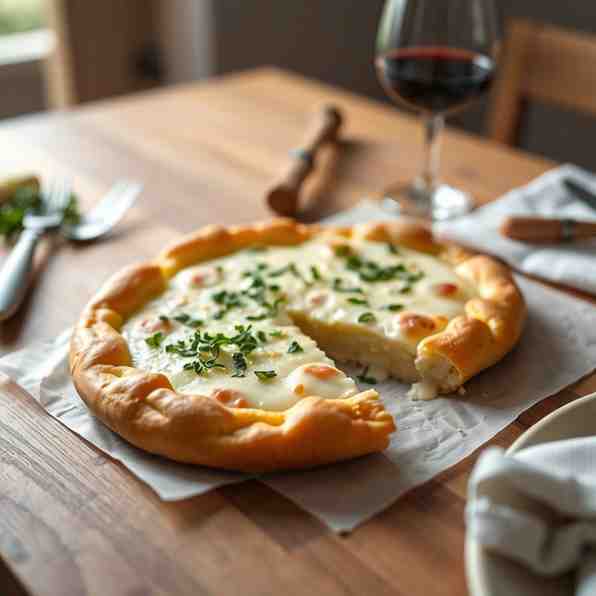
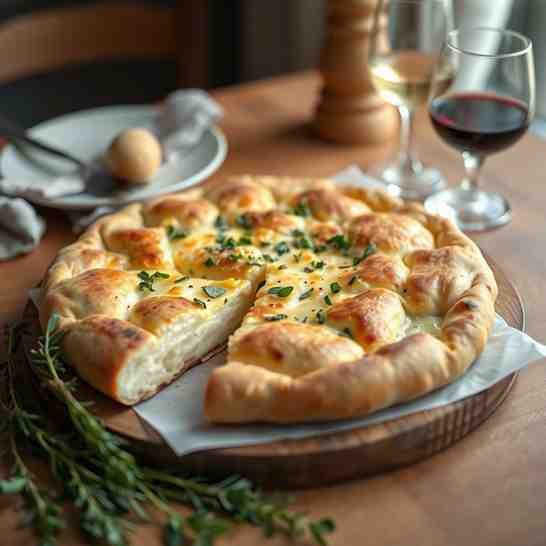
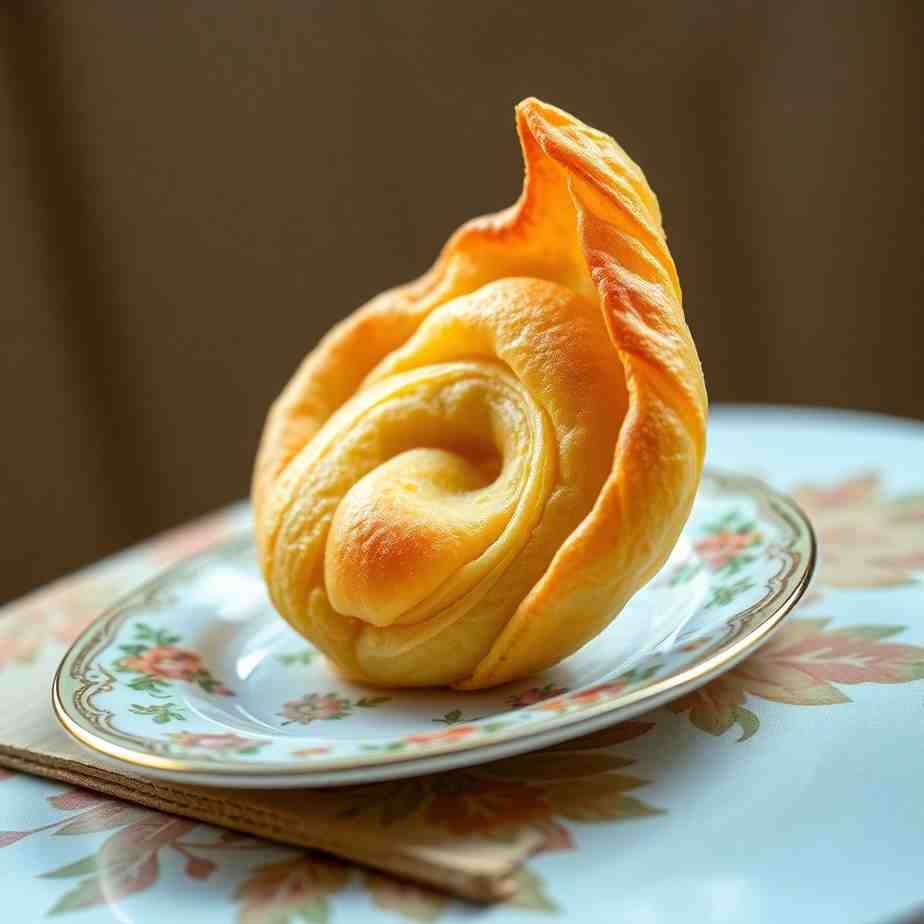
Kosovo Pita - Easy Homemade Cheese Pie Recipe
Kosovo Pita - Easy Homemade Cheese Pie Recipe
- Serves: 8 People
- Prepare Time: 25 minutes
- Cooking Time: 40 minutes
- Calories: -
- Difficulty: Medium
Get ready to discover a true Balkan treasure: Kosovo Pita (or Pite me Djathë)! This isn't just any pie; it's a wonderfully homemade cheese pie featuring layers of flaky phyllo dough embracing a rich, creamy cheese and eggs recipe filling. What makes it extra special? A generous touch of yogurt for that signature tang and moisture, making it one of the most satisfying savory Balkan phyllo pie experiences you'll ever have. Whether you're new to Balkan cuisine or looking for an authentic taste of Kosovo, this recipe is designed to be straightforward and absolutely delicious.
Authentic Flavor: Tastes just like the pies from Kosovo, with accessible ingredients.
Irresistibly Flaky: Learn the secrets to perfectly crisp, golden phyllo.
Creamy, Dreamy Filling: A savory blend of cheeses, eggs, and yogurt that's simply divine.
Versatile: Perfect for breakfast, brunch, lunch, or a light dinner.
Easier Than You Think: Step-by-step guidance makes phyllo less intimidating.
Ingredients
Directions
- Before You Start: Prep is Key!
- Thaw Phyllo: If you haven't already, ensure your phyllo dough is completely thawed, preferably overnight in the refrigerator.
- Preheat Oven: Preheat your oven to 375°F (190°C).
- Prepare Pan: Lightly grease a 9x13 inch baking pan (or an 8x8 inch pan for a thicker pie, adjusting baking time slightly).
- Gather Tools: You'll need a large mixing bowl, a whisk, a pastry brush, and a clean, slightly damp kitchen towel to cover your phyllo.
- Phyllo Rules: Phyllo dries out quickly! Keep the unused sheets covered with a damp towel while you work. Don't panic if sheets tear; you can easily patch them up, and once baked, no one will ever know! Work quickly but gently.
- Make the Creamy Cheese Filling
- In your large mixing bowl, combine the crumbled feta cheese and cottage cheese (or farmer cheese). Use your hands or a fork to mix them thoroughly, breaking up any large lumps of feta.
- Add the beaten eggs, plain yogurt, sparkling water, and baking powder to the cheese mixture.
- Season with black pepper. Give it a good whisk until everything is well combined and the mixture is smooth but still has some texture from the cheese.
- Visual Cue: The "right consistency" for the filling should be thick enough to coat a spoon, but still pourable. It shouldn't be too runny or overly stiff.
- Salt Check: Taste a tiny bit of the filling now. If your feta is very salty, you might not need any extra salt. Adjust if necessary, but usually, the feta provides enough.
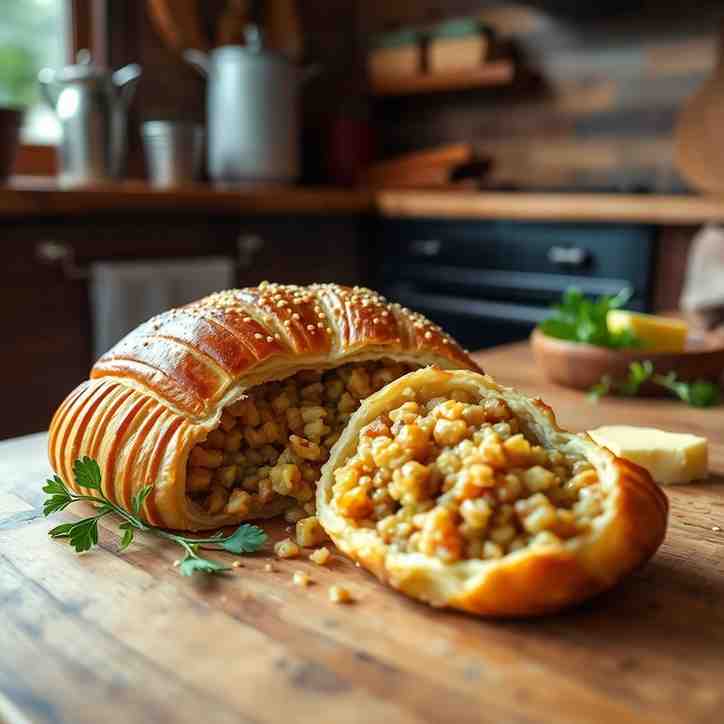
- Layer Your PitaWe're using a "scrunched layer" technique for a beautiful, rustic texture and easy assembly.
- Base Layers: Lay 3-4 sheets of phyllo dough flat in the bottom of your prepared baking pan, allowing the edges to overhang slightly. Brush generously with oil.
- Build the Body: Take 2-3 sheets of phyllo at a time. Lightly brush them with oil, then gently scrunch them up like an accordion or a loose ball. Place these scrunched phyllo sheets side-by-side in your pan, covering the base layers. Don't worry about perfection; the crinkles are part of the charm!
- Pour the Filling: Once you have a layer of scrunched phyllo covering the bottom, pour about one-third of your cheese and egg filling evenly over the scrunched phyllo.
- Repeat: Continue layering with more scrunched, oiled phyllo (2-3 sheets at a time), followed by another third of the filling. Repeat one more time, ending with a layer of scrunched, oiled phyllo. You should have 3 layers of filling separated by scrunched phyllo.
- Top Layers: Finish by folding the overhanging phyllo sheets from your base layers over the top. Then, lay 2-3 final flat sheets of phyllo over everything, brushing each generously with oil. Tuck in any edges to create a neat border.
- Optional Egg Wash & Sesame: If desired, brush the top with the whisked egg yolk and sprinkle with sesame seeds for a beautiful golden crust.
- Bake to Golden Perfection
- Place the pan in your preheated 375°F (190°C) oven.
- Bake for 35-45 minutes, or until the top is deeply golden brown and the center is set.
- Doneness Cues:
- The top should be a rich, golden-brown color.
- Gently jiggle the pan; the center should not slosh or ripple, indicating it's cooked through.
- The edges of the pita might pull away slightly from the sides of the pan.
- Rest and Serve Kosovo-Style
- Once baked, remove the pita from the oven and let it rest for at least 10-15 minutes before slicing. This rest time is crucial! It allows the filling to set completely, ensuring clean, beautiful slices and preventing the pie from falling apart.
- Portioning Guide: Cut the pita into squares or rectangles. A 9x13 pan typically yields 8 generous servings.
- Serve Kosovo-Style: For an authentic experience, serve your Kosovo Pita warm with a side of plain yogurt, kefir, or a refreshing glass of ayran (a savory yogurt drink).
- Optional Savory Sides: It's also delicious alongside a simple chopped salad or a spoonful of ajvar (roasted red pepper and eggplant spread).
Kosovo Pita - Easy Homemade Cheese Pie Recipe
- Serves: 8 People
- Prepare Time: 25 minutes
- Cooking Time: 40 minutes
- Calories: -
- Difficulty: Medium
Get ready to discover a true Balkan treasure: Kosovo Pita (or Pite me Djathë)! This isn't just any pie; it's a wonderfully homemade cheese pie featuring layers of flaky phyllo dough embracing a rich, creamy cheese and eggs recipe filling. What makes it extra special? A generous touch of yogurt for that signature tang and moisture, making it one of the most satisfying savory Balkan phyllo pie experiences you'll ever have. Whether you're new to Balkan cuisine or looking for an authentic taste of Kosovo, this recipe is designed to be straightforward and absolutely delicious.
Authentic Flavor: Tastes just like the pies from Kosovo, with accessible ingredients.
Irresistibly Flaky: Learn the secrets to perfectly crisp, golden phyllo.
Creamy, Dreamy Filling: A savory blend of cheeses, eggs, and yogurt that's simply divine.
Versatile: Perfect for breakfast, brunch, lunch, or a light dinner.
Easier Than You Think: Step-by-step guidance makes phyllo less intimidating.
Ingredients
Directions
- Before You Start: Prep is Key!
- Thaw Phyllo: If you haven't already, ensure your phyllo dough is completely thawed, preferably overnight in the refrigerator.
- Preheat Oven: Preheat your oven to 375°F (190°C).
- Prepare Pan: Lightly grease a 9x13 inch baking pan (or an 8x8 inch pan for a thicker pie, adjusting baking time slightly).
- Gather Tools: You'll need a large mixing bowl, a whisk, a pastry brush, and a clean, slightly damp kitchen towel to cover your phyllo.
- Phyllo Rules: Phyllo dries out quickly! Keep the unused sheets covered with a damp towel while you work. Don't panic if sheets tear; you can easily patch them up, and once baked, no one will ever know! Work quickly but gently.
- Make the Creamy Cheese Filling
- In your large mixing bowl, combine the crumbled feta cheese and cottage cheese (or farmer cheese). Use your hands or a fork to mix them thoroughly, breaking up any large lumps of feta.
- Add the beaten eggs, plain yogurt, sparkling water, and baking powder to the cheese mixture.
- Season with black pepper. Give it a good whisk until everything is well combined and the mixture is smooth but still has some texture from the cheese.
- Visual Cue: The "right consistency" for the filling should be thick enough to coat a spoon, but still pourable. It shouldn't be too runny or overly stiff.
- Salt Check: Taste a tiny bit of the filling now. If your feta is very salty, you might not need any extra salt. Adjust if necessary, but usually, the feta provides enough.
- Layer Your PitaWe're using a "scrunched layer" technique for a beautiful, rustic texture and easy assembly.
- Base Layers: Lay 3-4 sheets of phyllo dough flat in the bottom of your prepared baking pan, allowing the edges to overhang slightly. Brush generously with oil.
- Build the Body: Take 2-3 sheets of phyllo at a time. Lightly brush them with oil, then gently scrunch them up like an accordion or a loose ball. Place these scrunched phyllo sheets side-by-side in your pan, covering the base layers. Don't worry about perfection; the crinkles are part of the charm!
- Pour the Filling: Once you have a layer of scrunched phyllo covering the bottom, pour about one-third of your cheese and egg filling evenly over the scrunched phyllo.
- Repeat: Continue layering with more scrunched, oiled phyllo (2-3 sheets at a time), followed by another third of the filling. Repeat one more time, ending with a layer of scrunched, oiled phyllo. You should have 3 layers of filling separated by scrunched phyllo.
- Top Layers: Finish by folding the overhanging phyllo sheets from your base layers over the top. Then, lay 2-3 final flat sheets of phyllo over everything, brushing each generously with oil. Tuck in any edges to create a neat border.
- Optional Egg Wash & Sesame: If desired, brush the top with the whisked egg yolk and sprinkle with sesame seeds for a beautiful golden crust.
- Bake to Golden Perfection
- Place the pan in your preheated 375°F (190°C) oven.
- Bake for 35-45 minutes, or until the top is deeply golden brown and the center is set.
- Doneness Cues:
- The top should be a rich, golden-brown color.
- Gently jiggle the pan; the center should not slosh or ripple, indicating it's cooked through.
- The edges of the pita might pull away slightly from the sides of the pan.
- Rest and Serve Kosovo-Style
- Once baked, remove the pita from the oven and let it rest for at least 10-15 minutes before slicing. This rest time is crucial! It allows the filling to set completely, ensuring clean, beautiful slices and preventing the pie from falling apart.
- Portioning Guide: Cut the pita into squares or rectangles. A 9x13 pan typically yields 8 generous servings.
- Serve Kosovo-Style: For an authentic experience, serve your Kosovo Pita warm with a side of plain yogurt, kefir, or a refreshing glass of ayran (a savory yogurt drink).
- Optional Savory Sides: It's also delicious alongside a simple chopped salad or a spoonful of ajvar (roasted red pepper and eggplant spread).
You may also like


Hey there! I’m just someone who seriously loves good food and believes that cooking doesn’t have to be complicated to be amazing. Whether it’s a quick weeknight dinner or a cozy weekend meal, I’m all about sharing easy, tasty recipes that actually work.