
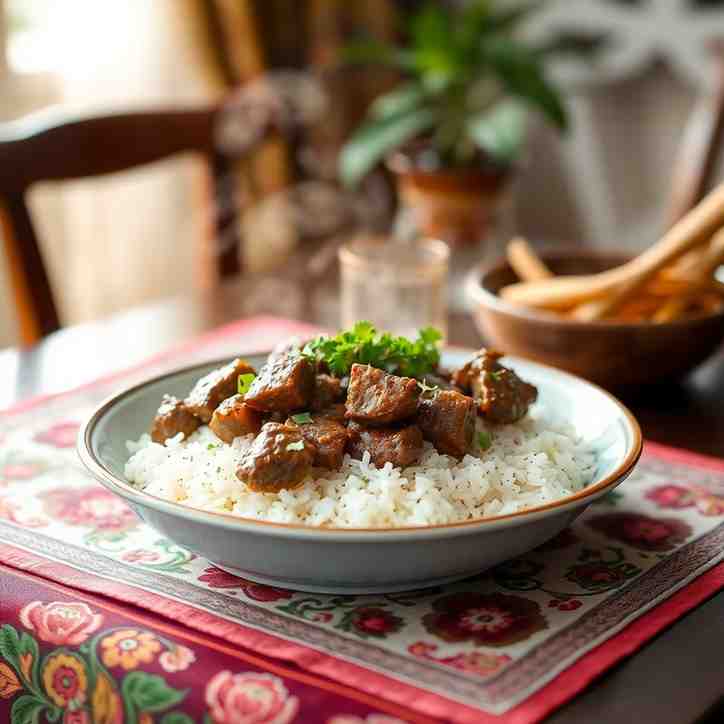
Afghani Chicken Dum Biryani Recipe: Cook At Home
Afghani Chicken Dum Biryani Recipe: Cook At Home


- Serves: 6 People
- Prepare Time: 45 minutes
- Cooking Time: 70 minutes
- Calories: 650
- Difficulty: Medium
Craving a dish that warms your soul and tantalizes your taste buds? Get ready to cook at home an authentic Afghani chicken dum biryani! This isn't just any biryani Indian food; it's a fragrant, layered masterpiece featuring tender chicken, aromatic basmati rice, and a symphony of warm spices, all cooked in one pot. Whether you're a seasoned chef or just starting your journey into cooking food recipes, this guide will make preparing this delicious dish a breeze.
We know the idea of making Indian chicken biryani from scratch can feel a little daunting, but we promise, there are no restaurant-only tricks here! Our step-by-step instructions are clear, concise, and designed for success, even if you’re looking for easy recipes for one or cooking for 1. You'll discover the genuine Afghan flavor profile, learn simple techniques for perfect rice and juicy chicken, and even get tips for scaling down for smaller households or handling leftovers like a pro. Forget complicated setups; with our hyderabadi biryani pot friendly method, you'll be savoring one of the best cooking recipes in no time. Let's get cooking at home!
We know the idea of making Indian chicken biryani from scratch can feel a little daunting, but we promise, there are no restaurant-only tricks here! Our step-by-step instructions are clear, concise, and designed for success, even if you’re looking for easy recipes for one or cooking for 1. You'll discover the genuine Afghan flavor profile, learn simple techniques for perfect rice and juicy chicken, and even get tips for scaling down for smaller households or handling leftovers like a pro. Forget complicated setups; with our hyderabadi biryani pot friendly method, you'll be savoring one of the best cooking recipes in no time. Let's get cooking at home!
Ingredients
Directions
Marinate the Chicken
- In a large bowl, combine the thick plain yogurt, ginger-garlic paste, nutmeg, garam masala, chopped cilantro, optional mint, slit green chilies, salt, and black pepper. Mix thoroughly to create a fragrant marinade.
- Add the bone-in chicken pieces to the marinade, ensuring each piece is fully coated.
- How long to marinate: Ideally, let it marinate for at least 4 hours, or even better, overnight in the refrigerator (up to 24 hours). If you're short on time, a minimum of 30 minutes will still infuse some flavor.
- Why it matters: This step is crucial for flavor penetration into the chicken, making it incredibly tender and juicy when cooked.
Make the Birista (Fried Onions)
- Heat ½ cup of oil or ghee in a heavy-bottomed pot or Dutch oven over medium-high heat.
- Add the thinly sliced onions. Fry them, stirring occasionally, until they turn a deep golden brown and become crispy. This usually takes about 10-15 minutes.
- Using a slotted spoon, carefully remove the fried onions (birista) and spread them on a paper towel-lined plate to drain excess oil. Reserve the flavored oil in the pot – you'll use it for the chicken!
- Common mistakes & how to avoid them: Don't overcrowd the pan, as this steams the onions instead of frying them. Stir frequently to ensure even browning and prevent burning. Burnt onions will make your biryani bitter.
Par-Boil the Rice
- Rinse the basmati rice several times under cold water until the water runs clear. Then, soak the rice in fresh water for at least 30 minutes (up to an hour). Drain thoroughly.
- In a large pot, bring plenty of water to a rolling boil. Add a generous amount of salt (it should taste like seawater), bay leaves, cardamom pods, cloves, cumin seeds, and black peppercorns.
- Add the drained basmati rice to the boiling water. Cook for 5-7 minutes, or until the rice is about ¾ cooked. The grains should be pliable but still have a slight bite in the center – not mushy.
- Drain the rice immediately and thoroughly using a large sieve or colander. Discard the whole spices if you wish, or leave them in for extra flavor.
- Common mistakes & how to avoid them: Overcooking the rice at this stage will lead to mushy biryani. Test the rice frequently. Draining quickly is key to stopping the cooking process.
Cook the Chicken Masala
- Using the same pot with the reserved birista oil (or add a little more if needed), sear the marinated chicken pieces over medium-high heat for 5-7 minutes until lightly browned on all sides.
- Reduce the heat to medium-low. Add about ¼ cup of water (just enough to prevent sticking and create a little steam). Cover the pot and let the chicken cook, stirring occasionally, for about 20-25 minutes, or until the chicken is almost cooked through and the sauce has thickened and become glossy.
- What the sauce should look like before layering: It should be rich, thick, and cling to the chicken, not watery. The oil should start to separate from the masala.
Layer the Biryani
- If necessary, add a thin smear of oil or ghee to the bottom of your heavy-bottomed pot to prevent sticking. You can also add a spoonful of par-boiled rice to the very bottom.
- Spread half of the par-boiled rice evenly over the bottom of the pot.
- Carefully arrange all of the cooked chicken masala over the first layer of rice. Sprinkle with some of the reserved birista and a handful of fresh cilantro/mint.
- Top with the remaining par-boiled rice, spreading it gently to cover the chicken layer.
- Drizzle the saffron milk and lemon juice evenly over the top layer of rice. Sprinkle with the remaining birista, toasted nuts, and a final flourish of fresh herbs.
- Make steam vents: Use the handle of a spoon to gently poke a few holes through the rice layers down to the chicken. This allows steam to circulate evenly.
Dum (Final Steam) & Rest
- To seal the pot for "dum" cooking, cover the pot tightly. You can use aluminum foil first, then place the lid on top, or use a ring of dough around the rim of the pot and seal the lid onto it.
- Place the sealed pot over medium heat for 5-7 minutes, then reduce the heat to the lowest possible setting. Cook on dum for 25-30 minutes. This allows the flavors to meld and the rice to finish cooking with the chicken's steam.
- Remove the pot from the heat but do not open the lid immediately. Let the biryani rest, still covered, for at least 10-15 minutes. This allows the steam to redistribute, resulting in perfectly fluffy, separate rice grains.
- Fluffing: When ready to serve, gently open the lid. Using a wide, flat spoon or spatula, carefully fluff the biryani from the edges, scooping downwards to bring up the chicken and masala from the bottom without breaking the delicate rice grains.
- Common mistakes & how to avoid them: Not sealing the pot tightly enough will lead to steam escaping, resulting in dry or unevenly cooked biryani. Opening the lid too early will release precious steam.
Afghani Chicken Dum Biryani Recipe: Cook At Home

- Serves: 6 People
- Prepare Time: 45 minutes
- Cooking Time: 70 minutes
- Calories: 650
- Difficulty: Medium
Craving a dish that warms your soul and tantalizes your taste buds? Get ready to cook at home an authentic Afghani chicken dum biryani! This isn't just any biryani Indian food; it's a fragrant, layered masterpiece featuring tender chicken, aromatic basmati rice, and a symphony of warm spices, all cooked in one pot. Whether you're a seasoned chef or just starting your journey into cooking food recipes, this guide will make preparing this delicious dish a breeze.
We know the idea of making Indian chicken biryani from scratch can feel a little daunting, but we promise, there are no restaurant-only tricks here! Our step-by-step instructions are clear, concise, and designed for success, even if you’re looking for easy recipes for one or cooking for 1. You'll discover the genuine Afghan flavor profile, learn simple techniques for perfect rice and juicy chicken, and even get tips for scaling down for smaller households or handling leftovers like a pro. Forget complicated setups; with our hyderabadi biryani pot friendly method, you'll be savoring one of the best cooking recipes in no time. Let's get cooking at home!
We know the idea of making Indian chicken biryani from scratch can feel a little daunting, but we promise, there are no restaurant-only tricks here! Our step-by-step instructions are clear, concise, and designed for success, even if you’re looking for easy recipes for one or cooking for 1. You'll discover the genuine Afghan flavor profile, learn simple techniques for perfect rice and juicy chicken, and even get tips for scaling down for smaller households or handling leftovers like a pro. Forget complicated setups; with our hyderabadi biryani pot friendly method, you'll be savoring one of the best cooking recipes in no time. Let's get cooking at home!
Ingredients
Directions
Marinate the Chicken
- In a large bowl, combine the thick plain yogurt, ginger-garlic paste, nutmeg, garam masala, chopped cilantro, optional mint, slit green chilies, salt, and black pepper. Mix thoroughly to create a fragrant marinade.
- Add the bone-in chicken pieces to the marinade, ensuring each piece is fully coated.
- How long to marinate: Ideally, let it marinate for at least 4 hours, or even better, overnight in the refrigerator (up to 24 hours). If you're short on time, a minimum of 30 minutes will still infuse some flavor.
- Why it matters: This step is crucial for flavor penetration into the chicken, making it incredibly tender and juicy when cooked.
Make the Birista (Fried Onions)
- Heat ½ cup of oil or ghee in a heavy-bottomed pot or Dutch oven over medium-high heat.
- Add the thinly sliced onions. Fry them, stirring occasionally, until they turn a deep golden brown and become crispy. This usually takes about 10-15 minutes.
- Using a slotted spoon, carefully remove the fried onions (birista) and spread them on a paper towel-lined plate to drain excess oil. Reserve the flavored oil in the pot – you'll use it for the chicken!
- Common mistakes & how to avoid them: Don't overcrowd the pan, as this steams the onions instead of frying them. Stir frequently to ensure even browning and prevent burning. Burnt onions will make your biryani bitter.
Par-Boil the Rice
- Rinse the basmati rice several times under cold water until the water runs clear. Then, soak the rice in fresh water for at least 30 minutes (up to an hour). Drain thoroughly.
- In a large pot, bring plenty of water to a rolling boil. Add a generous amount of salt (it should taste like seawater), bay leaves, cardamom pods, cloves, cumin seeds, and black peppercorns.
- Add the drained basmati rice to the boiling water. Cook for 5-7 minutes, or until the rice is about ¾ cooked. The grains should be pliable but still have a slight bite in the center – not mushy.
- Drain the rice immediately and thoroughly using a large sieve or colander. Discard the whole spices if you wish, or leave them in for extra flavor.
- Common mistakes & how to avoid them: Overcooking the rice at this stage will lead to mushy biryani. Test the rice frequently. Draining quickly is key to stopping the cooking process.
Cook the Chicken Masala
- Using the same pot with the reserved birista oil (or add a little more if needed), sear the marinated chicken pieces over medium-high heat for 5-7 minutes until lightly browned on all sides.
- Reduce the heat to medium-low. Add about ¼ cup of water (just enough to prevent sticking and create a little steam). Cover the pot and let the chicken cook, stirring occasionally, for about 20-25 minutes, or until the chicken is almost cooked through and the sauce has thickened and become glossy.
- What the sauce should look like before layering: It should be rich, thick, and cling to the chicken, not watery. The oil should start to separate from the masala.
Layer the Biryani
- If necessary, add a thin smear of oil or ghee to the bottom of your heavy-bottomed pot to prevent sticking. You can also add a spoonful of par-boiled rice to the very bottom.
- Spread half of the par-boiled rice evenly over the bottom of the pot.
- Carefully arrange all of the cooked chicken masala over the first layer of rice. Sprinkle with some of the reserved birista and a handful of fresh cilantro/mint.
- Top with the remaining par-boiled rice, spreading it gently to cover the chicken layer.
- Drizzle the saffron milk and lemon juice evenly over the top layer of rice. Sprinkle with the remaining birista, toasted nuts, and a final flourish of fresh herbs.
- Make steam vents: Use the handle of a spoon to gently poke a few holes through the rice layers down to the chicken. This allows steam to circulate evenly.
Dum (Final Steam) & Rest
- To seal the pot for "dum" cooking, cover the pot tightly. You can use aluminum foil first, then place the lid on top, or use a ring of dough around the rim of the pot and seal the lid onto it.
- Place the sealed pot over medium heat for 5-7 minutes, then reduce the heat to the lowest possible setting. Cook on dum for 25-30 minutes. This allows the flavors to meld and the rice to finish cooking with the chicken's steam.
- Remove the pot from the heat but do not open the lid immediately. Let the biryani rest, still covered, for at least 10-15 minutes. This allows the steam to redistribute, resulting in perfectly fluffy, separate rice grains.
- Fluffing: When ready to serve, gently open the lid. Using a wide, flat spoon or spatula, carefully fluff the biryani from the edges, scooping downwards to bring up the chicken and masala from the bottom without breaking the delicate rice grains.
- Common mistakes & how to avoid them: Not sealing the pot tightly enough will lead to steam escaping, resulting in dry or unevenly cooked biryani. Opening the lid too early will release precious steam.
The following nutritional values are per serving (one piece of cake) Calories ~550-650 kcal Carbohydrates ~60-70g Protein ~35-40g Fat ~20-25g Time-Saving Tools & Ingredients Sometimes, you just need a little help to get that delicious biryani on the table faster. Here are a few recommendations that can shave off some prep time: Problem: Chopping onions for birista can be tedious and tear-inducing. Problem: Grinding fresh ginger and garlic takes extra time and effort. Problem: Constantly monitoring heat and risking a burned bottom layer during dum cooking. Problem: Soaking saffron threads takes time, and sometimes you forget! Problem: Toasting and grinding whole spices from scratch adds an extra step. Click any ingredient for detailed nutritional information:Recipe Nutritional Values
Additional Information
Recipe Success Tips
Ingredient Substitutions & Variations
Cultural Variations
Make-Ahead & Storage Instructions
Frequently Asked Questions
Recommended Kitchen Tools
Smart Kitchen Gadgets
Agitate: Unevenly chopped onions burn easily, ruining the texture and flavor of your biryani.
Solution: A food processor with a slicing or chopping attachment can quickly and uniformly prepare your onions, saving your eyes and ensuring perfect birista every time.Smart Kitchen Gadgets
Agitate: Skipping fresh aromatics can compromise the depth of flavor in your marinade.
Solution: A mini food processor or blender makes quick work of fresh ginger and garlic, creating a smooth paste in seconds. Alternatively, pre-made ginger-garlic paste (available in most grocery stores) is a fantastic shortcut.Smart Kitchen Gadgets
Agitate: A scorched biryani is a heartbreaking disaster, and inconsistent heat can lead to unevenly cooked rice.
Solution: An inexpensive heat diffuser placed under your pot can distribute heat more evenly, especially on gas stoves, giving you peace of mind and preventing hot spots.Smart Ingredient Choices
Agitate: Without properly bloomed saffron, you miss out on that beautiful color and delicate aroma.
Solution: While not always available, saffron extract or saffron water can be a quick alternative if you're in a pinch, though the flavor profile will be slightly different. For best results, still aim for real saffron!Smart Ingredient Choices
Agitate: If you're new to spice blending, getting the right balance can be intimidating.
Solution: Using a high-quality pre-ground garam masala or a ready-made Afghan char masala blend can save you significant time and ensure a consistent flavor profile. Just make sure it's fresh for maximum potency.Calories per Ingredient
Resources & References
You may also like


Hey there! I’m just someone who seriously loves good food and believes that cooking doesn’t have to be complicated to be amazing. Whether it’s a quick weeknight dinner or a cozy weekend meal, I’m all about sharing easy, tasty recipes that actually work.


