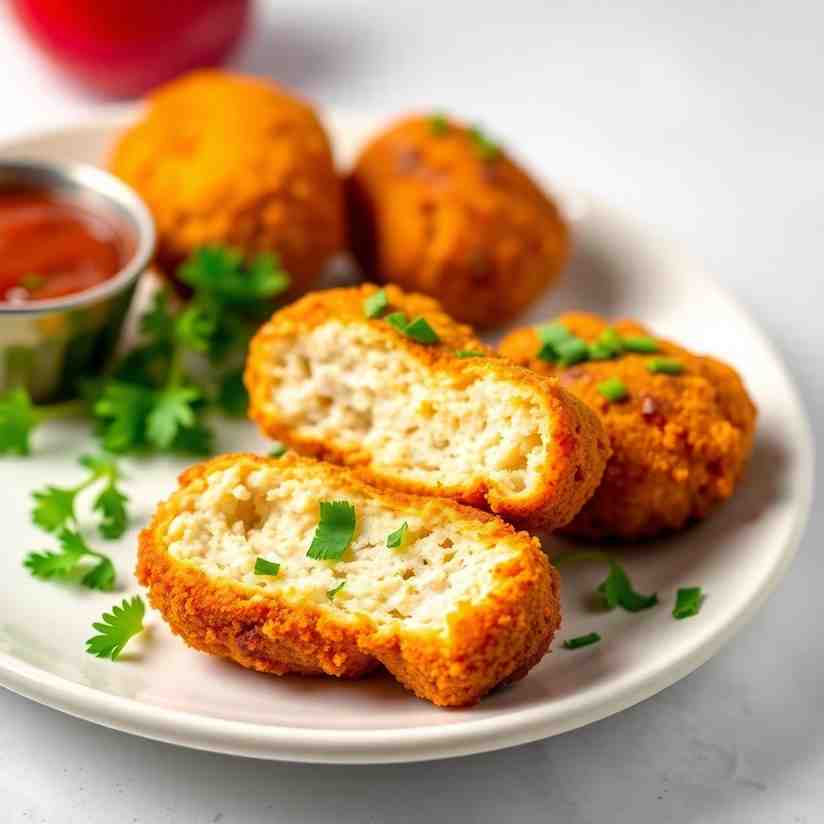
Chicken Croquettes Recipe Make Brazilian Coxinha
Chicken Croquettes Recipe Make Brazilian Coxinha

- Serves: 6 People
- Prepare Time: 45 minutes
- Cooking Time: 25 minutes
- Calories: -
- Difficulty: Medium
Hey there, snack lovers! Get ready to dive into the heart of Brazilian cuisine with our ultimate chicken croquettes recipe for Coxinha! If you've ever dreamt of sinking your teeth into a crispy, golden-brown shell filled with creamy, shredded chicken thigh (or flavorful chicken breast if that's your jam!), then you're in the right place. Coxinha isn't just a delicious snack; it's a cultural icon, a staple at every Brazilian party, street food stall, and family gathering. It’s one of the best Brazilian dishes you absolutely have to try making at home! Forget complicated food finger food ideas – this easy snack dish is surprisingly simple to master, and we're here to guide you every step of the way. Our recipe brings you the truly authentic flavors, ensuring that signature creamy filling and perfectly crisp exterior that makes Coxinha so irresistible. Let's get cooking and bring a piece of Brazil right to your kitchen!
Ingredients
Directions
- Prepare the Creamy Chicken Filling
- If your chicken isn't already cooked, boil or poach the chicken breasts/thighs until cooked through. Reserve the broth! Once cooled, shred the chicken finely.
- In a large skillet, heat the olive oil over medium heat. Add the chopped onion and cook until softened, about 3-5 minutes. Stir in the minced garlic and cook for another minute until fragrant.
- Add the shredded chicken to the skillet. Pour in 1/2 cup of the reserved chicken broth and let it simmer for a few minutes, allowing the chicken to absorb the flavors.
- Remove from heat and stir in the `requeijão` (or cream cheese) and fresh parsley. Mix well until the filling is creamy and evenly combined. Season with salt and black pepper to taste. Set aside and let it cool completely. This cooling step is super important!
- Craft the Soft Coxinha Dough
- In a large saucepan, combine the 2 cups chicken broth, milk, butter, and salt. Bring the mixture to a gentle boil over medium heat, stirring occasionally to melt the butter.
- Once boiling, remove the saucepan from the heat. Add all of the flour at once, stirring vigorously with a wooden spoon until a smooth ball of dough forms and pulls away from the sides of the pan. This takes a bit of elbow grease!
- Return the saucepan to low heat and continue to cook the dough for about 2-3 minutes, stirring constantly. This helps to cook out the raw flour taste.
- Transfer the hot dough to a lightly floured surface or a clean countertop. Let it cool for a few minutes until it's cool enough to handle, but still warm. Knead the dough for about 5-7 minutes until it's smooth, elastic, and no longer sticky.
- Shape Your Signature Coxinhas
- Lightly flour your hands. Take a small portion of the dough (about the size of a golf ball) and flatten it into a disc in the palm of your hand. Aim for about 1/4-inch thickness.
- Place a generous tablespoon of the cooled chicken filling in the center of the dough disc.
- Gently bring the edges of the dough up and around the filling, pinching them together at the top to seal. Carefully shape the dough into the classic "drumstick" or teardrop shape, ensuring the filling is completely enclosed. Take your time with this step to get that iconic look!
- Repeat with the remaining dough and filling.
- Coat for Crispy Perfection
- Set up your breading station: one shallow dish with the lightly beaten eggs and another shallow dish with the breadcrumbs.
- Dip each shaped coxinha first into the egg wash, making sure it's fully coated, then transfer it to the breadcrumbs. Roll it gently to ensure an even and thorough coating. Press lightly to help the breadcrumbs adhere.
- Place the coated coxinhas on a baking sheet lined with parchment paper.
- Fry Until Golden
- In a deep pot or Dutch oven, heat about 3-4 inches of vegetable oil to 350-375°F (175-190°C). If you don't have a thermometer, a small piece of dough should sizzle immediately and turn golden in about 30 seconds.
- Carefully lower a few coxinhas into the hot oil, making sure not to overcrowd the pot. Fry in batches.
- Fry for 3-5 minutes, turning occasionally, until they are beautifully golden brown and crispy on all sides.
- Drain and Serve Hot
- Using a slotted spoon, carefully remove the fried coxinhas from the oil and place them on a plate lined with paper towels to drain any excess oil.
- Serve your Deliciously Authentic: Coxinha - Brazil's Irresistible Savory Snack immediately while they're hot and crispy!
The following nutritional values are per serving (one piece of cake) Calories ~300-400 kcal Carbohydrates ~30-40g Protein ~15-20g Fat ~15-25g Tools and ingredients that can help you cook more easily and consistently. Problem: Shredding cooked chicken by hand can be a real chore, especially if you’re making a big batch. It's messy, time-consuming, and can leave your hands tired. Problem: Achieving a perfectly smooth, lump-free dough can be tricky. It requires constant stirring and attention, which can be demanding. Problem: Maintaining a consistent oil temperature for deep frying is crucial but can be challenging, often leading to unevenly cooked, greasy, or burnt coxinha. Problem: Cooking chicken from scratch, then cooling and shredding it, adds significant time to the overall recipe. Click any ingredient for detailed nutritional information:Recipe Nutritional Values
Additional Information
Recipe Success Tips
Ingredient Substitutions & Variations
Cultural Variations
Make-Ahead & Storage Instructions
Frequently Asked Questions
Recommended Kitchen Tools
Time-Saving Tools & Ingredients
Agitate: Who wants to spend ages pulling chicken apart when there's delicious coxinha waiting to be made? This step often feels like the longest and can be a real roadblock when you're craving quick, savory snacks.
Solution: A stand mixer with a paddle attachment is your secret weapon! Just toss your cooked, cooled chicken breasts or thighs into the bowl, turn it on low, and watch it shred perfectly in mere seconds. No stand mixer? A food processor can also do the trick with a few quick pulses, or even a hand mixer will work for smaller amounts.Time-Saving Tools & Ingredients
Agitate: Lumpy dough is no fun – it might not hold your filling as well, can make shaping more difficult, and won't give you that signature smooth exterior. You want your coxinha to look as good as it tastes!
Solution: Invest in a good non-stick pot and a sturdy silicone spatula or whisk. These will make stirring the dough much easier, preventing sticking and helping you achieve that silky-smooth consistency with less effort. If you struggle with initial lumps in your broth, an immersion blender can quickly smooth things out before you even add the flour.Time-Saving Tools & Ingredients
Agitate: There's nothing worse than biting into a coxinha that's soggy with oil or burnt on the outside and still cold in the middle! Inconsistent frying ruins the crispy, golden experience we all crave.
Solution: A deep-fry thermometer is a game-changer. It helps you keep your oil at the ideal temperature (around 350-375°F or 175-190°C) for that perfect golden-brown crust and evenly cooked interior. For ultimate temperature control and safety, a dedicated deep fryer is an excellent investment if you fry often.Time-Saving Tools & Ingredients
Agitate: When that coxinha craving hits, waiting for chicken to cook and then dealing with the shredding can feel like an eternity. You want to get to the good part – shaping and frying – faster!
Solution: Opt for pre-cooked, pre-shredded rotisserie chicken from your local grocery store. It’s a fantastic shortcut that cuts down on cooking and prep time without sacrificing flavor, allowing you to jump straight into making that delicious creamy filling.Calories per Ingredient
Resources & References
You may also like


Hey there! I’m just someone who seriously loves good food and believes that cooking doesn’t have to be complicated to be amazing. Whether it’s a quick weeknight dinner or a cozy weekend meal, I’m all about sharing easy, tasty recipes that actually work.