
Ukrainian Pirohy - Delicious Dumplings & More
Ukrainian Pirohy - Delicious Dumplings & More

- Serves: 4 People
- Prepare Time: 1 hour 15 m
- Cooking Time: 20 minutes
- Calories: -
- Difficulty: Medium
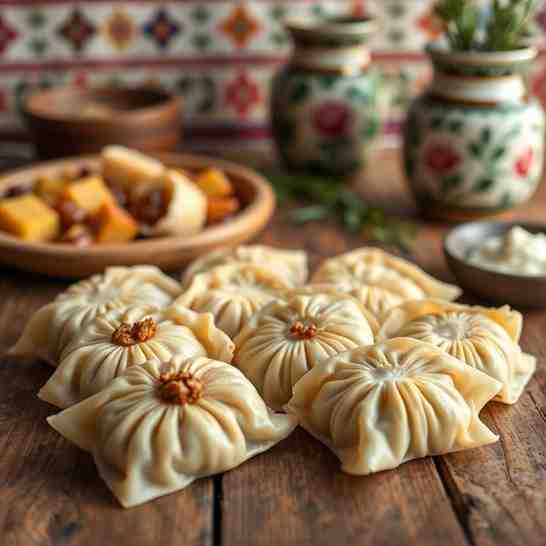
Welcome to the heartwarming world of Authentic Ukrainian Pirohy! If you're looking for a truly classic, comforting dish, you've hit the jackpot. These delightful dumplings and more are a staple in Ukrainian cuisine, traditionally filled with a creamy potato and farmer's cheese mixture that’s simply irresistible. This isn't just a recipe; it's an invitation to create homemade cooked meals that bring joy to your table, perfect for cooking for beginners recipes or seasoned pros. We'll guide you through every step, ensuring your pirohy are tender, flavorful, and absolutely authentic. Get ready to discover one of the best family recipes out there, suitable for meals for 1 person recipes or recipes for a family of 4 – it’s that versatile!
Ingredients
Directions
- Make the Dough
- In a large mixing bowl, combine the flour and salt.
- In a separate small bowl, whisk together the egg, warm water, and neutral oil.
- Pour the wet ingredients into the dry ingredients. Mix with a wooden spoon or your hands until a shaggy dough forms.
- Turn the dough out onto a lightly floured surface. Knead for 5-7 minutes until it's smooth and elastic. The oil helps with elasticity, making it easier to work with.
- Form the dough into a ball, lightly grease it with a tiny bit of oil, cover it with plastic wrap or a damp cloth, and let it rest at room temperature for at least 30 minutes. Resting the dough is crucial; it allows the gluten to relax, making the dough easier to roll out without shrinking back.
- Visual checkpoint: The dough should be soft, pliable, and elastic, not dry, stiff, or overly tacky.
- Make the Potato-Cheese Filling
- Place the peeled and quartered potatoes in a large pot and cover with cold water. Add a pinch of salt. Bring to a boil, then reduce heat and simmer until the potatoes are very tender, about 15-20 minutes.
- Drain the potatoes very well. You want them as dry as possible to prevent a watery filling. Return them to the hot pot for a minute or two over low heat to steam off any excess moisture.
- Mash the potatoes until smooth.
- Add the farmer’s cheese (or well-drained cottage cheese), melted butter, salt, and black pepper to the mashed potatoes. Mix until thoroughly combined and creamy.
- Taste and adjust seasoning if needed.
- Visual checkpoint: The filling should be scoopable, firm enough to hold its shape, and not wet or runny.
- Roll, Fill, and Seal
- Divide the rested dough into 2 or 3 portions. Keep the portions you’re not working with covered to prevent them from drying out.
- On a lightly floured surface, roll one portion of dough to about ⅛-inch (3mm) thickness. It should be thin enough to cook through quickly but thick enough not to tear.
- Using a 3-4 inch round cutter (or the rim of a glass), cut out as many circles as possible. Gather the scraps, gently knead them, and re-roll once or twice.
- Place about 1 teaspoon to 1 tablespoon of potato-cheese filling in the center of each dough circle. Don't overfill!
- Fold the dough over the filling to create a half-moon shape. Pinch the edges firmly together to seal. For an extra secure seal and decorative touch, you can crimp the edges with a fork.
- Leak test: After sealing, gently pinch the seam and lightly tug on the pirohy. If it feels secure, you're good. If it seems loose, pinch again!
- Place the formed pirohy on a lightly floured sheet pan as you work to prevent sticking.
- Boil (Main Method)
- Bring a large pot of salted water to a gentle boil (not a rolling boil, which can cause pirohy to burst).
- Carefully drop 8-10 pirohy into the boiling water, ensuring not to overcrowd the pot.
- Cook until they float to the surface, then allow them to simmer gently for another 2-3 minutes to ensure the dough is fully cooked.
- Doneness cue: The dough will look slightly translucent at the edges, and the pirohy will feel a bit puffed up.
- Using a slotted spoon, remove the cooked pirohy and place them in a serving bowl.
- Finish and Serve
- While the pirohy are boiling, melt 4 tablespoons of butter in a large skillet over medium heat. Add the sliced onions and caramelize them slowly until golden brown and sweet, about 15-20 minutes.
- Once the cooked pirohy are in the serving bowl, immediately toss them with a spoonful of the melted butter and caramelized onions to prevent sticking and add flavor.
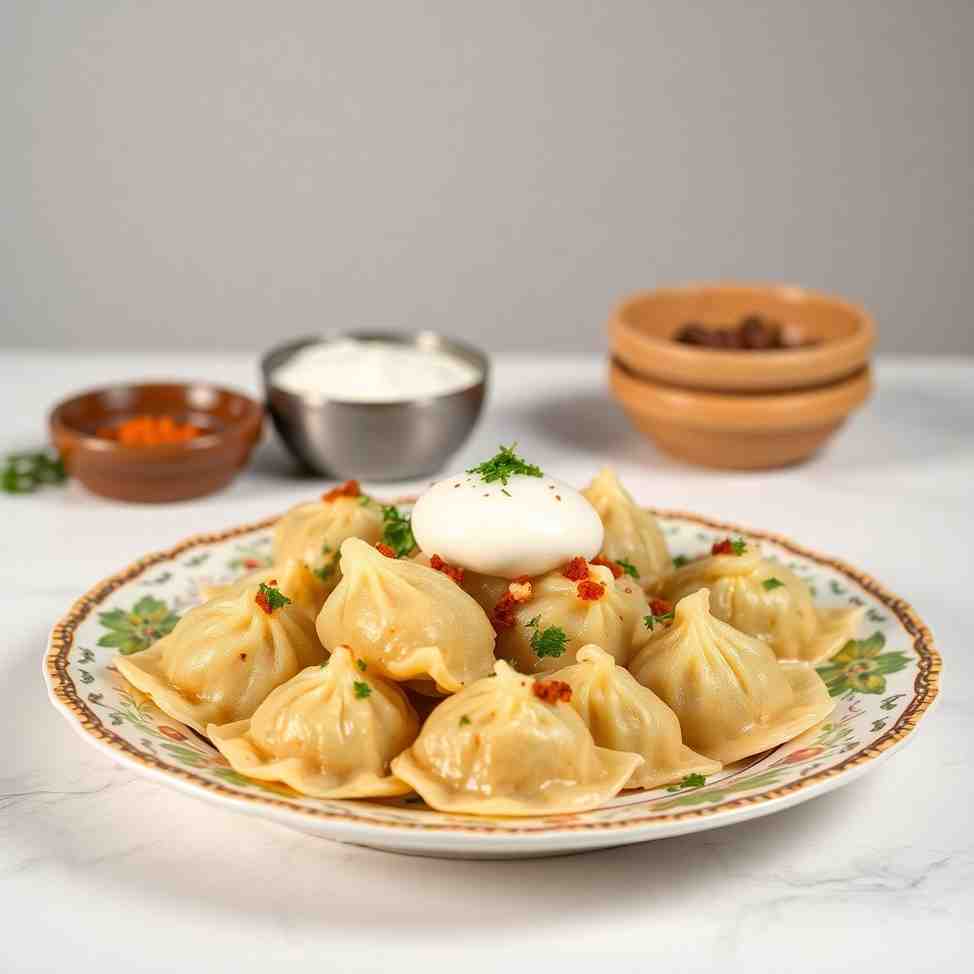
- Serve hot with a generous dollop of sour cream on the side. Garnish with optional fresh chives or dill.
- Optional quick sauté: For a golden-brown finish, after boiling, you can briefly sauté the pirohy in a little butter in a skillet over medium-high heat until lightly browned on both sides. This is an extra step, not a separate cooking method.
Ukrainian Pirohy - Delicious Dumplings & More

- Serves: 4 People
- Prepare Time: 1 hour 15 m
- Cooking Time: 20 minutes
- Calories: -
- Difficulty: Medium
Welcome to the heartwarming world of Authentic Ukrainian Pirohy! If you're looking for a truly classic, comforting dish, you've hit the jackpot. These delightful dumplings and more are a staple in Ukrainian cuisine, traditionally filled with a creamy potato and farmer's cheese mixture that’s simply irresistible. This isn't just a recipe; it's an invitation to create homemade cooked meals that bring joy to your table, perfect for cooking for beginners recipes or seasoned pros. We'll guide you through every step, ensuring your pirohy are tender, flavorful, and absolutely authentic. Get ready to discover one of the best family recipes out there, suitable for meals for 1 person recipes or recipes for a family of 4 – it’s that versatile!
Ingredients
Directions
- Make the Dough
- In a large mixing bowl, combine the flour and salt.
- In a separate small bowl, whisk together the egg, warm water, and neutral oil.
- Pour the wet ingredients into the dry ingredients. Mix with a wooden spoon or your hands until a shaggy dough forms.
- Turn the dough out onto a lightly floured surface. Knead for 5-7 minutes until it's smooth and elastic. The oil helps with elasticity, making it easier to work with.
- Form the dough into a ball, lightly grease it with a tiny bit of oil, cover it with plastic wrap or a damp cloth, and let it rest at room temperature for at least 30 minutes. Resting the dough is crucial; it allows the gluten to relax, making the dough easier to roll out without shrinking back.
- Visual checkpoint: The dough should be soft, pliable, and elastic, not dry, stiff, or overly tacky.
- Make the Potato-Cheese Filling
- Place the peeled and quartered potatoes in a large pot and cover with cold water. Add a pinch of salt. Bring to a boil, then reduce heat and simmer until the potatoes are very tender, about 15-20 minutes.
- Drain the potatoes very well. You want them as dry as possible to prevent a watery filling. Return them to the hot pot for a minute or two over low heat to steam off any excess moisture.
- Mash the potatoes until smooth.
- Add the farmer’s cheese (or well-drained cottage cheese), melted butter, salt, and black pepper to the mashed potatoes. Mix until thoroughly combined and creamy.
- Taste and adjust seasoning if needed.
- Visual checkpoint: The filling should be scoopable, firm enough to hold its shape, and not wet or runny.
- Roll, Fill, and Seal
- Divide the rested dough into 2 or 3 portions. Keep the portions you’re not working with covered to prevent them from drying out.
- On a lightly floured surface, roll one portion of dough to about ⅛-inch (3mm) thickness. It should be thin enough to cook through quickly but thick enough not to tear.
- Using a 3-4 inch round cutter (or the rim of a glass), cut out as many circles as possible. Gather the scraps, gently knead them, and re-roll once or twice.
- Place about 1 teaspoon to 1 tablespoon of potato-cheese filling in the center of each dough circle. Don't overfill!
- Fold the dough over the filling to create a half-moon shape. Pinch the edges firmly together to seal. For an extra secure seal and decorative touch, you can crimp the edges with a fork.
- Leak test: After sealing, gently pinch the seam and lightly tug on the pirohy. If it feels secure, you're good. If it seems loose, pinch again!
- Place the formed pirohy on a lightly floured sheet pan as you work to prevent sticking.
- Boil (Main Method)
- Bring a large pot of salted water to a gentle boil (not a rolling boil, which can cause pirohy to burst).
- Carefully drop 8-10 pirohy into the boiling water, ensuring not to overcrowd the pot.
- Cook until they float to the surface, then allow them to simmer gently for another 2-3 minutes to ensure the dough is fully cooked.
- Doneness cue: The dough will look slightly translucent at the edges, and the pirohy will feel a bit puffed up.
- Using a slotted spoon, remove the cooked pirohy and place them in a serving bowl.
- Finish and Serve
- While the pirohy are boiling, melt 4 tablespoons of butter in a large skillet over medium heat. Add the sliced onions and caramelize them slowly until golden brown and sweet, about 15-20 minutes.
- Once the cooked pirohy are in the serving bowl, immediately toss them with a spoonful of the melted butter and caramelized onions to prevent sticking and add flavor.
- Serve hot with a generous dollop of sour cream on the side. Garnish with optional fresh chives or dill.
- Optional quick sauté: For a golden-brown finish, after boiling, you can briefly sauté the pirohy in a little butter in a skillet over medium-high heat until lightly browned on both sides. This is an extra step, not a separate cooking method.
You may also like


Hey there! I’m just someone who seriously loves good food and believes that cooking doesn’t have to be complicated to be amazing. Whether it’s a quick weeknight dinner or a cozy weekend meal, I’m all about sharing easy, tasty recipes that actually work.


