
Vietnamese Pho Broth - Make It At Home
Vietnamese Pho Broth - Make It At Home
- Serves: 6 People
- Prepare Time: 30 minutes
- Cooking Time: 4 hours
- Calories: -
- Difficulty: Medium
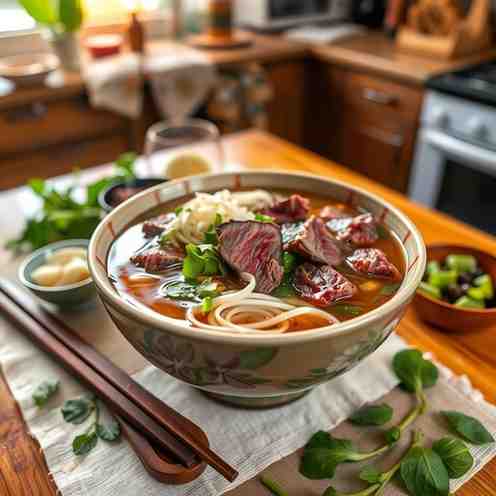
Welcome to the ultimate guide to making truly authentic Vietnamese pho broth right in your own kitchen! Imagine a bowl filled with silky rice noodles, tender slices of beef, and a fragrant, crystal-clear broth that warms you from the inside out. That incredible aroma and deep flavor? That's the soul of pho, and it all starts with the broth.
This isn't just any recipe; it's your definitive path to a clear bone broth for pho that tastes like it came straight from a bustling Hanoi or Saigon street stall. We know what you're thinking: isn't pho broth super complicated? While it requires a bit of a long simmer, the actual hands-on time is surprisingly low. You won't need any fancy restaurant equipment—just a big stockpot, a good strainer, and a little patience. Our goal is to give you an easy but traditional pho recipe that delivers restaurant-quality results, perfect for both beginners and seasoned home cooks. Get ready to impress your taste buds!
Ingredients
Directions
- Par-Boil & Clean the Bones: Your Secret to a Clear Broth
- Place all your beef bones (marrow and meaty) into your largest stockpot.
- Cover the bones completely with cold water.
- Bring the water to a hard, rolling boil over high heat. Let it boil vigorously for 5-10 minutes. You'll see a lot of scum and impurities rise to the surface – this is exactly what we want to remove!
- Carefully drain the water from the pot, discarding all the scummy liquid.
- Rinse the bones thoroughly under cold running water, scrubbing off any remaining gray scum or blood clots.
- Rinse out your stockpot completely to ensure it's spotless. This par-boiling step is crucial and prevents your broth from becoming cloudy.
- Char the Onion & Ginger: Unlocking Deep Flavor
- Take your unpeeled onions and ginger. You have a few options for charring:
- Direct Gas Flame: Hold them over a gas burner with tongs, turning until the skins are blackened and fragrant.
- Broiler: Place them on a baking sheet under a hot broiler, turning every few minutes until charred.
- Cast-Iron Pan: Sear them in a dry, hot cast-iron pan until well-charred on all sides.
- Once charred, rinse them under cold water to remove any loose black bits. The charring adds a beautiful light smokiness and depth of color, echoing traditional methods and even a nod to French pot-au-feu.
- Toast the Spices: Aromatic Magic
- In a dry pan over low heat, add your star anise, cloves, cinnamon sticks, coriander seeds, and optional fennel seeds and black cardamom.
- Stir constantly for 2-3 minutes until they become wonderfully fragrant. Be careful not to burn them!
- Once toasted, place all the spices into a cheesecloth bag or a large tea infuser. This keeps your broth clear and makes straining a breeze.
- Long Gentle Simmer: The Heart of the Broth
- Return the cleaned bones to your clean stockpot. Add the charred onion and ginger, the spice bundle, and the brisket or chuck roast.
- Fill the pot with enough cold water to cover everything by about 2-3 inches (usually around 4-5 quarts).
- Bring the pot to a very gentle simmer over medium-high heat. Once it starts to bubble, immediately reduce the heat to the lowest setting possible. You want a bare, lazy simmer, with just a few tiny bubbles breaking the surface, not a rolling boil.
- Skim, skim, skim! Throughout the first hour or two, use a ladle or fine-mesh skimmer to remove any foam or fat that rises to the surface. This is another key to a crystal-clear broth.
- Cook the Brisket/Chuck: After about 1.5 to 2 hours of simmering, carefully remove the brisket or chuck roast from the pot. It should be tender but not falling apart. Let it cool, then slice it thinly against the grain for your pho bowls. Return the bones to the pot.
- Continue to simmer the bones for a total of 3-4 hours (or even longer, up to 6-8 hours for deeper flavor, if you have the time). The longer the gentle simmer, the richer your broth will be.
- Strain, Season & Clarify: The Finishing Touches
- Once your broth has simmered sufficiently, remove the bones, onion, ginger, and spice bundle from the pot. Discard them.
- Carefully strain the broth through a fine-mesh sieve into a clean pot or large heatproof bowl. For an ultra-clear broth, you can line your sieve with a few layers of cheesecloth for a second pass.
- Return the strained broth to a clean pot.
- Now it's time to season! Add the fish sauce, rock sugar (or brown sugar), and initial tablespoon of salt.
- Bring the broth to a gentle simmer and taste. This is where the magic happens! You're aiming for a balance of salty, sweet, and umami. The broth should taste slightly stronger on its own than you might expect, as it will mellow out once poured over noodles and toppings.
- Adjust the seasoning as needed: add more fish sauce for depth, more sugar for roundness, or a pinch more salt. If it tastes too strong, a splash of water can dilute it slightly.
Vietnamese Pho Broth - Make It At Home
- Serves: 6 People
- Prepare Time: 30 minutes
- Cooking Time: 4 hours
- Calories: -
- Difficulty: Medium
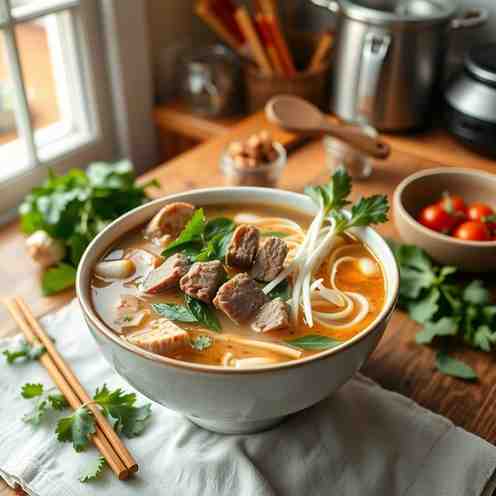
Welcome to the ultimate guide to making truly authentic Vietnamese pho broth right in your own kitchen! Imagine a bowl filled with silky rice noodles, tender slices of beef, and a fragrant, crystal-clear broth that warms you from the inside out. That incredible aroma and deep flavor? That's the soul of pho, and it all starts with the broth.
This isn't just any recipe; it's your definitive path to a clear bone broth for pho that tastes like it came straight from a bustling Hanoi or Saigon street stall. We know what you're thinking: isn't pho broth super complicated? While it requires a bit of a long simmer, the actual hands-on time is surprisingly low. You won't need any fancy restaurant equipment—just a big stockpot, a good strainer, and a little patience. Our goal is to give you an easy but traditional pho recipe that delivers restaurant-quality results, perfect for both beginners and seasoned home cooks. Get ready to impress your taste buds!
Ingredients
Directions
- Par-Boil & Clean the Bones: Your Secret to a Clear Broth
- Place all your beef bones (marrow and meaty) into your largest stockpot.
- Cover the bones completely with cold water.
- Bring the water to a hard, rolling boil over high heat. Let it boil vigorously for 5-10 minutes. You'll see a lot of scum and impurities rise to the surface – this is exactly what we want to remove!
- Carefully drain the water from the pot, discarding all the scummy liquid.
- Rinse the bones thoroughly under cold running water, scrubbing off any remaining gray scum or blood clots.
- Rinse out your stockpot completely to ensure it's spotless. This par-boiling step is crucial and prevents your broth from becoming cloudy.
- Char the Onion & Ginger: Unlocking Deep Flavor
- Take your unpeeled onions and ginger. You have a few options for charring:
- Direct Gas Flame: Hold them over a gas burner with tongs, turning until the skins are blackened and fragrant.
- Broiler: Place them on a baking sheet under a hot broiler, turning every few minutes until charred.
- Cast-Iron Pan: Sear them in a dry, hot cast-iron pan until well-charred on all sides.
- Once charred, rinse them under cold water to remove any loose black bits. The charring adds a beautiful light smokiness and depth of color, echoing traditional methods and even a nod to French pot-au-feu.
- Toast the Spices: Aromatic Magic
- In a dry pan over low heat, add your star anise, cloves, cinnamon sticks, coriander seeds, and optional fennel seeds and black cardamom.
- Stir constantly for 2-3 minutes until they become wonderfully fragrant. Be careful not to burn them!
- Once toasted, place all the spices into a cheesecloth bag or a large tea infuser. This keeps your broth clear and makes straining a breeze.
- Long Gentle Simmer: The Heart of the Broth
- Return the cleaned bones to your clean stockpot. Add the charred onion and ginger, the spice bundle, and the brisket or chuck roast.
- Fill the pot with enough cold water to cover everything by about 2-3 inches (usually around 4-5 quarts).
- Bring the pot to a very gentle simmer over medium-high heat. Once it starts to bubble, immediately reduce the heat to the lowest setting possible. You want a bare, lazy simmer, with just a few tiny bubbles breaking the surface, not a rolling boil.
- Skim, skim, skim! Throughout the first hour or two, use a ladle or fine-mesh skimmer to remove any foam or fat that rises to the surface. This is another key to a crystal-clear broth.
- Cook the Brisket/Chuck: After about 1.5 to 2 hours of simmering, carefully remove the brisket or chuck roast from the pot. It should be tender but not falling apart. Let it cool, then slice it thinly against the grain for your pho bowls. Return the bones to the pot.
- Continue to simmer the bones for a total of 3-4 hours (or even longer, up to 6-8 hours for deeper flavor, if you have the time). The longer the gentle simmer, the richer your broth will be.
- Strain, Season & Clarify: The Finishing Touches
- Once your broth has simmered sufficiently, remove the bones, onion, ginger, and spice bundle from the pot. Discard them.
- Carefully strain the broth through a fine-mesh sieve into a clean pot or large heatproof bowl. For an ultra-clear broth, you can line your sieve with a few layers of cheesecloth for a second pass.
- Return the strained broth to a clean pot.
- Now it's time to season! Add the fish sauce, rock sugar (or brown sugar), and initial tablespoon of salt.
- Bring the broth to a gentle simmer and taste. This is where the magic happens! You're aiming for a balance of salty, sweet, and umami. The broth should taste slightly stronger on its own than you might expect, as it will mellow out once poured over noodles and toppings.
- Adjust the seasoning as needed: add more fish sauce for depth, more sugar for roundness, or a pinch more salt. If it tastes too strong, a splash of water can dilute it slightly.
You may also like

.jpg)


Hey there! I’m just someone who seriously loves good food and believes that cooking doesn’t have to be complicated to be amazing. Whether it’s a quick weeknight dinner or a cozy weekend meal, I’m all about sharing easy, tasty recipes that actually work.


