
Xiaolongbao Recipe at Home
Xiaolongbao Recipe at Home
- Serves: 4 People
- Prepare Time: 1 hour 30 m
- Cooking Time: 10 minutes
- Calories: -
- Difficulty: Hard
If you’ve ever burned your tongue on an authentic xiaolongbao recipe, you already know why these incredible Chinese soup dumplings are worth every bit of effort. That burst of savory broth, the tender pork filling, and the delicate, translucent wrapper – it’s a culinary masterpiece that transports you straight to the bustling streets of Shanghai.
Making homemade xiaolongbao soup dumplings might seem daunting, but we're here to guide you through mastering this traditional art right in your kitchen. This comprehensive guide will teach you everything from crafting the perfect from-scratch, collagen-rich broth jelly (aspic) to rolling ultra-thin wrappers and executing those iconic pleats. You’ll discover how to make Shanghai style xiaolongbao recipe with juicy, soupy insides and how to slurp them safely, impressing everyone with your newfound dim sum skills. Get ready to dive into the world of these iconic Chinese delicacies!
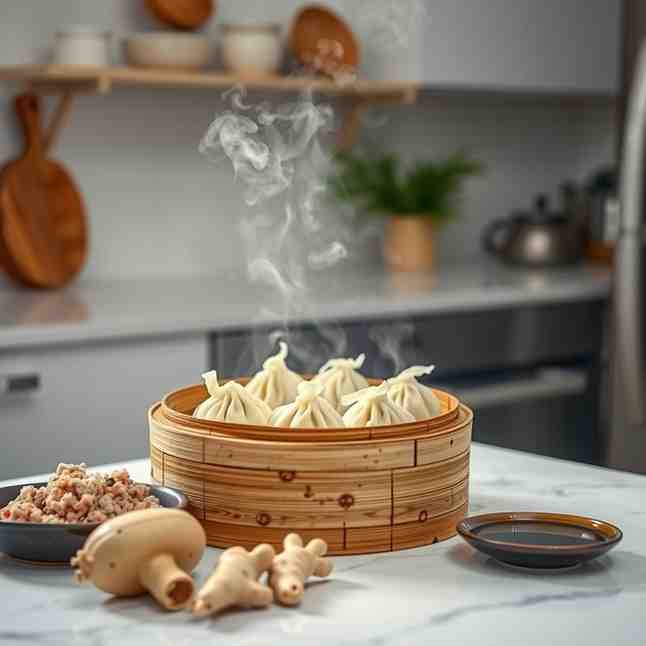
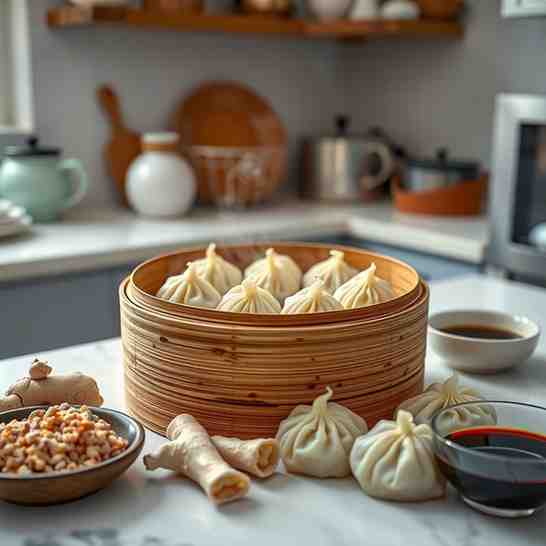
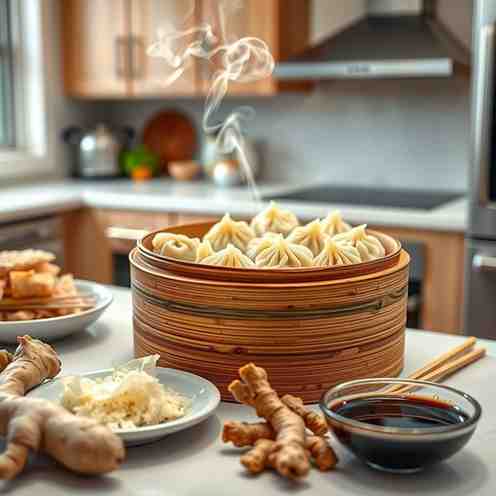
So, what exactly are Xiaolongbao? Originating from the Jiangnan region of China, particularly Shanghai, Xiaolongbao (小笼包) literally translates to "small basket buns," referring to the bamboo steamers they're traditionally served in. What sets them apart from regular dumplings is their signature soup filling, achieved by incorporating a gelatinized broth (aspic) into the pork mixture. When steamed, the aspic melts, creating that luscious, savory liquid encased within an incredibly thin, delicate wrapper. They’re usually enjoyed hot, often dipped in black vinegar and julienned ginger, making for an unforgettable culinary experience.
Ingredients
Directions
- A. Day 1 – Make the Soup Aspic
- Prepare Bones (Optional Browning): If using pork bones or chicken parts, you can lightly brown them in a teaspoon of neutral oil in a large pot for added depth of flavor. This step is optional but highly recommended.
- Simmer Collagen-Rich Stock: Add the browned bones/meat to a large pot. Add sliced ginger, chopped green onions, Shaoxing wine, light soy sauce, and enough water to cover the ingredients by [approx. 2-3 inches / 5-7 cm]. Bring to a boil, then reduce heat to a gentle simmer. Skim off any foam that rises to the surface. Simmer for [4-6 hours], or until the liquid has reduced significantly and is rich and flavorful. It should feel slightly sticky between your fingers, indicating good collagen extraction.
- Season Lightly: Taste the stock and adjust seasoning with a tiny bit more soy sauce if needed. Remember, it will be combined with the filling, so don't oversalt.
- Chill to Set: Strain the stock through a fine-mesh strainer, discarding solids. Pour the clear broth into a shallow, fridge-safe container (a shallow pan helps it cool and set faster). Refrigerate for at least [4-6 hours], or preferably overnight, until it's completely set into a firm jelly.
- Cut Aspic into Cubes: Once fully set, use a knife to cut the chilled aspic into small, [approx. 1/4-inch / 0.5 cm] cubes. This ensures they melt evenly inside the dumplings. Keep refrigerated until ready to use.
- B. Day 1 or 2 – Mix the Filling
- Combine Pork and Aromatics: In a large mixing bowl, combine the high-fat ground pork, finely minced ginger, finely minced green onions, light soy sauce, Shaoxing wine, sugar, white pepper, and sesame oil.
- Mix Thoroughly: Using your hands or a sturdy spoon, mix the ingredients vigorously in one direction (e.g., clockwise) for [3-5 minutes]. This develops the protein in the pork, leading to a bouncier, more cohesive filling.
- Fold in Aspic Cubes: Gently fold in the chilled aspic cubes, distributing them evenly throughout the meat mixture. Be careful not to mash the aspic. The ratio should be roughly [1 part aspic to 2-3 parts meat filling]. Keep the mixture cold; you can place the bowl over an ice bath if your kitchen is warm.
- Chill Until Ready: Cover the filling mixture and refrigerate for at least [30 minutes] (or up to a day) to allow the flavors to meld and the mixture to firm up, making it easier to handle.
- C. Day 2 – Make & Rest the Dough
- Hydrate Flour: In a large mixing bowl, combine the all-purpose flour and salt. Gradually pour the hot water over the flour, stirring with chopsticks or a spoon until shaggy. Then, slowly add [1-2 tablespoons / 15-30ml] of room-temperature water, a little at a time, until the dough just comes together. It should feel slightly sticky but not wet.
- Knead the Dough: Turn the dough out onto a lightly floured surface. Knead for [8-10 minutes] until it forms a smooth, elastic ball. It should bounce back slowly when poked.
- Rest the Dough: Place the dough ball back into the bowl, cover it with a damp cloth or plastic wrap, and let it rest at room temperature for at least [30 minutes]. This resting time is crucial for gluten relaxation, making the dough easier to roll very thin without tearing.
- D. Day 2 – Roll Thin Wrappers
- Portion Dough: Divide the rested dough into [approx. 20-24] equal pieces. Each piece should weigh around [10-12g]. Roll each piece into a small ball. Keep the unrolled dough covered to prevent drying.
- Roll with "Roll & Turn" Technique: Take one dough ball and flatten it slightly. Using a small dumpling rolling pin (or a thin rolling pin), use a "roll and turn" technique: roll the edge of the dough away from you, then turn the dough slightly, and repeat. The goal is to create a thin, round wrapper that is thicker in the center and thinner around the edges. This thicker center helps hold the filling and soup without bursting.
- Target Size and Thickness: Aim for a wrapper diameter of [approx. 3-3.5 inches / 7.5-9 cm]. The edges should be almost translucent, while the center remains slightly thicker.
- Keep Wrappers Covered: As you roll, stack the finished wrappers with a light dusting of flour between them and keep them covered with a damp cloth or plastic wrap to prevent them from drying out. Roll and fill in small batches (e.g., 5-6 at a time) to maintain moisture.
- E. Day 2 – Fill & Fold the Dumplings
- Filling Placement: Hold a wrapper in the palm of your non-dominant hand. Place [approx. 1 tablespoon / 15g] of the chilled filling (meat + aspic) in the center of the wrapper. Ensure you have a good mix of meat and aspic cubes.
- Folding Tutorial:
- Start Pinch Point: Using your thumb and index finger of your dominant hand, pinch a small section of the wrapper edge at the "12 o'clock" position.
- Pleat Clockwise: With your thumb holding the filling down, use your index finger to create small pleats by gathering the wrapper edge and pressing it into the initial pinch point. Work your way clockwise around the dumpling.
- Keep Thumb at Top: As you pleat, your thumb should continuously press the filling downwards and inwards, helping to keep the dumpling compact and soup contained.
- Goal: Aim for [10-12 pleats] for a beginner-friendly result, or challenge yourself for the ideal [16-18 pleats]. The more pleats, the prettier the dumpling!
- Sealing & Shaping: Once you've pleated all the way around, gather the final pleats at the top and twist gently to seal, forming a small "crown" or knot. Ensure there are no holes to prevent soup leakage. Avoid over-tight pleats, which can make the dough tough, or thick knots of dough at the top. The goal is a delicate, symmetrical pouch.
- Staging Dumplings: Place the assembled dumplings on a parchment paper-lined tray, spaced apart so they don't touch. Keep them covered with a damp cloth or plastic wrap while you finish folding the rest.
- F. Steam the Xiaolongbao
- Prepare Steamer & Water: Fill your pot or wok with [approx. 1-2 inches / 2.5-5 cm] of water. Bring it to a rolling boil. Line your bamboo steamer baskets with parchment paper (or napa cabbage/lettuce leaves) to prevent sticking.
- Load Dumplings: Carefully arrange the dumplings in the steamer baskets, ensuring they are spaced [at least 1 inch / 2.5 cm] apart to prevent them from sticking together as they expand. Do not overcrowd the steamer. Steam in batches if necessary.
- Steaming Times: Place the steamer basket over the boiling water, cover tightly, and steam for [8-10 minutes] for fresh dumplings. For frozen dumplings, increase steaming time to [12-15 minutes]. They are done when the wrappers become slightly translucent and the filling is cooked through.
- Resting Time: Once steamed, remove the steamer from the heat but keep the lid on for [1-2 minutes]. This allows the soup inside to settle slightly. Then, carefully remove the dumplings from the steamer using a spatula or chopsticks and let them cool for another [1-2 minutes] before eating to prevent burning your tongue.
- G. How to Eat Xiaolongbao Safely
- Chopsticks + Spoon Method: The traditional and safest way is to use chopsticks to carefully lift a dumpling onto a Chinese soup spoon.
- Bite a Vent, Sip Soup: Gently bite a small hole in the side of the dumpling wrapper to release some steam and allow you to safely sip the hot, flavorful soup.
- Then Eat the Rest: Once the soup has been sipped, you can eat the rest of the dumpling, often with a dab of dipping sauce.
- Dipping Sauce: Combine black vinegar with a few strands of julienned fresh ginger. A common ratio is [3 parts vinegar to 1 part ginger], but adjust to your preference.
Xiaolongbao Recipe at Home
- Serves: 4 People
- Prepare Time: 1 hour 30 m
- Cooking Time: 10 minutes
- Calories: -
- Difficulty: Hard
If you’ve ever burned your tongue on an authentic xiaolongbao recipe, you already know why these incredible Chinese soup dumplings are worth every bit of effort. That burst of savory broth, the tender pork filling, and the delicate, translucent wrapper – it’s a culinary masterpiece that transports you straight to the bustling streets of Shanghai.
Making homemade xiaolongbao soup dumplings might seem daunting, but we're here to guide you through mastering this traditional art right in your kitchen. This comprehensive guide will teach you everything from crafting the perfect from-scratch, collagen-rich broth jelly (aspic) to rolling ultra-thin wrappers and executing those iconic pleats. You’ll discover how to make Shanghai style xiaolongbao recipe with juicy, soupy insides and how to slurp them safely, impressing everyone with your newfound dim sum skills. Get ready to dive into the world of these iconic Chinese delicacies!
So, what exactly are Xiaolongbao? Originating from the Jiangnan region of China, particularly Shanghai, Xiaolongbao (小笼包) literally translates to "small basket buns," referring to the bamboo steamers they're traditionally served in. What sets them apart from regular dumplings is their signature soup filling, achieved by incorporating a gelatinized broth (aspic) into the pork mixture. When steamed, the aspic melts, creating that luscious, savory liquid encased within an incredibly thin, delicate wrapper. They’re usually enjoyed hot, often dipped in black vinegar and julienned ginger, making for an unforgettable culinary experience.
Ingredients
Directions
- A. Day 1 – Make the Soup Aspic
- Prepare Bones (Optional Browning): If using pork bones or chicken parts, you can lightly brown them in a teaspoon of neutral oil in a large pot for added depth of flavor. This step is optional but highly recommended.
- Simmer Collagen-Rich Stock: Add the browned bones/meat to a large pot. Add sliced ginger, chopped green onions, Shaoxing wine, light soy sauce, and enough water to cover the ingredients by [approx. 2-3 inches / 5-7 cm]. Bring to a boil, then reduce heat to a gentle simmer. Skim off any foam that rises to the surface. Simmer for [4-6 hours], or until the liquid has reduced significantly and is rich and flavorful. It should feel slightly sticky between your fingers, indicating good collagen extraction.
- Season Lightly: Taste the stock and adjust seasoning with a tiny bit more soy sauce if needed. Remember, it will be combined with the filling, so don't oversalt.
- Chill to Set: Strain the stock through a fine-mesh strainer, discarding solids. Pour the clear broth into a shallow, fridge-safe container (a shallow pan helps it cool and set faster). Refrigerate for at least [4-6 hours], or preferably overnight, until it's completely set into a firm jelly.
- Cut Aspic into Cubes: Once fully set, use a knife to cut the chilled aspic into small, [approx. 1/4-inch / 0.5 cm] cubes. This ensures they melt evenly inside the dumplings. Keep refrigerated until ready to use.
- B. Day 1 or 2 – Mix the Filling
- Combine Pork and Aromatics: In a large mixing bowl, combine the high-fat ground pork, finely minced ginger, finely minced green onions, light soy sauce, Shaoxing wine, sugar, white pepper, and sesame oil.
- Mix Thoroughly: Using your hands or a sturdy spoon, mix the ingredients vigorously in one direction (e.g., clockwise) for [3-5 minutes]. This develops the protein in the pork, leading to a bouncier, more cohesive filling.
- Fold in Aspic Cubes: Gently fold in the chilled aspic cubes, distributing them evenly throughout the meat mixture. Be careful not to mash the aspic. The ratio should be roughly [1 part aspic to 2-3 parts meat filling]. Keep the mixture cold; you can place the bowl over an ice bath if your kitchen is warm.
- Chill Until Ready: Cover the filling mixture and refrigerate for at least [30 minutes] (or up to a day) to allow the flavors to meld and the mixture to firm up, making it easier to handle.
- C. Day 2 – Make & Rest the Dough
- Hydrate Flour: In a large mixing bowl, combine the all-purpose flour and salt. Gradually pour the hot water over the flour, stirring with chopsticks or a spoon until shaggy. Then, slowly add [1-2 tablespoons / 15-30ml] of room-temperature water, a little at a time, until the dough just comes together. It should feel slightly sticky but not wet.
- Knead the Dough: Turn the dough out onto a lightly floured surface. Knead for [8-10 minutes] until it forms a smooth, elastic ball. It should bounce back slowly when poked.
- Rest the Dough: Place the dough ball back into the bowl, cover it with a damp cloth or plastic wrap, and let it rest at room temperature for at least [30 minutes]. This resting time is crucial for gluten relaxation, making the dough easier to roll very thin without tearing.
- D. Day 2 – Roll Thin Wrappers
- Portion Dough: Divide the rested dough into [approx. 20-24] equal pieces. Each piece should weigh around [10-12g]. Roll each piece into a small ball. Keep the unrolled dough covered to prevent drying.
- Roll with "Roll & Turn" Technique: Take one dough ball and flatten it slightly. Using a small dumpling rolling pin (or a thin rolling pin), use a "roll and turn" technique: roll the edge of the dough away from you, then turn the dough slightly, and repeat. The goal is to create a thin, round wrapper that is thicker in the center and thinner around the edges. This thicker center helps hold the filling and soup without bursting.
- Target Size and Thickness: Aim for a wrapper diameter of [approx. 3-3.5 inches / 7.5-9 cm]. The edges should be almost translucent, while the center remains slightly thicker.
- Keep Wrappers Covered: As you roll, stack the finished wrappers with a light dusting of flour between them and keep them covered with a damp cloth or plastic wrap to prevent them from drying out. Roll and fill in small batches (e.g., 5-6 at a time) to maintain moisture.
- E. Day 2 – Fill & Fold the Dumplings
- Filling Placement: Hold a wrapper in the palm of your non-dominant hand. Place [approx. 1 tablespoon / 15g] of the chilled filling (meat + aspic) in the center of the wrapper. Ensure you have a good mix of meat and aspic cubes.
- Folding Tutorial:
- Start Pinch Point: Using your thumb and index finger of your dominant hand, pinch a small section of the wrapper edge at the "12 o'clock" position.
- Pleat Clockwise: With your thumb holding the filling down, use your index finger to create small pleats by gathering the wrapper edge and pressing it into the initial pinch point. Work your way clockwise around the dumpling.
- Keep Thumb at Top: As you pleat, your thumb should continuously press the filling downwards and inwards, helping to keep the dumpling compact and soup contained.
- Goal: Aim for [10-12 pleats] for a beginner-friendly result, or challenge yourself for the ideal [16-18 pleats]. The more pleats, the prettier the dumpling!
- Sealing & Shaping: Once you've pleated all the way around, gather the final pleats at the top and twist gently to seal, forming a small "crown" or knot. Ensure there are no holes to prevent soup leakage. Avoid over-tight pleats, which can make the dough tough, or thick knots of dough at the top. The goal is a delicate, symmetrical pouch.
- Staging Dumplings: Place the assembled dumplings on a parchment paper-lined tray, spaced apart so they don't touch. Keep them covered with a damp cloth or plastic wrap while you finish folding the rest.
- F. Steam the Xiaolongbao
- Prepare Steamer & Water: Fill your pot or wok with [approx. 1-2 inches / 2.5-5 cm] of water. Bring it to a rolling boil. Line your bamboo steamer baskets with parchment paper (or napa cabbage/lettuce leaves) to prevent sticking.
- Load Dumplings: Carefully arrange the dumplings in the steamer baskets, ensuring they are spaced [at least 1 inch / 2.5 cm] apart to prevent them from sticking together as they expand. Do not overcrowd the steamer. Steam in batches if necessary.
- Steaming Times: Place the steamer basket over the boiling water, cover tightly, and steam for [8-10 minutes] for fresh dumplings. For frozen dumplings, increase steaming time to [12-15 minutes]. They are done when the wrappers become slightly translucent and the filling is cooked through.
- Resting Time: Once steamed, remove the steamer from the heat but keep the lid on for [1-2 minutes]. This allows the soup inside to settle slightly. Then, carefully remove the dumplings from the steamer using a spatula or chopsticks and let them cool for another [1-2 minutes] before eating to prevent burning your tongue.
- G. How to Eat Xiaolongbao Safely
- Chopsticks + Spoon Method: The traditional and safest way is to use chopsticks to carefully lift a dumpling onto a Chinese soup spoon.
- Bite a Vent, Sip Soup: Gently bite a small hole in the side of the dumpling wrapper to release some steam and allow you to safely sip the hot, flavorful soup.
- Then Eat the Rest: Once the soup has been sipped, you can eat the rest of the dumpling, often with a dab of dipping sauce.
- Dipping Sauce: Combine black vinegar with a few strands of julienned fresh ginger. A common ratio is [3 parts vinegar to 1 part ginger], but adjust to your preference.
You may also like


Hey there! I’m just someone who seriously loves good food and believes that cooking doesn’t have to be complicated to be amazing. Whether it’s a quick weeknight dinner or a cozy weekend meal, I’m all about sharing easy, tasty recipes that actually work.


