
Bake the Best Chocolate Raspberry Cake Ever
Bake the Best Chocolate Raspberry Cake Ever

- Serves: 12 People
- Prepare Time: 60 minutes
- Cooking Time: 30 minutes
- Calories: -
- Difficulty: Medium
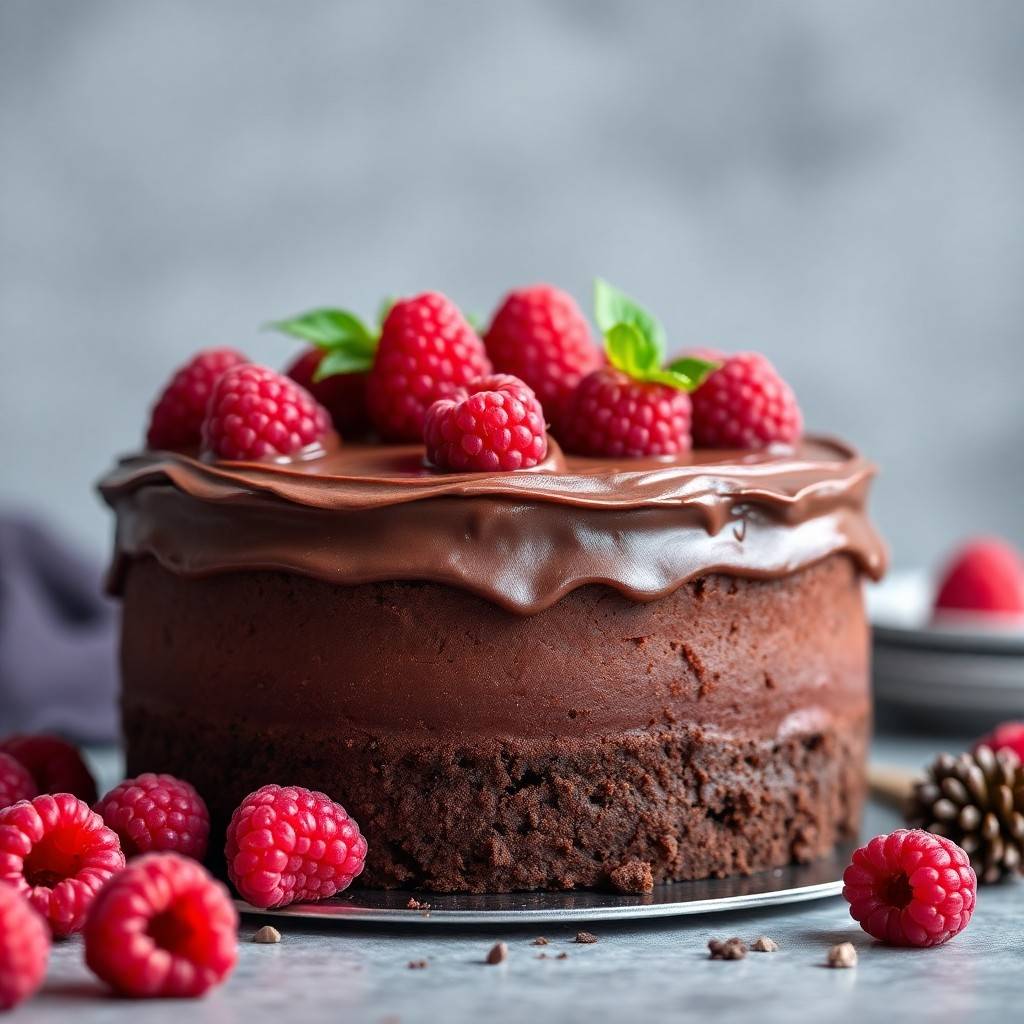
Get ready to bake a showstopper that tastes like it came straight from a European bakery: our Belarusian Raspberry Chocolate Ganache Cake! Imagine tall, tender layers of deep, rich chocolate cake, perfectly balanced with a vibrant, tangy raspberry filling, all enrobed in a glossy, real chocolate ganache. This isn't just any chocolate raspberry cake; it's an experience, designed to delight both beginners and experienced bakers with its simple yet sophisticated charm.
You'll absolutely fall in love with this cake for so many reasons:
Deep, rich chocolate layers that stay incredibly moist for days, thanks to a special ingredient.
A bright, tangy raspberry layer that cuts through the richness, offering a burst of fresh fruit flavor.
Real chocolate ganache as the main finish – no bland, cocoa-only frosting here!
A simple, repeatable method for one perfect batter, one delightful filling, and one luscious ganache.
It feels like a professional European bakery cake but uses standard US ingredients and pans, making it totally achievable in your home kitchen.
What gives this particular chocolate and raspberry cake its unique "Belarusian-style" flair? Eastern Europe, including Belarus, has a deep appreciation for forest berries like raspberries and currants, often incorporating them into their desserts alongside rich dairy like sour cream. This cake beautifully mirrors that tradition: we use sour cream in the chocolate cake batter for incredible tenderness and moisture, feature a strong, jammy raspberry layer, and finish it with a clean, elegant ganache coating instead of a heavy buttercream. While this is a modern, home-baker-friendly adaptation, it truly captures the essence of that beloved baking culture. Prepare to impress everyone with this incredible chocolate ganache cake!
Ingredients
Directions
- Make the Raspberry LayerCombine Ingredients: In a medium saucepan, whisk together the sugar and cornstarch. Add the fresh or frozen raspberries and lemon juice. If using frozen raspberries, there's no need to thaw them first.
- Cook to Thicken: Place the saucepan over medium heat. Bring the mixture to a gentle simmer, stirring frequently, and cook for 5-7 minutes, or until the raspberries have broken down and the mixture is thick and glossy. It should be thick enough to spoon and mound, not runny.
- Optional Seed Straining: If you prefer a seedless filling, press the warm mixture through a fine-mesh sieve into a clean bowl, using a spatula to extract as much pulp as possible. Discard the seeds.
- Cool Completely: Stir in the vanilla or raspberry liqueur, if using. Transfer the raspberry filling to a heatproof bowl, cover it with plastic wrap pressed directly onto the surface to prevent a skin from forming, and cool completely. You can refrigerate it for at least 2 hours or place it in the freezer for about 30 minutes for a quicker chill. It must be cold and firm before assembly.
- Make the Chocolate Cake Batter Preheat Oven & Prepare Pans: Preheat your oven to 350°F (175°C). Grease and flour three 8-inch round cake pans. Line the bottoms with parchment paper circles for easy release.
- Whisk Dry Ingredients: In a large bowl, whisk together the all-purpose flour, granulated sugar, dark cocoa powder, baking soda, baking powder, and salt until well combined.
- Whisk Wet Ingredients: In a separate medium bowl, whisk together the neutral oil, eggs, sour cream, milk (or buttermilk), and vanilla extract until smooth.
- Combine & Hydrate: Pour the wet ingredients into the dry ingredients. Mix on low speed with an electric mixer, or by hand with a whisk, until just combined (do not overmix). The batter will be thick. Carefully pour in the hot coffee or hot water, stirring gently until the batter is smooth and pourable. It will be fairly thin – this is normal and contributes to the cake's moistness.
- Optional Chocolate: If using, gently fold in the finely chopped dark chocolate chips.
- Bake & Cool the Layers
- Divide Batter: Divide the chocolate cake batter evenly among the three prepared 8-inch pans.
- Bake: Bake for 25-30 minutes, or until a wooden skewer or toothpick inserted into the center of a cake comes out with a few moist crumbs (but no wet batter). The tops should spring back gently when lightly touched.
- Cool: Let the cake layers cool in their pans on a wire rack for 10-15 minutes. Then, carefully invert them onto the wire racks, remove the pans and parchment paper, and allow the cakes to cool completely to room temperature. This can take 1-2 hours.
- Leveling Tip: If your cake tops have domed slightly, use a serrated knife to carefully level them once completely cool. This creates even layers for stacking.
- Make the Chocolate Ganache
- Prepare Chocolate: Place the finely chopped dark or semi-sweet chocolate in a heatproof bowl.
- Heat Cream: In a small saucepan, heat the heavy cream over medium heat until it just begins to simmer around the edges (do not boil).
- Pour & Rest: Immediately pour the hot cream over the chopped chocolate. Let it sit undisturbed for 5 minutes to allow the chocolate to melt.
- Whisk to Smooth: After 5 minutes, gently whisk the mixture starting from the center and working your way out, until it's completely smooth, shiny, and emulsified. If using, whisk in the optional butter and liqueur/coffee.
- Cool for Consistency: Let the ganache cool at room temperature, stirring occasionally, until it reaches your desired consistency for coating.
- For a soft drip or glossy top, use it slightly warmer and runnier (but not hot).
- For a thicker coating that holds its shape better, let it cool for 30-60 minutes, stirring occasionally, until it's spreadable but still pourable. It should be "ready for pouring" when it slowly drizzles off a spoon. If it's "too hot," it will be very thin; if "too cool," it will be too stiff.
- Assemble the Cake
- First Layer: Place your first cooled cake layer on your serving plate or cake stand.
- "Glue" Layer (Optional): Spread a very thin layer of ganache (or a light smear of cake crumbs mixed with a tiny bit of ganache) on top of the first layer. This helps "glue" the cake to the plate and prevent sliding.
- Ganache Border: If you want extra security against the raspberry filling leaking, pipe or spread a low border of ganache around the edge of the first cake layer.
- Raspberry Filling: Spoon half of the chilled, firm raspberry filling into the center of the border (or directly onto the cake if not using a border), and gently spread it evenly, making sure to stay within the border.
- Second Layer & Repeat: Carefully place the second cake layer on top. Repeat the ganache border and remaining raspberry filling.
- Final Layer & Chill: Place the final cake layer on top and press gently to level it.
- Settle & Firm: Chill the assembled cake in the refrigerator for 20-30 minutes. This allows the filling to firm up and the layers to settle, making it easier to frost.
- Coat with Ganache & Decorate
- Pour Ganache: Retrieve the cake from the fridge. If your ganache has cooled too much and become stiff, warm it gently in short bursts in the microwave or over a double boiler until it's pourable again. Pour the thicker ganache onto the top center of the cake.
- Smooth & Drip: Using an offset spatula, gently push the ganache toward the edges, allowing it to drip naturally down the sides. Continue to spread and smooth the top and sides until evenly coated.
- Set & Garnish: Let the ganache set slightly at room temperature or in the refrigerator for 15-20 minutes.
- Decorate: Arrange fresh raspberries in a nest or cluster on top. Add optional grated chocolate, chocolate curls, or toasted nuts.
- Final Chill & Serve: Chill the cake in the refrigerator for at least 1 hour to fully set the ganache. For the best texture and flavor, bring the cake toward room temperature for 20-30 minutes before slicing and serving.
Bake the Best Chocolate Raspberry Cake Ever
- Serves: 12 People
- Prepare Time: 60 minutes
- Cooking Time: 30 minutes
- Calories: -
- Difficulty: Medium
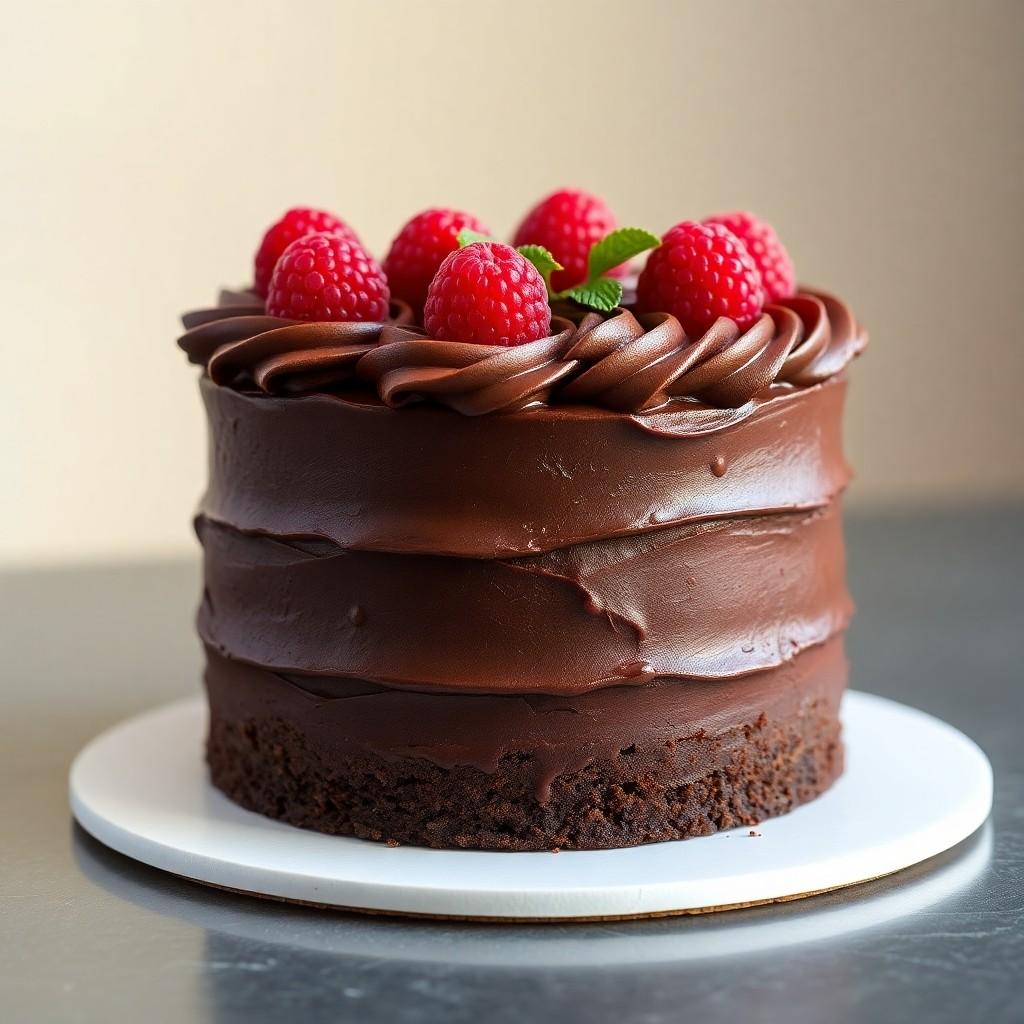
Get ready to bake a showstopper that tastes like it came straight from a European bakery: our Belarusian Raspberry Chocolate Ganache Cake! Imagine tall, tender layers of deep, rich chocolate cake, perfectly balanced with a vibrant, tangy raspberry filling, all enrobed in a glossy, real chocolate ganache. This isn't just any chocolate raspberry cake; it's an experience, designed to delight both beginners and experienced bakers with its simple yet sophisticated charm.
You'll absolutely fall in love with this cake for so many reasons:
Deep, rich chocolate layers that stay incredibly moist for days, thanks to a special ingredient.
A bright, tangy raspberry layer that cuts through the richness, offering a burst of fresh fruit flavor.
Real chocolate ganache as the main finish – no bland, cocoa-only frosting here!
A simple, repeatable method for one perfect batter, one delightful filling, and one luscious ganache.
It feels like a professional European bakery cake but uses standard US ingredients and pans, making it totally achievable in your home kitchen.
What gives this particular chocolate and raspberry cake its unique "Belarusian-style" flair? Eastern Europe, including Belarus, has a deep appreciation for forest berries like raspberries and currants, often incorporating them into their desserts alongside rich dairy like sour cream. This cake beautifully mirrors that tradition: we use sour cream in the chocolate cake batter for incredible tenderness and moisture, feature a strong, jammy raspberry layer, and finish it with a clean, elegant ganache coating instead of a heavy buttercream. While this is a modern, home-baker-friendly adaptation, it truly captures the essence of that beloved baking culture. Prepare to impress everyone with this incredible chocolate ganache cake!
Ingredients
Directions
- Make the Raspberry LayerCombine Ingredients: In a medium saucepan, whisk together the sugar and cornstarch. Add the fresh or frozen raspberries and lemon juice. If using frozen raspberries, there's no need to thaw them first.
- Cook to Thicken: Place the saucepan over medium heat. Bring the mixture to a gentle simmer, stirring frequently, and cook for 5-7 minutes, or until the raspberries have broken down and the mixture is thick and glossy. It should be thick enough to spoon and mound, not runny.
- Optional Seed Straining: If you prefer a seedless filling, press the warm mixture through a fine-mesh sieve into a clean bowl, using a spatula to extract as much pulp as possible. Discard the seeds.
- Cool Completely: Stir in the vanilla or raspberry liqueur, if using. Transfer the raspberry filling to a heatproof bowl, cover it with plastic wrap pressed directly onto the surface to prevent a skin from forming, and cool completely. You can refrigerate it for at least 2 hours or place it in the freezer for about 30 minutes for a quicker chill. It must be cold and firm before assembly.
- Make the Chocolate Cake Batter Preheat Oven & Prepare Pans: Preheat your oven to 350°F (175°C). Grease and flour three 8-inch round cake pans. Line the bottoms with parchment paper circles for easy release.
- Whisk Dry Ingredients: In a large bowl, whisk together the all-purpose flour, granulated sugar, dark cocoa powder, baking soda, baking powder, and salt until well combined.
- Whisk Wet Ingredients: In a separate medium bowl, whisk together the neutral oil, eggs, sour cream, milk (or buttermilk), and vanilla extract until smooth.
- Combine & Hydrate: Pour the wet ingredients into the dry ingredients. Mix on low speed with an electric mixer, or by hand with a whisk, until just combined (do not overmix). The batter will be thick. Carefully pour in the hot coffee or hot water, stirring gently until the batter is smooth and pourable. It will be fairly thin – this is normal and contributes to the cake's moistness.
- Optional Chocolate: If using, gently fold in the finely chopped dark chocolate chips.
- Bake & Cool the Layers
- Divide Batter: Divide the chocolate cake batter evenly among the three prepared 8-inch pans.
- Bake: Bake for 25-30 minutes, or until a wooden skewer or toothpick inserted into the center of a cake comes out with a few moist crumbs (but no wet batter). The tops should spring back gently when lightly touched.
- Cool: Let the cake layers cool in their pans on a wire rack for 10-15 minutes. Then, carefully invert them onto the wire racks, remove the pans and parchment paper, and allow the cakes to cool completely to room temperature. This can take 1-2 hours.
- Leveling Tip: If your cake tops have domed slightly, use a serrated knife to carefully level them once completely cool. This creates even layers for stacking.
- Make the Chocolate Ganache
- Prepare Chocolate: Place the finely chopped dark or semi-sweet chocolate in a heatproof bowl.
- Heat Cream: In a small saucepan, heat the heavy cream over medium heat until it just begins to simmer around the edges (do not boil).
- Pour & Rest: Immediately pour the hot cream over the chopped chocolate. Let it sit undisturbed for 5 minutes to allow the chocolate to melt.
- Whisk to Smooth: After 5 minutes, gently whisk the mixture starting from the center and working your way out, until it's completely smooth, shiny, and emulsified. If using, whisk in the optional butter and liqueur/coffee.
- Cool for Consistency: Let the ganache cool at room temperature, stirring occasionally, until it reaches your desired consistency for coating.
- For a soft drip or glossy top, use it slightly warmer and runnier (but not hot).
- For a thicker coating that holds its shape better, let it cool for 30-60 minutes, stirring occasionally, until it's spreadable but still pourable. It should be "ready for pouring" when it slowly drizzles off a spoon. If it's "too hot," it will be very thin; if "too cool," it will be too stiff.
- Assemble the Cake
- First Layer: Place your first cooled cake layer on your serving plate or cake stand.
- "Glue" Layer (Optional): Spread a very thin layer of ganache (or a light smear of cake crumbs mixed with a tiny bit of ganache) on top of the first layer. This helps "glue" the cake to the plate and prevent sliding.
- Ganache Border: If you want extra security against the raspberry filling leaking, pipe or spread a low border of ganache around the edge of the first cake layer.
- Raspberry Filling: Spoon half of the chilled, firm raspberry filling into the center of the border (or directly onto the cake if not using a border), and gently spread it evenly, making sure to stay within the border.
- Second Layer & Repeat: Carefully place the second cake layer on top. Repeat the ganache border and remaining raspberry filling.
- Final Layer & Chill: Place the final cake layer on top and press gently to level it.
- Settle & Firm: Chill the assembled cake in the refrigerator for 20-30 minutes. This allows the filling to firm up and the layers to settle, making it easier to frost.
- Coat with Ganache & Decorate
- Pour Ganache: Retrieve the cake from the fridge. If your ganache has cooled too much and become stiff, warm it gently in short bursts in the microwave or over a double boiler until it's pourable again. Pour the thicker ganache onto the top center of the cake.
- Smooth & Drip: Using an offset spatula, gently push the ganache toward the edges, allowing it to drip naturally down the sides. Continue to spread and smooth the top and sides until evenly coated.
- Set & Garnish: Let the ganache set slightly at room temperature or in the refrigerator for 15-20 minutes.
- Decorate: Arrange fresh raspberries in a nest or cluster on top. Add optional grated chocolate, chocolate curls, or toasted nuts.
- Final Chill & Serve: Chill the cake in the refrigerator for at least 1 hour to fully set the ganache. For the best texture and flavor, bring the cake toward room temperature for 20-30 minutes before slicing and serving.
The following nutritional values are per serving (one piece of cake) Calories ~450-550 kcal Carbohydrates ~55-65g Protein ~5-7g Fat ~25-35g Tools and ingredients that can help you cook more easily and consistently. Problem: Constantly scraping down bowls and unevenly mixing ingredients by hand can be tiring and lead to lumps. Problem: Spreading frosting evenly and achieving a professional-looking finish with just a regular knife is incredibly difficult. Problem: Measuring wet ingredients accurately, especially sticky ones like oil or sour cream, can be messy and lead to inaccurate proportions. Problem: Dealing with raspberry seeds can be a nuisance, especially if you prefer a perfectly smooth filling. Click any ingredient for detailed nutritional information:Recipe Nutritional Values
Additional Information
Recipe Success Tips
Ingredient Substitutions & Variations
Cultural Variations
Simple Timeline
How to Store the Cake
Frequently Asked Questions
Recommended Kitchen Tools
Time-Saving Tools & Ingredients
Agitate: Lumpy batter or poorly incorporated ingredients can ruin the texture of your cake and ganache, making your hard work less rewarding.
Solution: A good whisk (or even an electric hand mixer for the batter) ensures all your dry and wet ingredients are perfectly combined, creating a smooth, airy batter and a silky ganache with minimal effort.Time-Saving Tools & Ingredients
Agitate: Uneven layers and messy ganache can make your cake look homemade in a way you didn't intend, detracting from its beauty.
Solution: An offset spatula is a game-changer for spreading fillings and ganache smoothly across your cake layers and sides. Its angled blade keeps your knuckles out of the frosting, giving you precise control and a much cleaner finish.Time-Saving Tools & Ingredients
Agitate: Inaccurate measurements can throw off the delicate balance of your recipe, resulting in cakes that are too dry, too dense, or don't rise properly.
Solution: Investing in liquid measuring cups (with a spout for easy pouring) and using digital kitchen scales for dry ingredients (especially flour and chocolate for ganache) ensures precision, consistency, and less cleanup.Time-Saving Tools & Ingredients
Agitate: While not a deal-breaker, seeds can sometimes interrupt the smooth texture of your cake, and straining them by hand can be time-consuming.
Solution: A fine mesh strainer makes quick work of removing seeds from your raspberry filling, giving you a velvety smooth layer without much fuss. It's also great for sifting dry ingredients!Calories per Ingredient
Resources & References
You may also like


Hey there! I’m just someone who seriously loves good food and believes that cooking doesn’t have to be complicated to be amazing. Whether it’s a quick weeknight dinner or a cozy weekend meal, I’m all about sharing easy, tasty recipes that actually work.


