
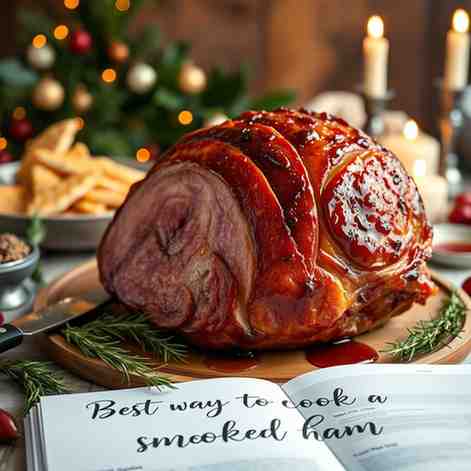
Best Way to Cook a Smoked Ham - Holiday Recipe
Best Way to Cook a Smoked Ham - Holiday Recipe

- Serves: 12 People
- Prepare Time: 60 minutes
- Cooking Time: 3 hours 30
- Calories: -
- Difficulty: Easy
Ever wondered if you could create a show-stopping, home-cured and smoked ham right in your own kitchen? Forget store-bought! This isn't just another smoked ham recipe; it's your definitive guide to crafting a holiday centerpiece that will have everyone asking for seconds. We're talking about taking a fresh pork leg and transforming it into a tender, flavorful smoked cured ham through a meticulous, yet incredibly rewarding, multi-day process.
From the crucial salt curing that infuses deep flavor and perfects texture, to the slow kiss of wood smoke, and finally, a glistening, sweet-savory glaze, we'll walk you through every step. This journey isn't just about the best way to cook a smoked ham; it's about the satisfaction of creating something truly special from scratch. So, roll up your sleeves – your holiday table is about to get a serious upgrade with this incredible whole ham recipe!
Ingredients
Directions
- Part 1: Curing the Ham (Days 1–5)
- Prep the Pork Leg: Start by carefully deboning your pork leg if it's bone-in (your butcher can often do this for you). Trim off any excessive fat or sinew, but leave a good fat cap for flavor and moisture. If you removed the bone, tie the ham securely with butcher’s twine to help it hold its shape during curing and cooking.
- Make the Curing Mixture: In a medium bowl, combine the sea salt, granulated sugar, and Prague #1 curing salt. Mix well until everything is evenly distributed.
- Apply the Cure: Generously rub the curing mixture all over the entire surface of the pork leg. Make sure every crevice and surface is covered. Don't be shy – this is where the magic begins!
- Refrigerate and Cure: Place the cured pork leg into a large, non-reactive container or a heavy-duty brining bag. Seal it tightly and place it in the coldest part of your refrigerator for 5 to 7 days.
- Maintain the Cure: Each day, flip the ham over in its container. You’ll notice a brine forming – this is normal! This liquid helps the curing process penetrate evenly. After 5-7 days, the ham should feel firm to the touch and have a slightly darker color.
- Rinse and Dry: Once cured, remove the ham from the container, discard the brine, and rinse the ham thoroughly under cold running water to remove any excess curing mixture. Pat it completely dry with paper towels. You can let it air-dry in the fridge for a few hours or overnight for an even better smoke ring.
- Part 2: Smoking the Ham (Day 6)
- Prepare Your Smoker: Fill your smoker with your chosen wood chips or chunks. Oak and applewood are fantastic choices for ham, offering a balanced, sweet, and robust smoke flavor. Preheat your smoker to a steady 250°F (120°C).
- Smoke the Ham: Place the cured ham directly onto the smoker grates. Smoke for 2 to 3 hours. The goal here is to infuse that beautiful smoky flavor and bring the internal temperature up to 135°F (57°C). Use a reliable meat thermometer to check.
- Rest and Cool: Once it reaches 135°F, remove the ham from the smoker. Let it rest at room temperature for about 30 minutes, then transfer it to the refrigerator to cool completely overnight. This resting period helps the smoke flavor settle and prepares it for the final cooking stage.
- Part 3: Glazing and Final Cooking (Day 7)
- Preheat Oven: The next day, preheat your oven to 300°F (150°C).
- Score the Fat Cap: Place the cooled, smoked ham on a roasting rack in a shallow roasting pan. Using a sharp knife, score the fat cap in a diamond pattern. Be careful not to cut too deeply into the meat itself. This scoring helps the glaze penetrate and renders the fat beautifully.
- Prepare the Glaze: In a small bowl, whisk together the Dijon mustard, brown sugar, honey, garlic powder, and optional ground black pepper until smooth.
- Glaze and Roast: Brush a generous layer of the glaze all over the scored ham. Place the ham in the preheated oven. Roast for 45 minutes, brushing with more glaze every 15 minutes, until the ham is golden brown, sticky, and the internal temperature reaches 145°F (63°C). The glaze should be beautifully caramelized.
- Final Rest: Remove the ham from the oven and tent it loosely with foil. Let it rest for at least 20 minutes before slicing and serving. This allows the juices to redistribute, ensuring a tender, moist ham.
You may also like


Hey there! I’m just someone who seriously loves good food and believes that cooking doesn’t have to be complicated to be amazing. Whether it’s a quick weeknight dinner or a cozy weekend meal, I’m all about sharing easy, tasty recipes that actually work.


