
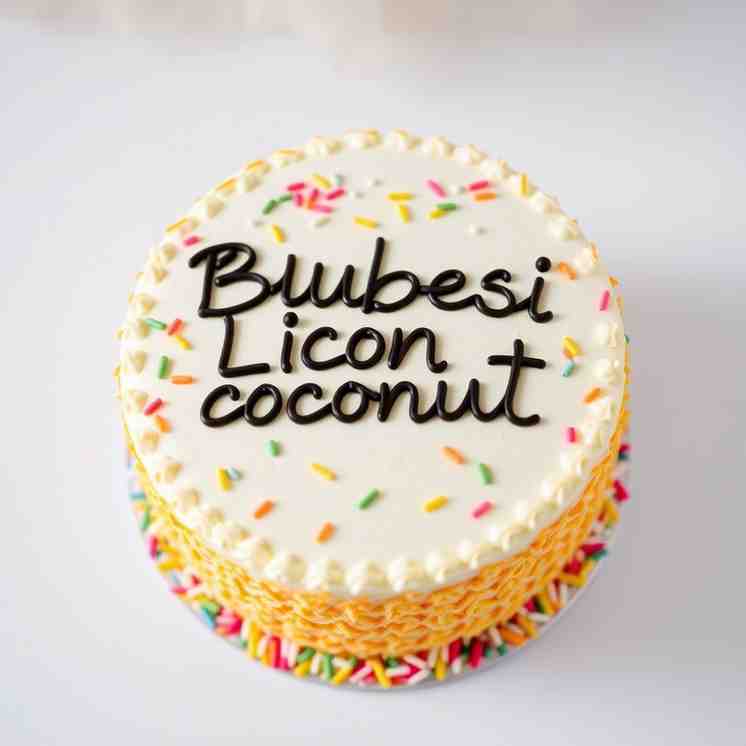
Bhubesi Lion Coconut Cake - Your 1st Birthday Treat
Bhubesi Lion Coconut Cake - Your 1st Birthday Treat

- Serves: 12 People
- Prepare Time: 45 minutes
- Cooking Time: 30-35 minut
- Calories: -
- Difficulty: Medium
Planning a first birthday or a jungle-themed bash? Look no further! This Bhubesi Sweet (Lion Coconut Birthday Cake) is your secret weapon for creating an unforgettable centerpiece. Imagine a moist, tender coconut birthday cake layered with fluffy coconut buttercream, all artfully decorated to resemble a friendly lion's face. It's not just a cake; it's a roar-some celebration sweet that’s perfect for busy parents, beginner bakers, and anyone looking for themed birthday cakes that truly impress. We’ll guide you through making this spectacular birthday celebration cake from scratch, ensuring you have all the ingredients to make cake and the know-how to bring this adorable lion to life, making it one of the best children's birthday cakes you'll ever bake! Get ready to discover how to make this delightful Bhubesi Sweet and explore fun 1st birthday foods ideas centered around this showstopper.
Here’s everything you’ll need and how to make your magnificent Bhubesi Lion Coconut Birthday Cake!
Ingredients
Directions
- Prep for Baking
- Preheat your oven to 350°F (175°C).
- Grease and flour your two 8-inch round cake pans. Line the bottoms with parchment paper rounds and spray the parchment as well.
- Ensure all your cold ingredients (butter, eggs, coconut milk) are at room temperature. This helps everything mix smoothly for a consistent batter.
- Mix Dry Ingredients
- In a large bowl, whisk together the all-purpose flour, baking powder, baking soda, salt, and unsweetened shredded coconut. Set aside.
- Cream Butter & Sugar, Build Batter
- In the bowl of your stand mixer (or a large bowl with a hand mixer), cream together the softened unsalted butter, neutral oil, and granulated sugar on medium-high speed until light and fluffy, about 3-5 minutes.
- Add the eggs one at a time, beating well after each addition until fully incorporated. Scrape down the sides of the bowl as needed. Stir in the vanilla extract.
- With the mixer on low speed, gradually add about one-third of the dry ingredient mixture, mixing until just combined.
- Pour in half of the coconut milk, mixing until just combined.
- Repeat with another third of the dry ingredients, then the remaining coconut milk, and finally the last of the dry ingredients. Mix until just combined. Be careful not to overmix; a few small lumps are okay. The batter should be thick and creamy.
- Bake the Cake Layers
- Divide the batter evenly between the two prepared 8-inch pans. The pans should be about two-thirds full.
- Bake for 30-35 minutes, or until a wooden skewer or toothpick inserted into the center of the cakes comes out with only moist crumbs, not wet batter. The cake should also spring back lightly when gently pressed.
- If the tops start browning too quickly, you can loosely tent them with aluminum foil.
- Cool & Level
- Let the cakes cool in their pans on a wire rack for 10-15 minutes.
- Invert the cakes onto the wire rack, remove the pans and parchment paper, and let them cool completely. This is crucial! Warm cakes will melt your frosting.
- Once completely cool, use a serrated knife to carefully level the tops of the cakes if they have domed. This creates flat surfaces for easy stacking and prevents crumbly frosting.
- Make Coconut Buttercream
- In the clean bowl of your stand mixer, beat the softened unsalted butter on medium-high speed for 3-5 minutes until very light and fluffy.
- With the mixer on low, gradually add the sifted powdered sugar, about 1-2 cups at a time, mixing until fully incorporated before adding more.
- Once all the sugar is added, slowly pour in the coconut milk (or cream), vanilla extract, coconut extract (if using), and pinch of salt.
- Increase the speed to medium-high and beat for another 3-5 minutes until the buttercream is light, airy, and spreadable.
- Texture Checkpoints:
- For the crumb coat, you want it smooth and spreadable. If it's too thick, add a tiny bit more coconut milk. If too thin, add more powdered sugar.
- For piping the mane, you want it slightly stiffer to hold its shape. If needed, chill a small portion briefly or add a touch more powdered sugar.
- Assemble & Crumb Coat
- Place one leveled cake layer on your serving plate or cake stand.
- Spread about ¾ cup of coconut buttercream evenly over the top.
- Carefully place the second cake layer on top.
- Apply a thin layer of buttercream all over the top and sides of the entire cake. This is your "crumb coat," which traps any loose crumbs.
- Chill the cake in the refrigerator for at least 20-30 minutes, or until the crumb coat is firm to the touch. This step is a game-changer for a smooth final finish!
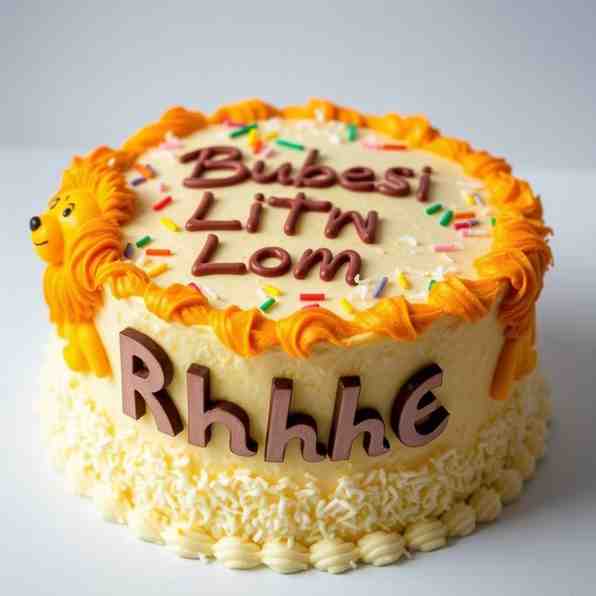
- Decorate the Lion (Bhubesi Finish)
- Base Coat: Take about ⅔ of the remaining buttercream. You can leave it white or add a tiny drop of yellow food coloring for a light lion color. Frost the entire cake (top and sides) with a smooth, even layer.
- Mark the Face: Use a small round cookie cutter or a glass (about 3-4 inches in diameter) to gently press a circle in the center of the cake top. This will be your guide for the lion's face.
- Pipe the Mane: Fill your piping bag fitted with the star tip with the remaining plain/lightly colored buttercream. Starting from the edge of the marked face circle, pipe short bursts of stars or rosettes outwards to create the lion's mane, covering the sides and around the top edge. Be generous!
- Facial Features:
- Take a small portion (about ¼ cup) of the remaining buttercream and mix in 1-2 teaspoons of cocoa powder to create a light brown color.
- Use a small spoon or a piping bag with a tiny round tip (or just snip the corner of a Ziploc bag) to pipe a triangle nose and a mouth.
- Place chocolate chips, mini chocolate chips, or soft fruit pieces for the eyes. For toddlers, ensure decorations are soft and small to avoid choking hazards.
- Optional Toasted Coconut Mane: If using, gently press the toasted shredded coconut into the piped mane for extra texture and a golden, fluffy look.
- Kid-Safe Decoration Note: For 1st birthdays, always prioritize safety. Avoid hard candies, whole nuts, or large, round pieces that could be choking hazards. Soft fruits or piped frosting features are best.
Bhubesi Lion Coconut Cake - Your 1st Birthday Treat
- Serves: 12 People
- Prepare Time: 45 minutes
- Cooking Time: 30-35 minut
- Calories: -
- Difficulty: Medium
Planning a first birthday or a jungle-themed bash? Look no further! This Bhubesi Sweet (Lion Coconut Birthday Cake) is your secret weapon for creating an unforgettable centerpiece. Imagine a moist, tender coconut birthday cake layered with fluffy coconut buttercream, all artfully decorated to resemble a friendly lion's face. It's not just a cake; it's a roar-some celebration sweet that’s perfect for busy parents, beginner bakers, and anyone looking for themed birthday cakes that truly impress. We’ll guide you through making this spectacular birthday celebration cake from scratch, ensuring you have all the ingredients to make cake and the know-how to bring this adorable lion to life, making it one of the best children's birthday cakes you'll ever bake! Get ready to discover how to make this delightful Bhubesi Sweet and explore fun 1st birthday foods ideas centered around this showstopper.
Here’s everything you’ll need and how to make your magnificent Bhubesi Lion Coconut Birthday Cake!
Ingredients
Directions
- Prep for Baking
- Preheat your oven to 350°F (175°C).
- Grease and flour your two 8-inch round cake pans. Line the bottoms with parchment paper rounds and spray the parchment as well.
- Ensure all your cold ingredients (butter, eggs, coconut milk) are at room temperature. This helps everything mix smoothly for a consistent batter.
- Mix Dry Ingredients
- In a large bowl, whisk together the all-purpose flour, baking powder, baking soda, salt, and unsweetened shredded coconut. Set aside.
- Cream Butter & Sugar, Build Batter
- In the bowl of your stand mixer (or a large bowl with a hand mixer), cream together the softened unsalted butter, neutral oil, and granulated sugar on medium-high speed until light and fluffy, about 3-5 minutes.
- Add the eggs one at a time, beating well after each addition until fully incorporated. Scrape down the sides of the bowl as needed. Stir in the vanilla extract.
- With the mixer on low speed, gradually add about one-third of the dry ingredient mixture, mixing until just combined.
- Pour in half of the coconut milk, mixing until just combined.
- Repeat with another third of the dry ingredients, then the remaining coconut milk, and finally the last of the dry ingredients. Mix until just combined. Be careful not to overmix; a few small lumps are okay. The batter should be thick and creamy.
- Bake the Cake Layers
- Divide the batter evenly between the two prepared 8-inch pans. The pans should be about two-thirds full.
- Bake for 30-35 minutes, or until a wooden skewer or toothpick inserted into the center of the cakes comes out with only moist crumbs, not wet batter. The cake should also spring back lightly when gently pressed.
- If the tops start browning too quickly, you can loosely tent them with aluminum foil.
- Cool & Level
- Let the cakes cool in their pans on a wire rack for 10-15 minutes.
- Invert the cakes onto the wire rack, remove the pans and parchment paper, and let them cool completely. This is crucial! Warm cakes will melt your frosting.
- Once completely cool, use a serrated knife to carefully level the tops of the cakes if they have domed. This creates flat surfaces for easy stacking and prevents crumbly frosting.
- Make Coconut Buttercream
- In the clean bowl of your stand mixer, beat the softened unsalted butter on medium-high speed for 3-5 minutes until very light and fluffy.
- With the mixer on low, gradually add the sifted powdered sugar, about 1-2 cups at a time, mixing until fully incorporated before adding more.
- Once all the sugar is added, slowly pour in the coconut milk (or cream), vanilla extract, coconut extract (if using), and pinch of salt.
- Increase the speed to medium-high and beat for another 3-5 minutes until the buttercream is light, airy, and spreadable.
- Texture Checkpoints:
- For the crumb coat, you want it smooth and spreadable. If it's too thick, add a tiny bit more coconut milk. If too thin, add more powdered sugar.
- For piping the mane, you want it slightly stiffer to hold its shape. If needed, chill a small portion briefly or add a touch more powdered sugar.
- Assemble & Crumb Coat
- Place one leveled cake layer on your serving plate or cake stand.
- Spread about ¾ cup of coconut buttercream evenly over the top.
- Carefully place the second cake layer on top.
- Apply a thin layer of buttercream all over the top and sides of the entire cake. This is your "crumb coat," which traps any loose crumbs.
- Chill the cake in the refrigerator for at least 20-30 minutes, or until the crumb coat is firm to the touch. This step is a game-changer for a smooth final finish!
- Decorate the Lion (Bhubesi Finish)
- Base Coat: Take about ⅔ of the remaining buttercream. You can leave it white or add a tiny drop of yellow food coloring for a light lion color. Frost the entire cake (top and sides) with a smooth, even layer.
- Mark the Face: Use a small round cookie cutter or a glass (about 3-4 inches in diameter) to gently press a circle in the center of the cake top. This will be your guide for the lion's face.
- Pipe the Mane: Fill your piping bag fitted with the star tip with the remaining plain/lightly colored buttercream. Starting from the edge of the marked face circle, pipe short bursts of stars or rosettes outwards to create the lion's mane, covering the sides and around the top edge. Be generous!
- Facial Features:
- Take a small portion (about ¼ cup) of the remaining buttercream and mix in 1-2 teaspoons of cocoa powder to create a light brown color.
- Use a small spoon or a piping bag with a tiny round tip (or just snip the corner of a Ziploc bag) to pipe a triangle nose and a mouth.
- Place chocolate chips, mini chocolate chips, or soft fruit pieces for the eyes. For toddlers, ensure decorations are soft and small to avoid choking hazards.
- Optional Toasted Coconut Mane: If using, gently press the toasted shredded coconut into the piped mane for extra texture and a golden, fluffy look.
- Kid-Safe Decoration Note: For 1st birthdays, always prioritize safety. Avoid hard candies, whole nuts, or large, round pieces that could be choking hazards. Soft fruits or piped frosting features are best.
You may also like


Hey there! I’m just someone who seriously loves good food and believes that cooking doesn’t have to be complicated to be amazing. Whether it’s a quick weeknight dinner or a cozy weekend meal, I’m all about sharing easy, tasty recipes that actually work.


