
Bulgarian Turshia Pickled Vegetables Recipe
Bulgarian Turshia Pickled Vegetables Recipe

- Serves: 16 People
- Prepare Time: 1 hour
- Cooking Time: 30 minutes
- Calories: -
- Difficulty: Medium
Hey there, fellow food adventurers! Are you ready to dive into the vibrant world of Balkan cuisine and discover the best pickled vegetables you've ever tasted? We're talking about Bulgarian Turshia, a mouth-watering pickled vegetable mix that's a staple in homes across Bulgaria and the wider Balkan region. Forget those bland, store-bought pickles; this isn't just a recipe, it's a journey into a rich culinary tradition that brings crunch, tang, and incredible flavor to any meal.
Traditionally, families would gather in the fall to prepare huge batches of turshia, preserving the garden's bounty to enjoy throughout the long winter months. Picture crisp pickled cauliflower and carrots, vibrant pickled red peppers, and even tangy green tomatoes, all swimming in a perfectly balanced brine. It’s often served alongside hearty bean stews, grilled meats, or as a delightful snack with a shot of rakia. While some regions might use large community barrels for brine-fermented "barrel turshiya," our recipe focuses on a home-friendly, shelf-stable "jarred turshiya" that's perfect for your pantry. Think of it like a punchier, more diverse cousin to your everyday American dill pickle – once you try it, you'll immediately get it.
Now, you might have stumbled upon various pickled peppers recipe or `recipe pickled cauliflower` online that suggest quick fixes or questionable methods. But here, we're giving you the definitive, single, canonical approach for making authentic Bulgarian Turshia, combining grandma's traditional vegetable mix with modern, US-friendly canning safety guidelines. That means no "just flip the hot jars and hope" tricks, and definitely no aspirin tablets! We're using a vinegar-forward brine and the reliable boiling water bath canning method to ensure your pickled vegetables in a jar are not only delicious but also perfectly safe and shelf-stable. Get ready to master the art of making the ultimate jar of pickled vegetables!
Ingredients
Directions
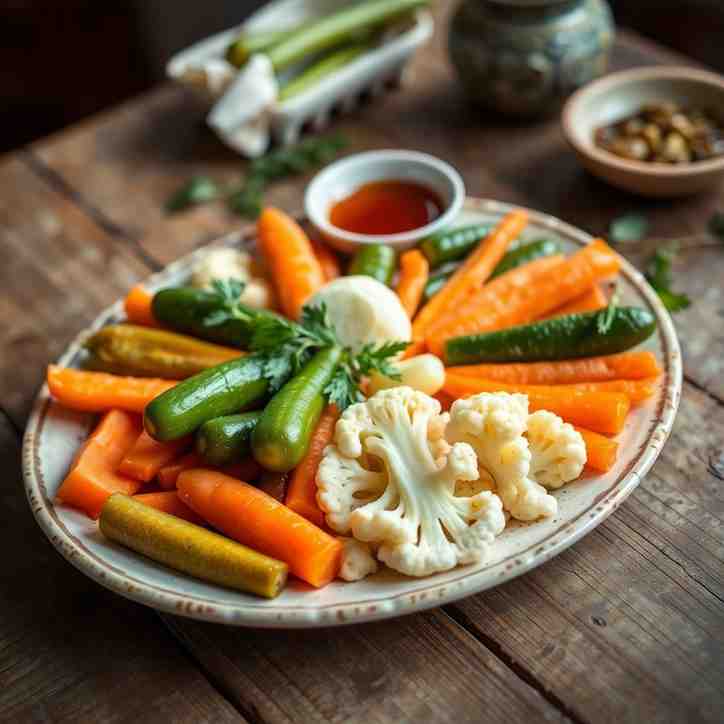
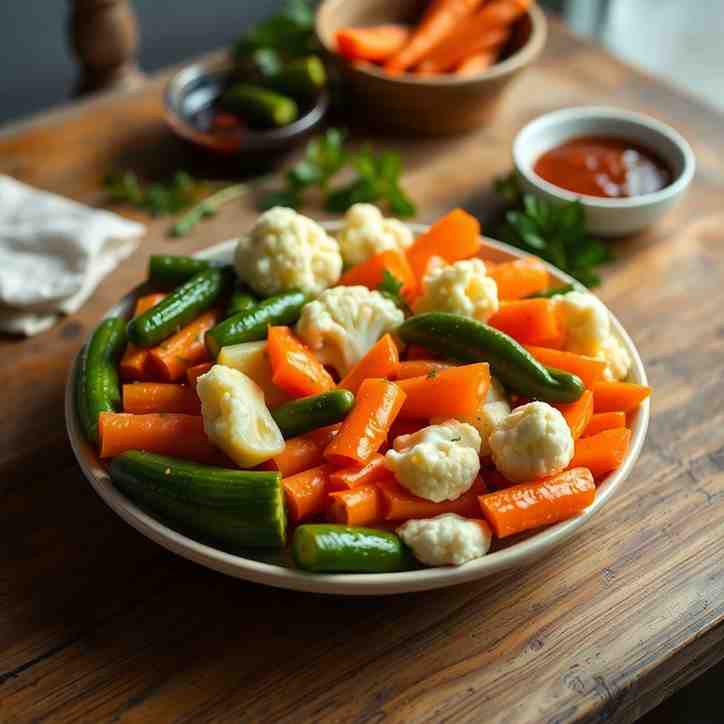
- Prep and Sort the VegetablesBegin by thoroughly washing all your vegetables under cool running water. Carefully inspect them for any blemishes or soft spots and discard as needed. Cut the cauliflower into sturdy florets, the carrots into sticks or thick coins (about ¼-inch thick), and the red bell peppers into generous chunks. If using green tomatoes, cut them into wedges. The key here is bite-size pieces that are robust enough to withstand the pickling process without turning mushy. A good tip is to group your vegetables by hardness – cauliflower and carrots are tougher, while peppers and green tomatoes are softer. This will help you layer them intelligently in the jars later.
- Sterilize Jars & Set Up Your CannerWash your canning jars, lids, and bands in hot, soapy water. While bands don't need to be sterilized, lids and jars do. Heat your jars in hot (not boiling) water in your canner, or run them through a dishwasher "sanitize" cycle. This keeps them hot, which is crucial for preventing thermal shock when you add hot brine. Place your canner rack in the large stockpot or dedicated boiling-water-bath canner, and fill it with water. Bring the canner water up to a simmer (just below a boil) while you prepare the brine; this ensures it’s ready when your filled jars are loaded. Always check your jars for any chips or cracks, especially around the rim, as these can prevent a proper seal.
- Make the Vinegar BrineIn a large stainless steel pot, combine the 5% acidity vinegar, water, pickling salt, sugar, whole black peppercorns, bay leaves, and optional mustard or dill seeds. Bring this mixture to a full rolling boil over medium-high heat, stirring occasionally to ensure the salt and sugar fully dissolve. Carefully taste a small amount of the brine (it will be hot!) to check for a balanced sweet-sour flavor. It's important to remember that for shelf-stable jars, you must not reduce the vinegar below a 50/50 vinegar-to-water ratio. This precise acidity is vital for food safety.
- Pack the JarsCarefully remove your hot, sterilized jars from the canner or dishwasher. Begin packing the mixed vegetables into the hot jars. It’s a good idea to layer the harder vegetables (like cauliflower and carrots) at the bottom, and the softer ones (peppers, green tomatoes) towards the top. Tuck in the peeled garlic cloves, fresh celery leaves, and any optional hot peppers into the sides of the jar. Aim for a tight pack, but don't crush the vegetables; they need a little room for the brine to circulate and prevent mushiness.
- Add Hot Brine & Remove Air BubblesUsing a ladle and a canning funnel, carefully pour the boiling hot brine over the packed vegetables in each jar. Ensure the brine completely covers the vegetables, leaving a ½-inch headspace from the rim of the jar. This headspace is critical for a proper seal. Next, run a bubble remover tool or a non-metal spatula around the inside of each jar, gently pressing down on the vegetables to release any trapped air bubbles. If the brine level drops below ½-inch headspace after removing bubbles, add a little more hot brine to restore it. Wipe the rims of the jars thoroughly with a clean, damp kitchen towel to remove any brine or food particles. Center the lids on the jars, then screw on the bands until they are "fingertip tight" – snug but not overly forceful.Boiling-Water-Bath Process (For Shelf-Stable Turshiya)Carefully place the filled, lidded jars onto the rack in your canner. Ensure the jars are not touching each other. Add more hot water to the canner if needed, making sure the water covers the jar lids by at least 1–2 inches. Place the lid on the canner and bring the water to a full, rolling boil. Once it reaches a full boil, start your processing timer:
- For pint jars: Process for 10 minutes at a full boil.
- For quart jars: Process for 15 minutes at a full boil.
- Check Seals, Label & CureAfter 12–24 hours, check the seals on your jars. A properly sealed lid will be concave (curved inwards) and will not flex when you press on the center. If a lid did not seal (it's convex or pops when pressed), that jar is not shelf-stable. Store any unsealed jars in the refrigerator and consume them within a few weeks. For sealed jars, remove the bands (this prevents rust and allows for easier re-checking of seals later), wipe the jars clean, and label them with the date. Store your turshiya in a cool, dark place. The flavor of Bulgarian Turshia actually improves significantly after at least 2–4 weeks of curing, allowing the vegetables to fully absorb the delicious brine.
Bulgarian Turshia Pickled Vegetables Recipe
- Serves: 16 People
- Prepare Time: 1 hour
- Cooking Time: 30 minutes
- Calories: -
- Difficulty: Medium
Hey there, fellow food adventurers! Are you ready to dive into the vibrant world of Balkan cuisine and discover the best pickled vegetables you've ever tasted? We're talking about Bulgarian Turshia, a mouth-watering pickled vegetable mix that's a staple in homes across Bulgaria and the wider Balkan region. Forget those bland, store-bought pickles; this isn't just a recipe, it's a journey into a rich culinary tradition that brings crunch, tang, and incredible flavor to any meal.
Traditionally, families would gather in the fall to prepare huge batches of turshia, preserving the garden's bounty to enjoy throughout the long winter months. Picture crisp pickled cauliflower and carrots, vibrant pickled red peppers, and even tangy green tomatoes, all swimming in a perfectly balanced brine. It’s often served alongside hearty bean stews, grilled meats, or as a delightful snack with a shot of rakia. While some regions might use large community barrels for brine-fermented "barrel turshiya," our recipe focuses on a home-friendly, shelf-stable "jarred turshiya" that's perfect for your pantry. Think of it like a punchier, more diverse cousin to your everyday American dill pickle – once you try it, you'll immediately get it.
Now, you might have stumbled upon various pickled peppers recipe or `recipe pickled cauliflower` online that suggest quick fixes or questionable methods. But here, we're giving you the definitive, single, canonical approach for making authentic Bulgarian Turshia, combining grandma's traditional vegetable mix with modern, US-friendly canning safety guidelines. That means no "just flip the hot jars and hope" tricks, and definitely no aspirin tablets! We're using a vinegar-forward brine and the reliable boiling water bath canning method to ensure your pickled vegetables in a jar are not only delicious but also perfectly safe and shelf-stable. Get ready to master the art of making the ultimate jar of pickled vegetables!
Ingredients
Directions
- Prep and Sort the VegetablesBegin by thoroughly washing all your vegetables under cool running water. Carefully inspect them for any blemishes or soft spots and discard as needed. Cut the cauliflower into sturdy florets, the carrots into sticks or thick coins (about ¼-inch thick), and the red bell peppers into generous chunks. If using green tomatoes, cut them into wedges. The key here is bite-size pieces that are robust enough to withstand the pickling process without turning mushy. A good tip is to group your vegetables by hardness – cauliflower and carrots are tougher, while peppers and green tomatoes are softer. This will help you layer them intelligently in the jars later.
- Sterilize Jars & Set Up Your CannerWash your canning jars, lids, and bands in hot, soapy water. While bands don't need to be sterilized, lids and jars do. Heat your jars in hot (not boiling) water in your canner, or run them through a dishwasher "sanitize" cycle. This keeps them hot, which is crucial for preventing thermal shock when you add hot brine. Place your canner rack in the large stockpot or dedicated boiling-water-bath canner, and fill it with water. Bring the canner water up to a simmer (just below a boil) while you prepare the brine; this ensures it’s ready when your filled jars are loaded. Always check your jars for any chips or cracks, especially around the rim, as these can prevent a proper seal.
- Make the Vinegar BrineIn a large stainless steel pot, combine the 5% acidity vinegar, water, pickling salt, sugar, whole black peppercorns, bay leaves, and optional mustard or dill seeds. Bring this mixture to a full rolling boil over medium-high heat, stirring occasionally to ensure the salt and sugar fully dissolve. Carefully taste a small amount of the brine (it will be hot!) to check for a balanced sweet-sour flavor. It's important to remember that for shelf-stable jars, you must not reduce the vinegar below a 50/50 vinegar-to-water ratio. This precise acidity is vital for food safety.
- Pack the JarsCarefully remove your hot, sterilized jars from the canner or dishwasher. Begin packing the mixed vegetables into the hot jars. It’s a good idea to layer the harder vegetables (like cauliflower and carrots) at the bottom, and the softer ones (peppers, green tomatoes) towards the top. Tuck in the peeled garlic cloves, fresh celery leaves, and any optional hot peppers into the sides of the jar. Aim for a tight pack, but don't crush the vegetables; they need a little room for the brine to circulate and prevent mushiness.
- Add Hot Brine & Remove Air BubblesUsing a ladle and a canning funnel, carefully pour the boiling hot brine over the packed vegetables in each jar. Ensure the brine completely covers the vegetables, leaving a ½-inch headspace from the rim of the jar. This headspace is critical for a proper seal. Next, run a bubble remover tool or a non-metal spatula around the inside of each jar, gently pressing down on the vegetables to release any trapped air bubbles. If the brine level drops below ½-inch headspace after removing bubbles, add a little more hot brine to restore it. Wipe the rims of the jars thoroughly with a clean, damp kitchen towel to remove any brine or food particles. Center the lids on the jars, then screw on the bands until they are "fingertip tight" – snug but not overly forceful.Boiling-Water-Bath Process (For Shelf-Stable Turshiya)Carefully place the filled, lidded jars onto the rack in your canner. Ensure the jars are not touching each other. Add more hot water to the canner if needed, making sure the water covers the jar lids by at least 1–2 inches. Place the lid on the canner and bring the water to a full, rolling boil. Once it reaches a full boil, start your processing timer:
- For pint jars: Process for 10 minutes at a full boil.
- For quart jars: Process for 15 minutes at a full boil.
- Check Seals, Label & CureAfter 12–24 hours, check the seals on your jars. A properly sealed lid will be concave (curved inwards) and will not flex when you press on the center. If a lid did not seal (it's convex or pops when pressed), that jar is not shelf-stable. Store any unsealed jars in the refrigerator and consume them within a few weeks. For sealed jars, remove the bands (this prevents rust and allows for easier re-checking of seals later), wipe the jars clean, and label them with the date. Store your turshiya in a cool, dark place. The flavor of Bulgarian Turshia actually improves significantly after at least 2–4 weeks of curing, allowing the vegetables to fully absorb the delicious brine.
The following nutritional values are per serving (one piece of cake) Calories ~20-30 kcal Carbohydrates ~5-7g Protein ~0.5-1g Fat ~0g (negligible) Sodium ~300-400mg Making Bulgarian Turshiya the safe, shelf-stable way involves a few key pieces of equipment that can really streamline your process. While you can often improvise, these tools are designed to make canning easier, safer, and faster. Problem: Canning can feel like a daunting task, especially when it comes to safely processing jars in boiling water. Juggling hot jars in a regular stockpot can be tricky and even risky. Problem: Hot, wet canning jars are notoriously slippery and dangerous to handle directly after processing. Problem: Pouring hot brine into jars with relatively narrow openings can be messy, leading to spills on the jar rims and countertop. Problem: After packing your jars with vegetables and brine, air bubbles can get trapped, especially around chunky ingredients. Click any ingredient for detailed nutritional information:Recipe Nutritional Values
Additional Information
Recipe Success Tips
Ingredient Substitutions & Variations
Cultural Variations
Make-Ahead & Storage Instructions
Frequently Asked Questions
Recommended Kitchen Tools
Boiling-Water-Bath Canner with Rack
Agitate: Without the right setup, you might struggle to keep jars submerged, risk them tipping over, or even burn yourself trying to retrieve them. This can make the whole process slow, stressful, and less safe.
Solution: A dedicated boiling-water-bath canner comes with a fitted rack that keeps your jars upright, prevents them from touching the bottom of the pot, and allows for easy insertion and removal. It ensures even heat distribution and makes the processing step much more efficient and worry-free.Jar Lifter
Agitate: Trying to use regular tongs or oven mitts often results in precarious grips, potential slips, and the risk of dropping a hot jar, leading to spills, breakage, or serious burns. This slows down your workflow and increases anxiety.
Solution: A jar lifter is specifically designed with rubber-coated grips that securely grasp jars of all sizes, allowing you to confidently and safely move them in and out of boiling water. It makes transferring jars to your cooling spot quick and minimizes the chance of accidents.Canning Funnel
Agitate: A sticky jar rim can interfere with the lid's seal, meaning your hard work might go to waste. Plus, cleaning up spills adds extra time and effort to your canning day.
Solution: A wide-mouth canning funnel sits perfectly on top of your jar, guiding the hot brine (or even vegetables) precisely where it needs to go. This keeps your jar rims clean, prevents waste, and makes the filling process much faster and tidier.Bubble Remover Tool (or Non-Metal Spatula)
Agitate: If these air bubbles aren't removed, they can create false headspace, potentially leading to a poor seal or even food spoilage down the line. Re-processing jars because of air bubbles is a frustrating time sink.
Solution: A simple bubble remover tool (or any non-metal spatula) allows you to easily run it around the inside of the jar, releasing trapped air. This ensures accurate headspace, a more reliable seal, and ultimately saves you the headache of dealing with unsealed jars later.Calories per Ingredient
Resources & References
You may also like


Hey there! I’m just someone who seriously loves good food and believes that cooking doesn’t have to be complicated to be amazing. Whether it’s a quick weeknight dinner or a cozy weekend meal, I’m all about sharing easy, tasty recipes that actually work.


