
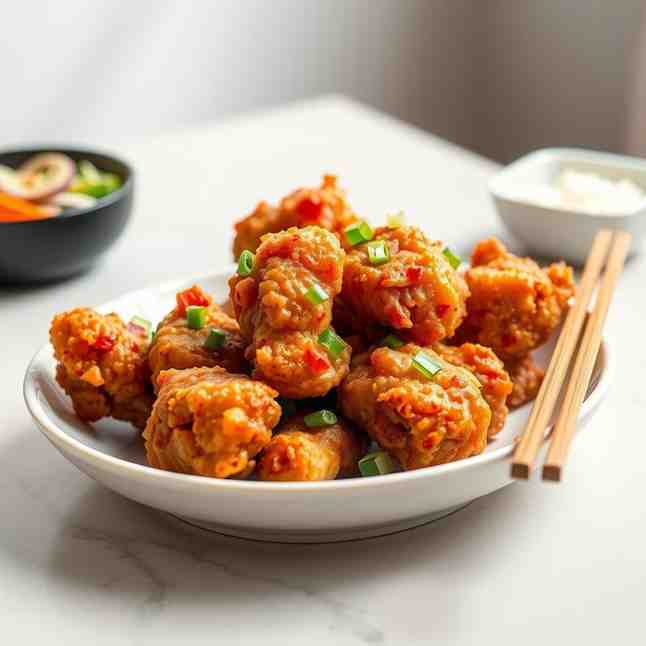
Crispy Karaage - Japanese Food Recipes Chicken You'll Love
Crispy Karaage - Japanese Food Recipes Chicken You'll Love

- Serves: 4 People
- Prepare Time: 20 minutes
- Cooking Time: 15-20 minut
- Calories: -
- Difficulty: Medium
Craving that unbelievably crunchy outside and super juicy inside bite? You’ve landed in the right spot! This recipe for Crispy Japanese Karaage is about to become your new favorite among all the `japanese food recipes chicken` out there. Forget dry, bland chicken—we're talking about perfectly marinated, bite-sized pieces of `fried chicken` that deliver an explosion of flavor and texture. Unlike traditional American `fried chicken`, Karaage (pronounced kah-rah-ah-geh) boasts a lighter, incredibly crispy coating and a deeply savory marinade that infuses every morsel. It’s the ultimate `asian fried chicken` experience, and we're going to show you exactly how to make it perfectly at home. Get ready for some seriously delicious eats!
At its heart, Karaage is simply Japanese fried chicken. But don't let the "simple" part fool you—it's an art form! It’s typically made with bite-sized pieces of chicken (often thigh meat) that are marinated in a savory blend, lightly coated in starch, and then deep-fried until gloriously golden and crisp. While both are Japanese fried foods, Karaage is different from tempura. Tempura uses a very light, airy batter that's more like a delicate fritter, whereas Karaage focuses on a crisp, thin, almost "shattered" coating that really locks in the chicken's juices.
Getting that legendary Karaage crispiness isn't hard, but it does require a few key steps. Follow this mini checklist for success every time:
Dry Chicken Well: Excess moisture is the enemy of crispiness. Pat your chicken super dry before marinating.
Use the Right Starch: Potato starch is king for Karaage. It creates an incredibly light and crisp coating.
Don’t Overload the Oil: Frying too many pieces at once drops the oil temperature, leading to greasy, less crispy chicken. Give them space!
Fry Twice (and Rest Between): This is the secret weapon! A lower-temperature first fry cooks the chicken through, and a higher-temperature second fry creates that ultimate crunch. Resting in between helps the chicken relax and redistributes heat.
Drain on a Rack, Not Just Paper Towels: Draining on a wire rack allows air to circulate all around the chicken, preventing the bottom from getting soggy.
Ingredients
Directions
- Cut the chicken
- Cut the `boneless skin on chicken thighs` into bite-sized pieces, roughly 1.5 to 2 inches (4-5 cm) in size. Aim for pieces that are approximately 1.5 to 2 ounces (40-55g) each. This ensures even cooking and perfect `fried chicken pieces`.
- Marinate
- In a medium bowl, combine the soy sauce, sake, mirin, grated ginger, grated garlic, and sugar (if using). Add the cut chicken pieces, tossing to coat thoroughly.
- Marinate for at least 30 minutes at room temperature, or ideally 1-2 hours in the refrigerator. Marinating for too long (e.g., overnight) can make the chicken too salty or change its texture, so stick to the recommended time for best results. This `asian marinade for chicken` is key to flavor!
- Coat + set the coating
- Once marinated, remove the chicken from the fridge. In a shallow dish or a large zip-top bag, combine the potato starch and flour (if using).
- Working in batches, add the marinated chicken pieces to the starch mixture. Toss thoroughly to coat each piece evenly. Shake off any excess starch—you want a thin, even coating, not a thick paste.
- Place the coated chicken pieces on a wire rack set over a sheet pan. Let them rest for 5-10 minutes. This brief rest allows the starch to hydrate and adhere to the chicken, preventing the `fried chicken flour` from falling off during frying.
- First fry (lower temp)
- Pour the neutral oil into your heavy pot or Dutch oven, filling it about 2-3 inches deep. Heat the oil over medium-high heat to 325°F (160°C).
- Carefully add 4-6 pieces of chicken to the hot oil, ensuring you don't overcrowd the pot. The oil temperature will drop slightly.
- Fry for 2-3 minutes, or until the chicken is lightly golden and cooked through. The internal temperature should reach 165°F (74°C). The `crispy popcorn chicken` will look pale but cooked.
- Remove the chicken from the oil and place it back on the wire rack over the sheet pan. Repeat with the remaining chicken, frying in batches.
- Rest
- Allow all the first-fried chicken pieces to rest on the wire rack for at least 5-10 minutes. This resting period is crucial! It allows the internal temperature to equalize, makes the chicken incredibly juicy, and prepares it for the second fry, ensuring maximum crispiness.
- Second fry (higher temp)
- Increase the oil temperature to 375°F (190°C). This higher temperature is for achieving that ultimate `crunchy crispy chicken` exterior.
- Working in the same small batches, return the rested chicken pieces to the hot oil.
- Fry for another 1-2 minutes, or until the chicken is a deep golden brown and exceptionally crispy. You'll see the coating become more pronounced and hear a satisfying sizzle.
- Drain + season + serve
- Remove the perfectly `best fried chicken` from the oil and immediately transfer it back to the clean wire rack (or a fresh one if the first is oily) to drain any excess oil.
- While hot, you can optionally sprinkle with a pinch of sea salt or a dash of shichimi togarashi (Japanese seven-spice blend) for an extra kick.
- Serve immediately and enjoy your homemade `tokyo fried chicken`!
You may also like


Hey there! I’m just someone who seriously loves good food and believes that cooking doesn’t have to be complicated to be amazing. Whether it’s a quick weeknight dinner or a cozy weekend meal, I’m all about sharing easy, tasty recipes that actually work.


