Crispy Kubba Halab - Middle Eastern Meal Prep
Crispy Kubba Halab - Middle Eastern Meal Prep
- Serves: 18 People
- Prepare Time: 60 minutes
- Cooking Time: 30 minutes
- Calories: -
- Difficulty: Medium
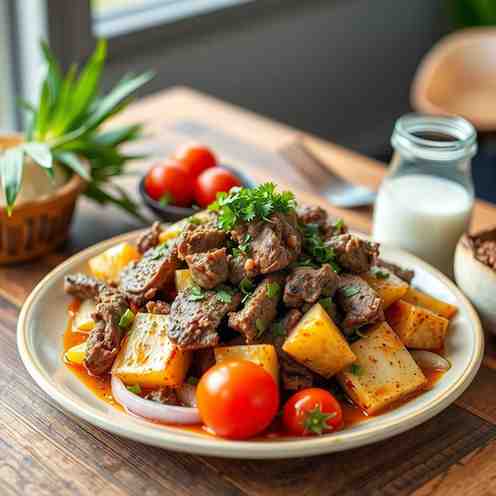
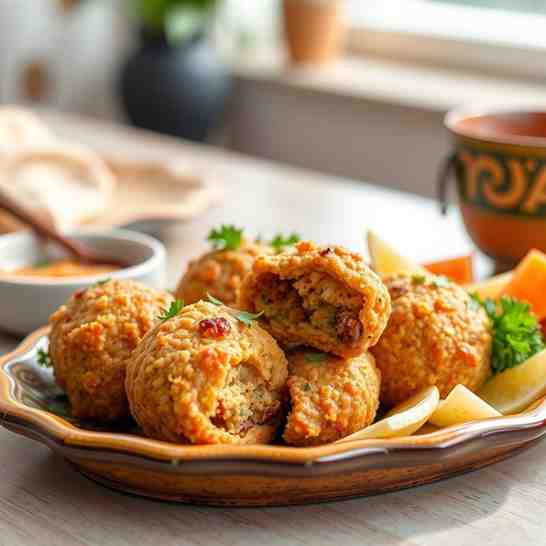
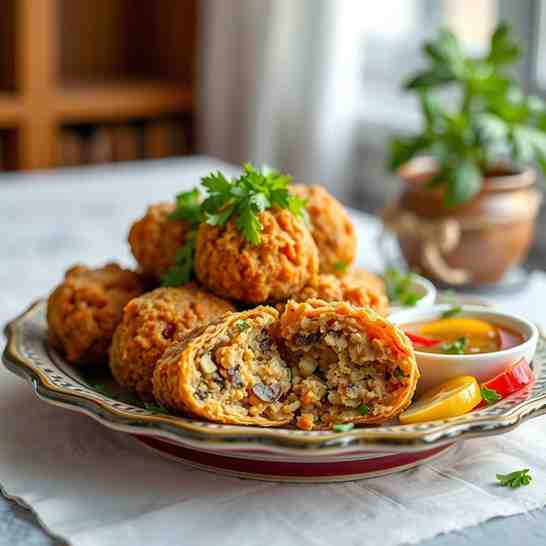
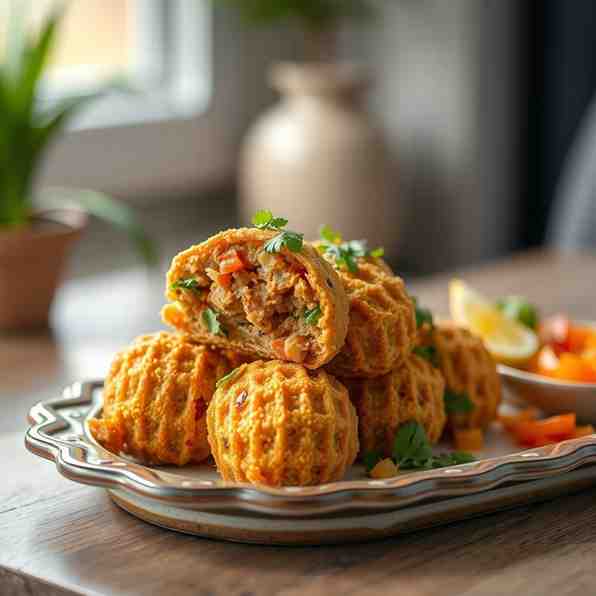
Get ready to discover the magic of Kubba Halab! These incredible crispy stuffed dumplings are an Iraqi culinary treasure, boasting a delightful crunch on the outside, a tender rice interior, and a savory, juicy beef and potato filling. It's no wonder why they're adored by so many – they’re truly a taste sensation! This recipe is specifically for the fried, crispy version, perfect for middle eastern meal prep and stocking your freezer. We're not making the soup dumplings (like Kubba Hamuth or Chamusta) today; this is all about that golden, fried perfection! Whether you're looking for new meal prep beef recipes or a delicious potato and beef recipe to impress, these easy lunch meal prep heroes are a fantastic choice for any busy schedule.
Ingredients
Directions
- Step 1: Cook and Cool the Rice
- Rinse the jasmine or basmati rice in a fine-mesh sieve under cold running water until the water runs mostly clear. This removes excess starch and helps prevent stickiness.
- Combine the rinsed rice, 1 teaspoon salt, and 3 cups water in a medium saucepan. Bring to a boil, then reduce heat to low, cover, and simmer for 15-18 minutes, or until all the water is absorbed and the rice is fully tender.
- Immediately spread the cooked rice in a thin, even layer on a wide baking tray lined with parchment paper. This helps it cool quickly and prevents it from clumping. Let it cool completely to room temperature (about 30-45 minutes).
- Step 2: Turn Rice into Workable "Dough
- Once the rice is completely cool, transfer it to a large bowl. Using clean, slightly damp hands, knead the rice vigorously for 5-7 minutes. Alternatively, you can process it in a food processor with the dough blade attachment until it forms a sticky, moldable dough.
- Texture Checkpoints:
What it should feel like:** The rice dough should be sticky enough to hold together but not wet. It should feel pliable, like play-doh, and you should be able to press it into a ball without it crumbling.Too Dry? If the dough feels too dry, crumbly, and won't hold its shape, add water a teaspoon at a time, kneading after each addition, until it reaches the right consistency. Be very conservative; a little goes a long way.
Too Wet?,/br> If the dough is overly sticky and difficult to handle, try adding a tablespoon of rice flour or a few tablespoons of leftover cooked, cooled plain rice (if you have it) to absorb excess moisture, kneading until combined.
- Step 3: Make the Beef & Potato Filling
- Heat 1 tablespoon of neutral oil in a large skillet over medium-high heat. Add the ground beef and cook, breaking it up with a spoon, until fully browned. Drain any excess fat.
- Add the finely diced onion to the skillet and cook for 5-7 minutes, or until softened and translucent.
- Stir in the finely diced potato. If using diced potato, add a splash of water (1-2 tablespoons), cover, and cook for 8-10 minutes, stirring occasionally, until the potato is tender. If using pre-mashed potato, simply stir it in and heat through for 1-2 minutes.
- Remove the skillet from the heat. Stir in the chopped parsley, 1 teaspoon salt, ½ teaspoon black pepper, and optional warm spices, slivered almonds, and/or raisins.
- Spread the filling on a plate or small tray to cool completely. It’s crucial for the filling to be cold before shaping to prevent the dumplings from tearing.
- Step 4: Shape and Stuff (Football/Egg Shape)
- Line a wide baking tray with parchment paper. Keep a small bowl of water nearby to moisten your hands.
- Portion Guidance: For consistent size, aim for about 1 ½ tablespoons of rice dough per dumpling and about 1 tablespoon of filling.
- Technique:
Moisten your hands lightly with water. Take a portion of rice dough and roll it into a smooth ball.
Using your thumb and index finger, gently press a hollow into the center of the ball, rotating it to create an even, cup-like shell.
Carefully thin the walls of the rice shell evenly, aiming for about ¼-inch thickness. The thinner the shell, the crispier the kubba will be.
Spoon about 1 tablespoon of the cooled beef and potato filling into the hollow.
Gently bring the edges of the rice shell together over the filling, pinching and sealing them completely. Smooth the seam and shape the dumpling into an oval or football shape. Ensure there are no cracks or openings.
Place the shaped dumpling on the prepared baking tray. Repeat with the remaining rice dough and filling.
- Step 5: Chill/Freeze to Set the Shape
- Once all the dumplings are shaped, place the baking tray with the kubba in the refrigerator for at least 30 minutes, or preferably in the freezer for 1-2 hours.
- Why this matters: Chilling or freezing helps the dumplings firm up, making them less fragile and ensuring they hold their shape better during frying. This also helps prevent cracking and bursting in the hot oil.
- Step 6: Fry Until Crisp and Golden
- Pour 4-5 cups of neutral oil into a large, heavy-bottomed pot or Dutch oven. The oil should be deep enough to fully submerge the kubba (at least 3-4 inches).
- Heat the oil over medium-high heat to 350-360°F (175-180°C). If you don't have a thermometer, a small piece of rice dough should sizzle immediately when dropped in.
- While the oil heats, lightly brush each chilled kubba with the beaten egg wash. This helps achieve a beautiful golden color and extra crispness.
- Carefully lower 3-4 kubba into the hot oil at a time. **Do not overcrowd the pot**, as this will lower the oil temperature and result in greasy, soggy dumplings.
- Fry for 5-7 minutes, gently turning them occasionally with a slotted spoon or spider, until they are deeply golden brown and crispy on all sides. Handle them carefully to avoid cracking.
- Using a slotted spoon, transfer the fried kubba to a wire rack set over a baking sheet to drain any excess oil. This is crucial for maintaining their crispness.
- Repeat with the remaining kubba, ensuring the oil returns to temperature between batches. Serve immediately or prepare for meal prep!
Crispy Kubba Halab - Middle Eastern Meal Prep
- Serves: 18 People
- Prepare Time: 60 minutes
- Cooking Time: 30 minutes
- Calories: -
- Difficulty: Medium
Get ready to discover the magic of Kubba Halab! These incredible crispy stuffed dumplings are an Iraqi culinary treasure, boasting a delightful crunch on the outside, a tender rice interior, and a savory, juicy beef and potato filling. It's no wonder why they're adored by so many – they’re truly a taste sensation! This recipe is specifically for the fried, crispy version, perfect for middle eastern meal prep and stocking your freezer. We're not making the soup dumplings (like Kubba Hamuth or Chamusta) today; this is all about that golden, fried perfection! Whether you're looking for new meal prep beef recipes or a delicious potato and beef recipe to impress, these easy lunch meal prep heroes are a fantastic choice for any busy schedule.
Ingredients
Directions
- Step 1: Cook and Cool the Rice
- Rinse the jasmine or basmati rice in a fine-mesh sieve under cold running water until the water runs mostly clear. This removes excess starch and helps prevent stickiness.
- Combine the rinsed rice, 1 teaspoon salt, and 3 cups water in a medium saucepan. Bring to a boil, then reduce heat to low, cover, and simmer for 15-18 minutes, or until all the water is absorbed and the rice is fully tender.
- Immediately spread the cooked rice in a thin, even layer on a wide baking tray lined with parchment paper. This helps it cool quickly and prevents it from clumping. Let it cool completely to room temperature (about 30-45 minutes).
- Step 2: Turn Rice into Workable "Dough
- Once the rice is completely cool, transfer it to a large bowl. Using clean, slightly damp hands, knead the rice vigorously for 5-7 minutes. Alternatively, you can process it in a food processor with the dough blade attachment until it forms a sticky, moldable dough.
- Texture Checkpoints:
What it should feel like:** The rice dough should be sticky enough to hold together but not wet. It should feel pliable, like play-doh, and you should be able to press it into a ball without it crumbling.Too Dry? If the dough feels too dry, crumbly, and won't hold its shape, add water a teaspoon at a time, kneading after each addition, until it reaches the right consistency. Be very conservative; a little goes a long way.
Too Wet?,/br> If the dough is overly sticky and difficult to handle, try adding a tablespoon of rice flour or a few tablespoons of leftover cooked, cooled plain rice (if you have it) to absorb excess moisture, kneading until combined.
- Step 3: Make the Beef & Potato Filling
- Heat 1 tablespoon of neutral oil in a large skillet over medium-high heat. Add the ground beef and cook, breaking it up with a spoon, until fully browned. Drain any excess fat.
- Add the finely diced onion to the skillet and cook for 5-7 minutes, or until softened and translucent.
- Stir in the finely diced potato. If using diced potato, add a splash of water (1-2 tablespoons), cover, and cook for 8-10 minutes, stirring occasionally, until the potato is tender. If using pre-mashed potato, simply stir it in and heat through for 1-2 minutes.
- Remove the skillet from the heat. Stir in the chopped parsley, 1 teaspoon salt, ½ teaspoon black pepper, and optional warm spices, slivered almonds, and/or raisins.
- Spread the filling on a plate or small tray to cool completely. It’s crucial for the filling to be cold before shaping to prevent the dumplings from tearing.
- Step 4: Shape and Stuff (Football/Egg Shape)
- Line a wide baking tray with parchment paper. Keep a small bowl of water nearby to moisten your hands.
- Portion Guidance: For consistent size, aim for about 1 ½ tablespoons of rice dough per dumpling and about 1 tablespoon of filling.
- Technique:
Moisten your hands lightly with water. Take a portion of rice dough and roll it into a smooth ball.
Using your thumb and index finger, gently press a hollow into the center of the ball, rotating it to create an even, cup-like shell.
Carefully thin the walls of the rice shell evenly, aiming for about ¼-inch thickness. The thinner the shell, the crispier the kubba will be.
Spoon about 1 tablespoon of the cooled beef and potato filling into the hollow.
Gently bring the edges of the rice shell together over the filling, pinching and sealing them completely. Smooth the seam and shape the dumpling into an oval or football shape. Ensure there are no cracks or openings.
Place the shaped dumpling on the prepared baking tray. Repeat with the remaining rice dough and filling.
- Step 5: Chill/Freeze to Set the Shape
- Once all the dumplings are shaped, place the baking tray with the kubba in the refrigerator for at least 30 minutes, or preferably in the freezer for 1-2 hours.
- Why this matters: Chilling or freezing helps the dumplings firm up, making them less fragile and ensuring they hold their shape better during frying. This also helps prevent cracking and bursting in the hot oil.
- Step 6: Fry Until Crisp and Golden
- Pour 4-5 cups of neutral oil into a large, heavy-bottomed pot or Dutch oven. The oil should be deep enough to fully submerge the kubba (at least 3-4 inches).
- Heat the oil over medium-high heat to 350-360°F (175-180°C). If you don't have a thermometer, a small piece of rice dough should sizzle immediately when dropped in.
- While the oil heats, lightly brush each chilled kubba with the beaten egg wash. This helps achieve a beautiful golden color and extra crispness.
- Carefully lower 3-4 kubba into the hot oil at a time. **Do not overcrowd the pot**, as this will lower the oil temperature and result in greasy, soggy dumplings.
- Fry for 5-7 minutes, gently turning them occasionally with a slotted spoon or spider, until they are deeply golden brown and crispy on all sides. Handle them carefully to avoid cracking.
- Using a slotted spoon, transfer the fried kubba to a wire rack set over a baking sheet to drain any excess oil. This is crucial for maintaining their crispness.
- Repeat with the remaining kubba, ensuring the oil returns to temperature between batches. Serve immediately or prepare for meal prep!
You may also like


Hey there! I’m just someone who seriously loves good food and believes that cooking doesn’t have to be complicated to be amazing. Whether it’s a quick weeknight dinner or a cozy weekend meal, I’m all about sharing easy, tasty recipes that actually work.