
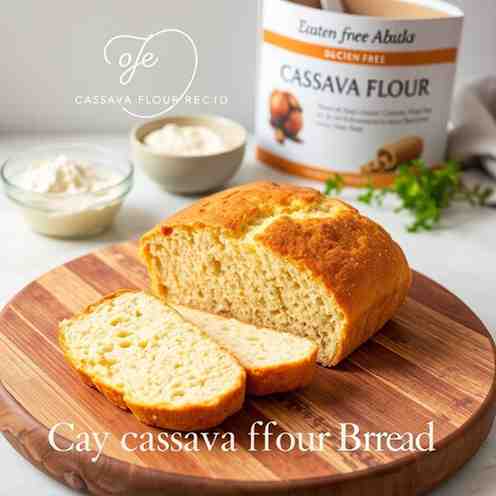
Easy Cassava Flour Bread Recipe - Gluten-Free & Healthy
Easy Cassava Flour Bread Recipe - Gluten-Free & Healthy
- Serves: 8 People
- Prepare Time: 15 minutes
- Cooking Time: 20 minutes
- Calories: -
- Difficulty: Easy
Looking for a truly easy cassava bread recipe that's both gluten-free and wonderfully healthy? You've found it! This recipe will guide you through making traditional Dominican-style casabe using cassava flour bread. Get ready for a thin, crisp, and satisfying bread that comes together in just about 35 minutes total. It's a fantastic way to explore cassava flour recipes and enjoy a taste of the Dominican Republic dishes right in your own kitchen.
So, what exactly is cassava bread, or casabe? It's a staple across the Caribbean, with deep roots tracing back to the indigenous Taíno people. In fact, its traditional preparation has even earned UNESCO recognition! Imagine a flatbread that’s incredibly thin and crisp, almost like a giant cracker. It has a mild, earthy flavor that makes it super versatile, perfect for pairing with just about anything. It’s not chewy or soft like typical bread; instead, it offers a delightful "snap" that's incredibly satisfying. And don't worry, we'll keep it simple and straightforward, perfect for both beginners and experienced bakers alike.
Ingredients
Directions
- 1 Prep
- Preheat & Prepare: Get your kitchen ready! Preheat a large skillet or griddle over medium heat. At the same time, preheat your oven to 300°F (150°C). This oven step is key for that perfect crisp finish.
- Parchment Setup: Lay out a couple of sheets of parchment paper on your counter. You’ll use these for rolling out your dough without any sticking.
- 2 Mix + Rest the Dough
- Combine Dry: In a medium mixing bowl, whisk together the cassava flour and salt.
- Add Water Gradually: Pour in the warm water, about half a cup at a time, mixing with a spoon or your hands. You're aiming for a dough that's soft and pliable, but not sticky. It should hold together well without crumbling. If it feels too dry, add a tiny bit more water, a teaspoon at a time. If it's too wet, a sprinkle of extra cassava flour will help.
- Rest Time: Cover the bowl with a clean kitchen towel and let the dough rest for about 10 minutes. This allows the cassava flour to fully hydrate, which is super important for a smooth, crack-free dough later on.
- 3 Shape (Thin, Even Rounds)
- Portion & Roll: Divide your dough into 8 equal portions. Take one portion and place it between two sheets of parchment paper.
- Roll It Out: Using a rolling pin (or a tortilla press for extra ease!), roll the dough out as thinly and evenly as possible into a round shape, about 6-8 inches in diameter. The thinner you get it, the crispier your casabe will be! Aim for a thickness similar to a thin tortilla.
- 4 Cook on Skillet/Griddle
- Cook First Side: Carefully peel off the top layer of parchment paper from your rolled-out dough. Gently transfer the dough (still on the bottom parchment) onto your preheated skillet or griddle. Peel off the remaining parchment.
- Flip & Cook Second Side: Cook for 1-2 minutes per side. You'll know it's time to flip when you see light brown spots appearing on the surface and the dough looks dry, not shiny or wet. Use a spatula to carefully flip it over and cook for another 1-2 minutes. The goal here is to dry out the bread, not necessarily to brown it deeply.
- Repeat: As each round finishes cooking on the griddle, transfer it to a baking sheet. Repeat with the remaining dough portions.
- 5 Finish in Oven (The “Casabe Snap”)
- Crisp it Up: Once all your casabe rounds are lightly cooked on the griddle and on the baking sheet, place the baking sheet into your preheated 300°F (150°C) oven.
- Bake for Crunch: Bake for 10-15 minutes, or until the casabe feels completely firm and dry to the touch, with crisp edges. It might not look deeply browned, but it should feel brittle.
- Cool & Enjoy: Let the casabe cool completely on a wire rack. As it cools, it will continue to crisp up, giving you that perfect "casabe snap"!
Easy Cassava Flour Bread Recipe - Gluten-Free & Healthy
- Serves: 8 People
- Prepare Time: 15 minutes
- Cooking Time: 20 minutes
- Calories: -
- Difficulty: Easy
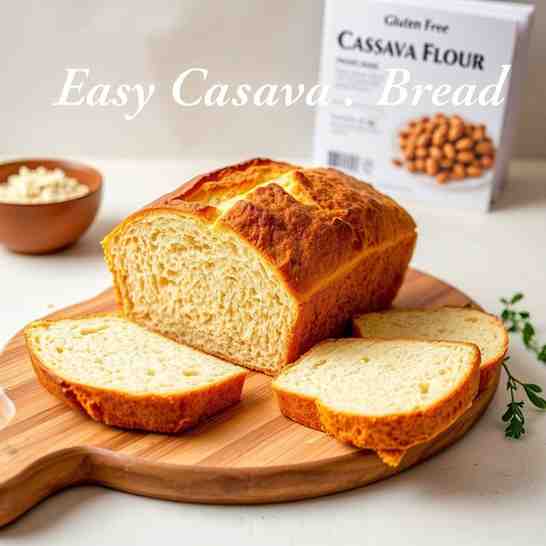
Looking for a truly easy cassava bread recipe that's both gluten-free and wonderfully healthy? You've found it! This recipe will guide you through making traditional Dominican-style casabe using cassava flour bread. Get ready for a thin, crisp, and satisfying bread that comes together in just about 35 minutes total. It's a fantastic way to explore cassava flour recipes and enjoy a taste of the Dominican Republic dishes right in your own kitchen.
So, what exactly is cassava bread, or casabe? It's a staple across the Caribbean, with deep roots tracing back to the indigenous Taíno people. In fact, its traditional preparation has even earned UNESCO recognition! Imagine a flatbread that’s incredibly thin and crisp, almost like a giant cracker. It has a mild, earthy flavor that makes it super versatile, perfect for pairing with just about anything. It’s not chewy or soft like typical bread; instead, it offers a delightful "snap" that's incredibly satisfying. And don't worry, we'll keep it simple and straightforward, perfect for both beginners and experienced bakers alike.
Ingredients
Directions
- 1 Prep
- Preheat & Prepare: Get your kitchen ready! Preheat a large skillet or griddle over medium heat. At the same time, preheat your oven to 300°F (150°C). This oven step is key for that perfect crisp finish.
- Parchment Setup: Lay out a couple of sheets of parchment paper on your counter. You’ll use these for rolling out your dough without any sticking.
- 2 Mix + Rest the Dough
- Combine Dry: In a medium mixing bowl, whisk together the cassava flour and salt.
- Add Water Gradually: Pour in the warm water, about half a cup at a time, mixing with a spoon or your hands. You're aiming for a dough that's soft and pliable, but not sticky. It should hold together well without crumbling. If it feels too dry, add a tiny bit more water, a teaspoon at a time. If it's too wet, a sprinkle of extra cassava flour will help.
- Rest Time: Cover the bowl with a clean kitchen towel and let the dough rest for about 10 minutes. This allows the cassava flour to fully hydrate, which is super important for a smooth, crack-free dough later on.
- 3 Shape (Thin, Even Rounds)
- Portion & Roll: Divide your dough into 8 equal portions. Take one portion and place it between two sheets of parchment paper.
- Roll It Out: Using a rolling pin (or a tortilla press for extra ease!), roll the dough out as thinly and evenly as possible into a round shape, about 6-8 inches in diameter. The thinner you get it, the crispier your casabe will be! Aim for a thickness similar to a thin tortilla.
- 4 Cook on Skillet/Griddle
- Cook First Side: Carefully peel off the top layer of parchment paper from your rolled-out dough. Gently transfer the dough (still on the bottom parchment) onto your preheated skillet or griddle. Peel off the remaining parchment.
- Flip & Cook Second Side: Cook for 1-2 minutes per side. You'll know it's time to flip when you see light brown spots appearing on the surface and the dough looks dry, not shiny or wet. Use a spatula to carefully flip it over and cook for another 1-2 minutes. The goal here is to dry out the bread, not necessarily to brown it deeply.
- Repeat: As each round finishes cooking on the griddle, transfer it to a baking sheet. Repeat with the remaining dough portions.
- 5 Finish in Oven (The “Casabe Snap”)
- Crisp it Up: Once all your casabe rounds are lightly cooked on the griddle and on the baking sheet, place the baking sheet into your preheated 300°F (150°C) oven.
- Bake for Crunch: Bake for 10-15 minutes, or until the casabe feels completely firm and dry to the touch, with crisp edges. It might not look deeply browned, but it should feel brittle.
- Cool & Enjoy: Let the casabe cool completely on a wire rack. As it cools, it will continue to crisp up, giving you that perfect "casabe snap"!
You may also like


Hey there! I’m just someone who seriously loves good food and believes that cooking doesn’t have to be complicated to be amazing. Whether it’s a quick weeknight dinner or a cozy weekend meal, I’m all about sharing easy, tasty recipes that actually work.


