
Easy Fried Duck with Rakā’iq - Egyptian Ramadan Feast at Home
Easy Fried Duck with Rakā’iq - Egyptian Ramadan Feast at Home

- Serves: 6 People
- Prepare Time: 30 minutes
- Cooking Time: 2 hours 15
- Calories: -
- Difficulty: Medium
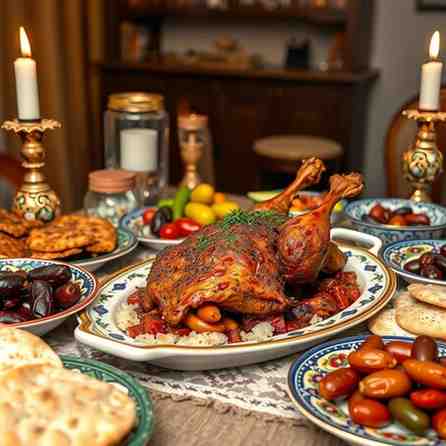
Ever wondered about the secrets behind those incredible Egyptian Ramadan feasts? Today, we're diving into one of the most beloved and impressive `easy food dishes to make at home`: Fried Duck with Rakā’iq. This isn't just any duck; it's a culinary journey to Egypt, offering a tender, succulent duck with an irresistibly crispy finish, paired perfectly with delicate, crisp rakā’iq. It's truly a showstopper, making it one of the best `food blog recipes` for a special `meal for friends` or family gatherings.
If you're searching for `easy to make meal recipes` that feel utterly luxurious, this is it. We're talking about a dish that embodies celebration, making it a staple for festive occasions like Ramadan. And don't worry if you're new to cooking duck! This method is incredibly forgiving, guiding you through each step to ensure a perfectly cooked, flavorful bird every time. Get ready to add this incredible `simple dish recipe` to your repertoire – it’s one of those `recipes to make` that will impress everyone. Let's get cooking!
Ingredients
Directions
- Before You Start:
- Duck Prep: Trim any excess fat from the duck, especially around the cavity and neck. Pat the duck thoroughly dry with paper towels – this is key for crisp skin!
- Food Safety Note: Cook duck to an internal temperature of 165°F (74°C). Always probe the thickest part of the thigh without touching the bone.
- Dry Brine (Overnight):
- Generously rub the trimmed and patted-dry duck with the kosher salt and black pepper (or your chosen spice mix). Ensure it's coated evenly inside and out.
- Place the duck on a wire rack set over a sheet pan and refrigerate, uncovered, for at least 12 hours or up to 24 hours. This process draws out moisture and seasons the meat deeply, leading to a more flavorful and tender result.
- Quick Tip: Do NOT rinse the duck after brining; simply pat it dry again before moving to the next step.
- Simmer the Duck (Build the Broth):
- After brining, pat the duck dry once more.
- Place the duck in a large pot and add the onion, carrots, celery, garlic, bay leaves, black peppercorns, mastic, and cardamom pods.
- Pour enough cold water over the duck to completely submerge it.
- Bring the pot to a gentle simmer over medium-high heat, then reduce the heat to low, cover, and cook for 1.5 to 2.5 hours, or until the duck is very tender. The meat should pull away easily from the bone.
- Confirm doneness by checking the internal temperature in the thickest part of the thigh; it should reach 165°F (74°C).
- Drain & Dry (The Crisping Secret):
- Carefully remove the cooked duck from the broth using tongs (reserve the flavorful broth for assembly and future use!).
- Place the duck on a clean wire rack set over a sheet pan.
- Allow the duck to air-dry for at least 30 minutes at room temperature, or ideally, refrigerate it uncovered for an hour or two. This crucial step ensures the skin will crisp beautifully when fried, rather than steaming.
- Fry to Crisp (Skin-First):
- In a deep skillet or Dutch oven, heat 2-3 cups of neutral oil over medium-high heat until it reaches about 350-375°F (175-190°C).
- Carefully place the duck, breast-side down, into the hot oil. Be mindful of splattering oil and use caution.
- Fry for about 8-12 minutes per side, or until the skin is deeply golden brown and incredibly crisp. Use tongs to carefully flip the duck.
- Remove the duck and place it on a clean wire rack set over paper towels to drain any excess oil. Let it rest for 10-15 minutes before carving.
- Crisp the Rakā’iq:
- While the duck rests, break the rakā’iq sheets into large, irregular shards.
- Working in batches, quickly fry the rakā’iq shards in the same hot oil for just 10-20 seconds per side, until they turn golden and crisp. They cook very fast!
- Remove with tongs or a slotted spoon and place on a wire rack or paper towels to drain. Season lightly with salt if desired.
- Assemble (So It Doesn't Turn Soggy):
- On your serving platter, lightly splash a small amount of the reserved warm duck broth (strained) on the bottom. This adds flavor without making the rakā’iq soggy.
- Arrange the crisp rakā’iq shards on top of the broth.
- Carve the fried duck into serving pieces and arrange them beautifully over the rakā’iq.
- Garnish with fresh parsley or cilantro and lemon wedges, if using. Serve immediately to enjoy the crisp texture!
Easy Fried Duck with Rakā’iq - Egyptian Ramadan Feast at Home

- Serves: 6 People
- Prepare Time: 30 minutes
- Cooking Time: 2 hours 15
- Calories: -
- Difficulty: Medium
Ever wondered about the secrets behind those incredible Egyptian Ramadan feasts? Today, we're diving into one of the most beloved and impressive `easy food dishes to make at home`: Fried Duck with Rakā’iq. This isn't just any duck; it's a culinary journey to Egypt, offering a tender, succulent duck with an irresistibly crispy finish, paired perfectly with delicate, crisp rakā’iq. It's truly a showstopper, making it one of the best `food blog recipes` for a special `meal for friends` or family gatherings.
If you're searching for `easy to make meal recipes` that feel utterly luxurious, this is it. We're talking about a dish that embodies celebration, making it a staple for festive occasions like Ramadan. And don't worry if you're new to cooking duck! This method is incredibly forgiving, guiding you through each step to ensure a perfectly cooked, flavorful bird every time. Get ready to add this incredible `simple dish recipe` to your repertoire – it’s one of those `recipes to make` that will impress everyone. Let's get cooking!
Ingredients
Directions
- Before You Start:
- Duck Prep: Trim any excess fat from the duck, especially around the cavity and neck. Pat the duck thoroughly dry with paper towels – this is key for crisp skin!
- Food Safety Note: Cook duck to an internal temperature of 165°F (74°C). Always probe the thickest part of the thigh without touching the bone.
- Dry Brine (Overnight):
- Generously rub the trimmed and patted-dry duck with the kosher salt and black pepper (or your chosen spice mix). Ensure it's coated evenly inside and out.
- Place the duck on a wire rack set over a sheet pan and refrigerate, uncovered, for at least 12 hours or up to 24 hours. This process draws out moisture and seasons the meat deeply, leading to a more flavorful and tender result.
- Quick Tip: Do NOT rinse the duck after brining; simply pat it dry again before moving to the next step.
- Simmer the Duck (Build the Broth):
- After brining, pat the duck dry once more.
- Place the duck in a large pot and add the onion, carrots, celery, garlic, bay leaves, black peppercorns, mastic, and cardamom pods.
- Pour enough cold water over the duck to completely submerge it.
- Bring the pot to a gentle simmer over medium-high heat, then reduce the heat to low, cover, and cook for 1.5 to 2.5 hours, or until the duck is very tender. The meat should pull away easily from the bone.
- Confirm doneness by checking the internal temperature in the thickest part of the thigh; it should reach 165°F (74°C).
- Drain & Dry (The Crisping Secret):
- Carefully remove the cooked duck from the broth using tongs (reserve the flavorful broth for assembly and future use!).
- Place the duck on a clean wire rack set over a sheet pan.
- Allow the duck to air-dry for at least 30 minutes at room temperature, or ideally, refrigerate it uncovered for an hour or two. This crucial step ensures the skin will crisp beautifully when fried, rather than steaming.
- Fry to Crisp (Skin-First):
- In a deep skillet or Dutch oven, heat 2-3 cups of neutral oil over medium-high heat until it reaches about 350-375°F (175-190°C).
- Carefully place the duck, breast-side down, into the hot oil. Be mindful of splattering oil and use caution.
- Fry for about 8-12 minutes per side, or until the skin is deeply golden brown and incredibly crisp. Use tongs to carefully flip the duck.
- Remove the duck and place it on a clean wire rack set over paper towels to drain any excess oil. Let it rest for 10-15 minutes before carving.
- Crisp the Rakā’iq:
- While the duck rests, break the rakā’iq sheets into large, irregular shards.
- Working in batches, quickly fry the rakā’iq shards in the same hot oil for just 10-20 seconds per side, until they turn golden and crisp. They cook very fast!
- Remove with tongs or a slotted spoon and place on a wire rack or paper towels to drain. Season lightly with salt if desired.
- Assemble (So It Doesn't Turn Soggy):
- On your serving platter, lightly splash a small amount of the reserved warm duck broth (strained) on the bottom. This adds flavor without making the rakā’iq soggy.
- Arrange the crisp rakā’iq shards on top of the broth.
- Carve the fried duck into serving pieces and arrange them beautifully over the rakā’iq.
- Garnish with fresh parsley or cilantro and lemon wedges, if using. Serve immediately to enjoy the crisp texture!
You may also like


Hey there! I’m just someone who seriously loves good food and believes that cooking doesn’t have to be complicated to be amazing. Whether it’s a quick weeknight dinner or a cozy weekend meal, I’m all about sharing easy, tasty recipes that actually work.


