
Fresh Fruit Tart Cake - Easy Recipe
Fresh Fruit Tart Cake - Easy Recipe
- Serves: 8 People
- Prepare Time: 45 minutes
- Cooking Time: 25 minutes
- Calories: -
- Difficulty: Medium
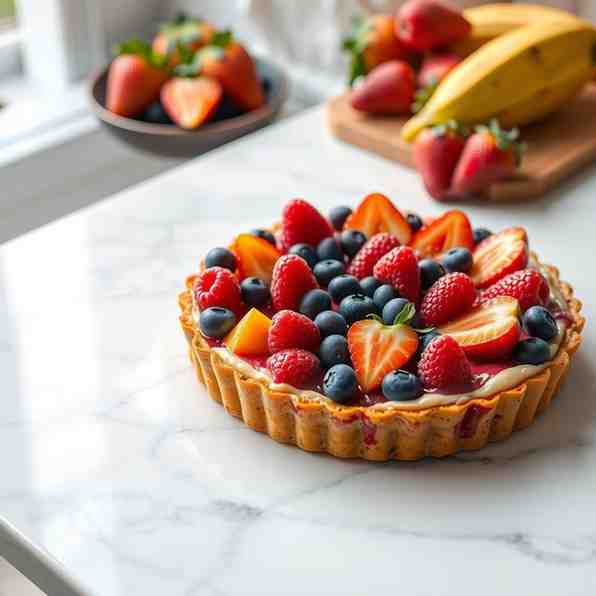
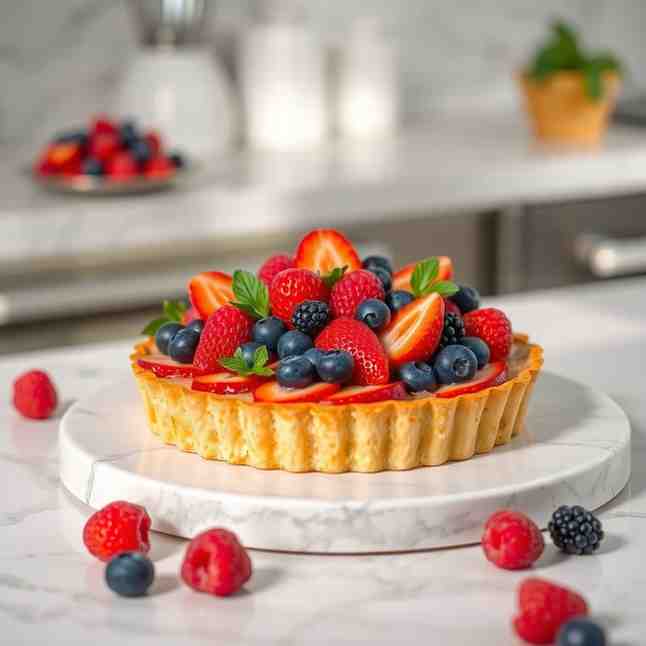
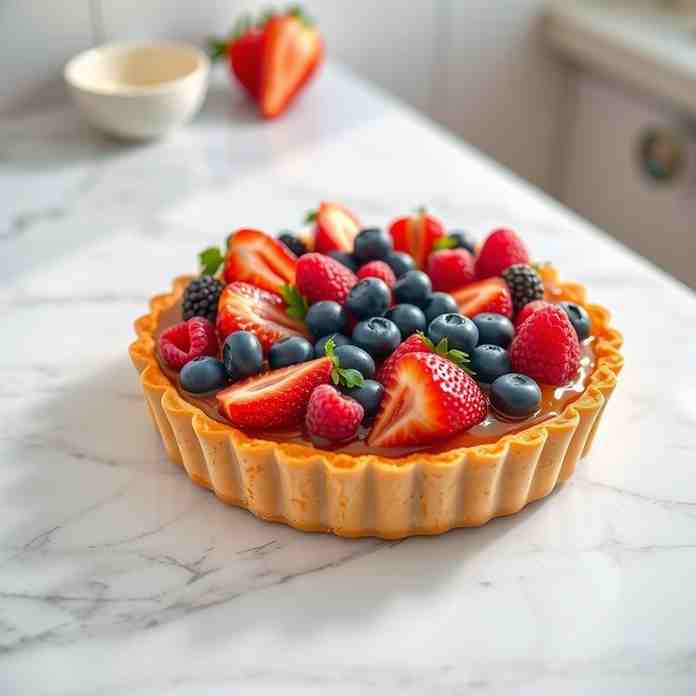
Craving a classic bakery-style fruit tart that’s actually doable at home? You’ve found it! This amazing dessert recipe brings together a perfectly crisp, buttery tart crust, a rich, silky vanilla pastry cream, and a vibrant medley of fresh fruit. It’s an easy sweet to bake that looks incredibly impressive. I've personally tested this recipe countless times to ensure every step is foolproof, guaranteeing you a stunning fruit tart cake that tastes as good as it looks. Say goodbye to soggy crusts and runny custard – this is your go-to best tart recipe for success every single time.
Chill Time: 4 hours (minimum)
Total Time: 4 hours 45 minutes
Pan Size: 9-inch tart pan with removable bottom
This fresh fruit cake is built on three simple, yet perfectly balanced, components: a crisp, tender tart crust, a thick, luscious vanilla pastry cream, and a colorful array of fresh fruit. What makes this particular recipe so easy to make baking success? We focus on foolproof techniques: a fully baked crust for ultimate crispness, a properly thickened custard that holds its shape beautifully, and the right choice of dry fruit with an optional apricot glaze to keep everything looking pristine. It's truly one of the best baking recipes for a showstopping pastry dessert recipe that everyone will adore.
Ingredients
Directions
- Combine Dry Ingredients: In a large bowl, whisk together the flour, powdered sugar, and salt.
- Cut in Butter: Add the cold, cubed butter to the dry ingredients. Using your fingertips, a pastry blender, or a food processor, cut the butter into the flour mixture until it resembles coarse meal with some pea-sized pieces of butter remaining.
- Add Water: Gradually add the ice water, 1 tablespoon at a time, mixing until the dough just comes together. Be careful not to overwork the dough, as this can lead to a tough crust.
- Press into Pan: Gently press the dough evenly into a 9-inch tart pan with a removable bottom. Ensure the bottom and sides are covered with an even thickness.
- Chill: Cover the tart pan with plastic wrap and chill in the refrigerator for at least 30 minutes (or up to 2 days). This helps prevent shrinking during baking.
- Preheat & Dock: Preheat your oven to 375°F (190°C). Prick the bottom of the chilled crust all over with a fork (this is called "docking").
- Blind Bake: Line the crust with parchment paper and fill with pie weights, dry beans, or rice. Bake for 15 minutes.
- Remove Weights & Continue Baking: Carefully remove the parchment paper and weights. Continue baking for another 10-15 minutes, or until the crust is golden brown and fully cooked. How to know it’s actually done? It should look thoroughly golden, not just pale, to ensure crispness and prevent a soggy bottom.
- Cool Completely: Let the tart crust cool completely on a wire rack before filling. This is crucial for maintaining its crispness.
- Vanilla Pastry Cream Ingredients
- 2 cups (480ml) whole milk
- ½ cup (100g) granulated sugar, divided
- 4 large egg yolks
- ¼ cup (30g) cornstarch – What it does? Cornstarch is key for thickening the custard, ensuring a stable, sliceable cream.
- 2 tablespoons (28g) unsalted butter, cold
- 1 teaspoon pure vanilla extract – What it does? Adds that classic, warm vanilla flavor.
- Vanilla Pastry Cream Step-by-Step Instructions
- Heat Milk: In a medium saucepan, heat the whole milk with half of the granulated sugar over medium heat until it's steaming and small bubbles form around the edge of the pan. Visual cues: Look for steam rising and gentle simmering, but don't let it boil vigorously.
- Whisk Yolks & Sugar: In a separate medium bowl, whisk together the egg yolks, remaining granulated sugar, and cornstarch until the mixture is pale yellow and smooth with no lumps.
- Temper Eggs: Slowly pour about half of the hot milk mixture into the egg yolk mixture, whisking constantly. This "tempering" step gently raises the temperature of the egg yolks, preventing them from scrambling when added to the hot milk.
- Cook Custard: Pour the tempered egg mixture back into the saucepan with the remaining hot milk. Whisk constantly over medium heat until the mixture thickens considerably, resembling a thick pudding. Exact visual thickness cue: It should be thick enough to coat the back of a spoon and hold its shape when you run your finger across it, without the line immediately filling in. This usually takes 2-4 minutes once it begins to simmer.
- Strain & Finish: Remove from heat. For extra smoothness, strain the pastry cream through a fine-mesh sieve into a clean bowl (optional but highly recommended to catch any tiny cooked egg bits). Stir in the cold butter until melted and fully incorporated, then stir in the vanilla extract.
- Chill Correctly: Cover the surface of the pastry cream directly with plastic wrap, pressing it down so it touches the entire surface. This prevents a "skin" from forming. Chill in the refrigerator for at least 3-4 hours, or until completely cold and firm.
- Fruit Topping & Assembly Ingredients
- 2-3 cups assorted fresh fruit (e.g., berries, kiwi, mandarin oranges, firm stone fruit) – Best-choice fruit list: Think vibrant, firm fruits like strawberries, blueberries, raspberries, kiwi, grapes, and sliced peaches or nectarines (when firm-ripe). What to avoid: Overly ripe or watery fruits, and those that brown quickly like sliced apples without lemon juice.
- ¼ cup apricot jam (optional, for glaze)
- 1-2 teaspoons water (optional, for glaze)
- Fruit Topping & Assembly Step-by-Step Instructions
- Prep Fruit: Wash all fresh fruit thoroughly. Dry it completely with paper towels – this is key to preventing a watery tart and helping the glaze adhere. Slice larger fruits (like strawberries or kiwi) into uniform, visually appealing pieces.
- Fill Crust: Once the pastry cream is thoroughly chilled and firm, spoon it into the cooled, blind-baked tart crust. Spread it evenly to about ½ to ¾ inch thick, leaving a slight border around the edge.
- Arrange Fruit: Artfully arrange your prepared fresh fruit over the pastry cream. You can create concentric rings, a mosaic pattern, or a more organic design. Simple arranging method: Start with larger fruits as a base, then fill in gaps with smaller berries. How to hide messy pieces: Place any imperfect slices towards the center or under other fruits.
- Optional Glaze: If using, warm the apricot jam in a small saucepan over low heat or in the microwave for 15-30 seconds until melted and fluid. If it's too thick, stir in 1-2 teaspoons of water to thin it slightly. Gently brush a thin layer of the warm glaze over the fruit using a pastry brush. How to avoid tinted/overly sticky fruit: Use a very light hand and don't over-apply. The goal is a subtle sheen, not a thick coating.
- Chill to Set: Chill the assembled fruit tart cake in the refrigerator for 30-60 minutes before slicing and serving. This brief chill helps the pastry cream and glaze set, making for cleaner cuts.
Fresh Fruit Tart Cake - Easy Recipe
- Serves: 8 People
- Prepare Time: 45 minutes
- Cooking Time: 25 minutes
- Calories: -
- Difficulty: Medium
Craving a classic bakery-style fruit tart that’s actually doable at home? You’ve found it! This amazing dessert recipe brings together a perfectly crisp, buttery tart crust, a rich, silky vanilla pastry cream, and a vibrant medley of fresh fruit. It’s an easy sweet to bake that looks incredibly impressive. I've personally tested this recipe countless times to ensure every step is foolproof, guaranteeing you a stunning fruit tart cake that tastes as good as it looks. Say goodbye to soggy crusts and runny custard – this is your go-to best tart recipe for success every single time.
Chill Time: 4 hours (minimum)
Total Time: 4 hours 45 minutes
Pan Size: 9-inch tart pan with removable bottom
This fresh fruit cake is built on three simple, yet perfectly balanced, components: a crisp, tender tart crust, a thick, luscious vanilla pastry cream, and a colorful array of fresh fruit. What makes this particular recipe so easy to make baking success? We focus on foolproof techniques: a fully baked crust for ultimate crispness, a properly thickened custard that holds its shape beautifully, and the right choice of dry fruit with an optional apricot glaze to keep everything looking pristine. It's truly one of the best baking recipes for a showstopping pastry dessert recipe that everyone will adore.
Ingredients
Directions
- Combine Dry Ingredients: In a large bowl, whisk together the flour, powdered sugar, and salt.
- Cut in Butter: Add the cold, cubed butter to the dry ingredients. Using your fingertips, a pastry blender, or a food processor, cut the butter into the flour mixture until it resembles coarse meal with some pea-sized pieces of butter remaining.
- Add Water: Gradually add the ice water, 1 tablespoon at a time, mixing until the dough just comes together. Be careful not to overwork the dough, as this can lead to a tough crust.
- Press into Pan: Gently press the dough evenly into a 9-inch tart pan with a removable bottom. Ensure the bottom and sides are covered with an even thickness.
- Chill: Cover the tart pan with plastic wrap and chill in the refrigerator for at least 30 minutes (or up to 2 days). This helps prevent shrinking during baking.
- Preheat & Dock: Preheat your oven to 375°F (190°C). Prick the bottom of the chilled crust all over with a fork (this is called "docking").
- Blind Bake: Line the crust with parchment paper and fill with pie weights, dry beans, or rice. Bake for 15 minutes.
- Remove Weights & Continue Baking: Carefully remove the parchment paper and weights. Continue baking for another 10-15 minutes, or until the crust is golden brown and fully cooked. How to know it’s actually done? It should look thoroughly golden, not just pale, to ensure crispness and prevent a soggy bottom.
- Cool Completely: Let the tart crust cool completely on a wire rack before filling. This is crucial for maintaining its crispness.
- Vanilla Pastry Cream Ingredients
- 2 cups (480ml) whole milk
- ½ cup (100g) granulated sugar, divided
- 4 large egg yolks
- ¼ cup (30g) cornstarch – What it does? Cornstarch is key for thickening the custard, ensuring a stable, sliceable cream.
- 2 tablespoons (28g) unsalted butter, cold
- 1 teaspoon pure vanilla extract – What it does? Adds that classic, warm vanilla flavor.
- Vanilla Pastry Cream Step-by-Step Instructions
- Heat Milk: In a medium saucepan, heat the whole milk with half of the granulated sugar over medium heat until it's steaming and small bubbles form around the edge of the pan. Visual cues: Look for steam rising and gentle simmering, but don't let it boil vigorously.
- Whisk Yolks & Sugar: In a separate medium bowl, whisk together the egg yolks, remaining granulated sugar, and cornstarch until the mixture is pale yellow and smooth with no lumps.
- Temper Eggs: Slowly pour about half of the hot milk mixture into the egg yolk mixture, whisking constantly. This "tempering" step gently raises the temperature of the egg yolks, preventing them from scrambling when added to the hot milk.
- Cook Custard: Pour the tempered egg mixture back into the saucepan with the remaining hot milk. Whisk constantly over medium heat until the mixture thickens considerably, resembling a thick pudding. Exact visual thickness cue: It should be thick enough to coat the back of a spoon and hold its shape when you run your finger across it, without the line immediately filling in. This usually takes 2-4 minutes once it begins to simmer.
- Strain & Finish: Remove from heat. For extra smoothness, strain the pastry cream through a fine-mesh sieve into a clean bowl (optional but highly recommended to catch any tiny cooked egg bits). Stir in the cold butter until melted and fully incorporated, then stir in the vanilla extract.
- Chill Correctly: Cover the surface of the pastry cream directly with plastic wrap, pressing it down so it touches the entire surface. This prevents a "skin" from forming. Chill in the refrigerator for at least 3-4 hours, or until completely cold and firm.
- Fruit Topping & Assembly Ingredients
- 2-3 cups assorted fresh fruit (e.g., berries, kiwi, mandarin oranges, firm stone fruit) – Best-choice fruit list: Think vibrant, firm fruits like strawberries, blueberries, raspberries, kiwi, grapes, and sliced peaches or nectarines (when firm-ripe). What to avoid: Overly ripe or watery fruits, and those that brown quickly like sliced apples without lemon juice.
- ¼ cup apricot jam (optional, for glaze)
- 1-2 teaspoons water (optional, for glaze)
- Fruit Topping & Assembly Step-by-Step Instructions
- Prep Fruit: Wash all fresh fruit thoroughly. Dry it completely with paper towels – this is key to preventing a watery tart and helping the glaze adhere. Slice larger fruits (like strawberries or kiwi) into uniform, visually appealing pieces.
- Fill Crust: Once the pastry cream is thoroughly chilled and firm, spoon it into the cooled, blind-baked tart crust. Spread it evenly to about ½ to ¾ inch thick, leaving a slight border around the edge.
- Arrange Fruit: Artfully arrange your prepared fresh fruit over the pastry cream. You can create concentric rings, a mosaic pattern, or a more organic design. Simple arranging method: Start with larger fruits as a base, then fill in gaps with smaller berries. How to hide messy pieces: Place any imperfect slices towards the center or under other fruits.
- Optional Glaze: If using, warm the apricot jam in a small saucepan over low heat or in the microwave for 15-30 seconds until melted and fluid. If it's too thick, stir in 1-2 teaspoons of water to thin it slightly. Gently brush a thin layer of the warm glaze over the fruit using a pastry brush. How to avoid tinted/overly sticky fruit: Use a very light hand and don't over-apply. The goal is a subtle sheen, not a thick coating.
- Chill to Set: Chill the assembled fruit tart cake in the refrigerator for 30-60 minutes before slicing and serving. This brief chill helps the pastry cream and glaze set, making for cleaner cuts.
You may also like


Hey there! I’m just someone who seriously loves good food and believes that cooking doesn’t have to be complicated to be amazing. Whether it’s a quick weeknight dinner or a cozy weekend meal, I’m all about sharing easy, tasty recipes that actually work.


