
Hawaiian Sweet Dinner Rolls - Soft, Fluffy & Easy Recipe
Hawaiian Sweet Dinner Rolls - Soft, Fluffy & Easy Recipe

- Serves: 16 People
- Prepare Time: 30 minutes
- Cooking Time: 20 minutes
- Calories: -
- Difficulty: Medium
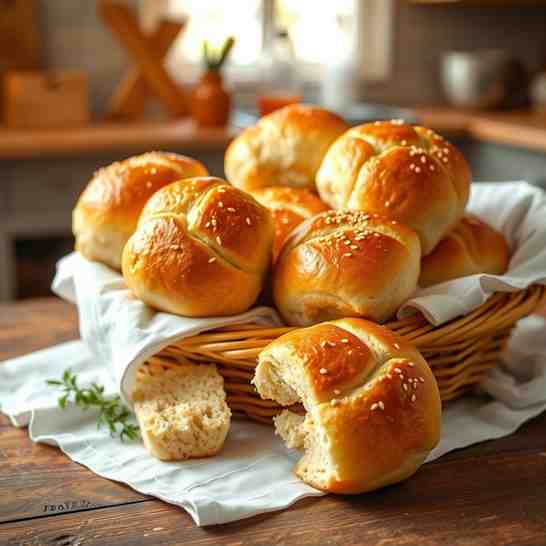
Get ready to bake the most irresistible Hawaiian sweet dinner rolls you've ever tasted! These aren't just any ordinary bread rolls; they're a tropical delight, promising a pillowy soft texture and a delicate pineapple sweetness that makes them perfect for dinner, sliders, or even a delightful breakfast treat. Forget those dense, dry rolls – our recipe for homemade Hawaiian sweet rolls will guide you to fluffy perfection. We're talking about classic Hawaiian yeast sweet bread rolls here, distinct from the quicker coconut breads you might find in other tropical regions. This recipe focuses on creating those incredibly soft dinner rolls with a lightly sweet, buttery, and subtly pineapple-infused flavor profile that truly sets them apart. Whether you're a beginner baker or looking to master your bread-making skills, you'll find everything you need to create these beloved buns, including notes for gluten free Hawaiian sweet bread variations.
Ingredients
Directions
- Prep + Warm Liquids: In a microwave-safe bowl or small saucepan, gently warm the pineapple juice and milk together until the mixture reaches an ideal temperature range of 105-115°F (40-46°C). This temperature is crucial for activating the yeast without killing it. If using active dry yeast, proof it in a small portion of this warm liquid with a pinch of sugar for 5-10 minutes until foamy.
- Mix the Dough: In the bowl of a stand mixer, combine the warmed pineapple juice and milk mixture, yeast, sugar, melted butter, egg, and vanilla (if using). Stir gently. Add the bread flour and salt. If adding optional shredded coconut, mix it in now.
- Knead Until Smooth: Using the dough hook attachment, mix on low speed until a shaggy dough forms, then increase to medium-low speed and knead for 7-10 minutes. The dough should become smooth, elastic, and slightly tacky to the touch, but not sticky or soupy. It should pass the "windowpane-ish" test, stretching thin enough that light can pass through without tearing. Avoid adding too much flour early, as this can lead to dense rolls.
- First Rise: Lightly grease a large bowl. Transfer the dough to the bowl, turning once to coat. Cover the bowl tightly with plastic wrap or a clean kitchen towel. Let the dough rise in a warm spot for 1-1.5 hours, or until it has visibly doubled in size. The exact time will depend on your room temperature.
- Shape Rolls: Gently punch down the risen dough to release the air. Turn it out onto a lightly floured surface. Divide the dough into 16 equal pieces, aiming for about 45-50 grams per roll if using a kitchen scale (highly recommended for consistency). Shape each piece into a smooth, tight ball by pulling the edges underneath and rolling it against the counter with a cupped hand.
- Second Rise: Arrange the shaped rolls in a greased 9x13 inch baking pan or on a sheet pan, leaving a little space between each. Cover the pan loosely with plastic wrap or a clean towel. Let the rolls rise again in a warm spot for 30-45 minutes, or until they look puffy and nearly doubled in size. A good readiness test is the "finger dent" test: gently press a finger into a roll; if the indentation slowly springs back, it's ready. If it springs back quickly, it needs more time. If it doesn't spring back at all, it's over-proofed.
- Bake: Preheat your oven to 375°F (190°C). If desired, brush the tops of the rolls with an egg wash (1 egg beaten with 1 tablespoon water) for a shiny, golden crust. Bake for 15-20 minutes, or until the tops are golden brown and the internal temperature of a roll reaches 190-200°F (88-93°C) when checked with an instant-read thermometer.
- Finish for Ultra-Soft Rolls: Immediately after removing the rolls from the oven, brush their warm tops generously with 1-2 tablespoons of melted unsalted butter. This adds extra flavor and keeps them incredibly soft. Let the rolls cool in the pan for 5-10 minutes before transferring them to a wire rack to cool completely. Cooling properly prevents them from getting gummy.
Hawaiian Sweet Dinner Rolls - Soft, Fluffy & Easy Recipe

- Serves: 16 People
- Prepare Time: 30 minutes
- Cooking Time: 20 minutes
- Calories: -
- Difficulty: Medium
Get ready to bake the most irresistible Hawaiian sweet dinner rolls you've ever tasted! These aren't just any ordinary bread rolls; they're a tropical delight, promising a pillowy soft texture and a delicate pineapple sweetness that makes them perfect for dinner, sliders, or even a delightful breakfast treat. Forget those dense, dry rolls – our recipe for homemade Hawaiian sweet rolls will guide you to fluffy perfection. We're talking about classic Hawaiian yeast sweet bread rolls here, distinct from the quicker coconut breads you might find in other tropical regions. This recipe focuses on creating those incredibly soft dinner rolls with a lightly sweet, buttery, and subtly pineapple-infused flavor profile that truly sets them apart. Whether you're a beginner baker or looking to master your bread-making skills, you'll find everything you need to create these beloved buns, including notes for gluten free Hawaiian sweet bread variations.
Ingredients
Directions
- Prep + Warm Liquids: In a microwave-safe bowl or small saucepan, gently warm the pineapple juice and milk together until the mixture reaches an ideal temperature range of 105-115°F (40-46°C). This temperature is crucial for activating the yeast without killing it. If using active dry yeast, proof it in a small portion of this warm liquid with a pinch of sugar for 5-10 minutes until foamy.
- Mix the Dough: In the bowl of a stand mixer, combine the warmed pineapple juice and milk mixture, yeast, sugar, melted butter, egg, and vanilla (if using). Stir gently. Add the bread flour and salt. If adding optional shredded coconut, mix it in now.
- Knead Until Smooth: Using the dough hook attachment, mix on low speed until a shaggy dough forms, then increase to medium-low speed and knead for 7-10 minutes. The dough should become smooth, elastic, and slightly tacky to the touch, but not sticky or soupy. It should pass the "windowpane-ish" test, stretching thin enough that light can pass through without tearing. Avoid adding too much flour early, as this can lead to dense rolls.
- First Rise: Lightly grease a large bowl. Transfer the dough to the bowl, turning once to coat. Cover the bowl tightly with plastic wrap or a clean kitchen towel. Let the dough rise in a warm spot for 1-1.5 hours, or until it has visibly doubled in size. The exact time will depend on your room temperature.
- Shape Rolls: Gently punch down the risen dough to release the air. Turn it out onto a lightly floured surface. Divide the dough into 16 equal pieces, aiming for about 45-50 grams per roll if using a kitchen scale (highly recommended for consistency). Shape each piece into a smooth, tight ball by pulling the edges underneath and rolling it against the counter with a cupped hand.
- Second Rise: Arrange the shaped rolls in a greased 9x13 inch baking pan or on a sheet pan, leaving a little space between each. Cover the pan loosely with plastic wrap or a clean towel. Let the rolls rise again in a warm spot for 30-45 minutes, or until they look puffy and nearly doubled in size. A good readiness test is the "finger dent" test: gently press a finger into a roll; if the indentation slowly springs back, it's ready. If it springs back quickly, it needs more time. If it doesn't spring back at all, it's over-proofed.
- Bake: Preheat your oven to 375°F (190°C). If desired, brush the tops of the rolls with an egg wash (1 egg beaten with 1 tablespoon water) for a shiny, golden crust. Bake for 15-20 minutes, or until the tops are golden brown and the internal temperature of a roll reaches 190-200°F (88-93°C) when checked with an instant-read thermometer.
- Finish for Ultra-Soft Rolls: Immediately after removing the rolls from the oven, brush their warm tops generously with 1-2 tablespoons of melted unsalted butter. This adds extra flavor and keeps them incredibly soft. Let the rolls cool in the pan for 5-10 minutes before transferring them to a wire rack to cool completely. Cooling properly prevents them from getting gummy.
You may also like


Hey there! I’m just someone who seriously loves good food and believes that cooking doesn’t have to be complicated to be amazing. Whether it’s a quick weeknight dinner or a cozy weekend meal, I’m all about sharing easy, tasty recipes that actually work.


