
Aruban Keshi Yena Recipe
Aruban Keshi Yena Recipe
- Serves: 6 People
- Prepare Time: 30 minutes
- Cooking Time: 45 minutes
- Calories: -
- Difficulty: Easy
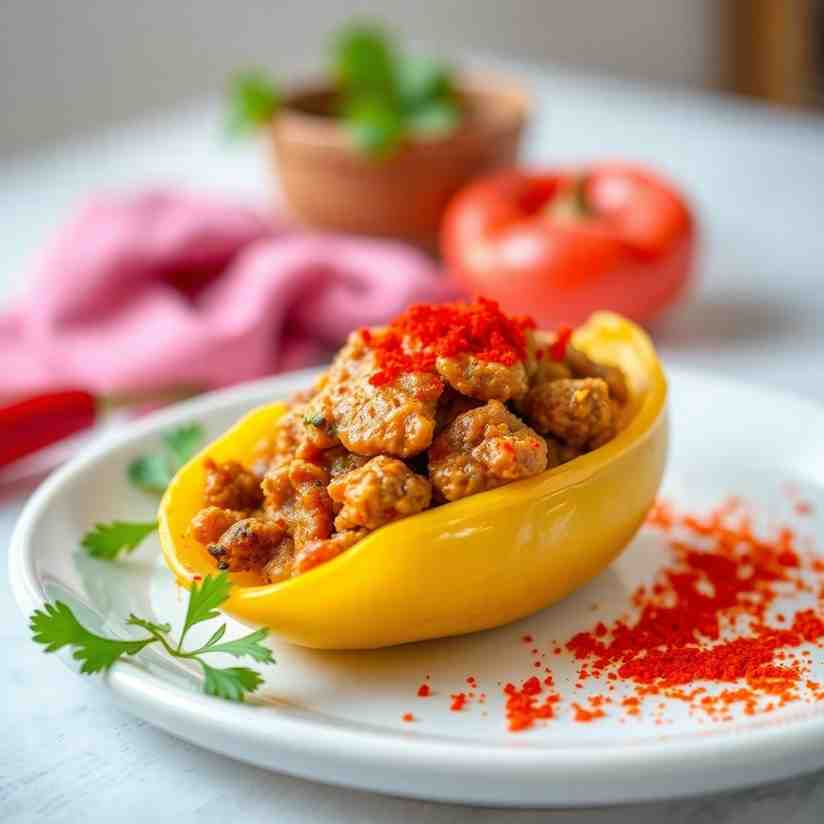
Get ready to bring a taste of the Caribbean sunshine right into your kitchen! Today, we're diving into the heart of Aruban cuisine with a truly special dish: Keshi Yena. This isn't just any casserole; it's a creamy, baked cheese shell lovingly wrapped around a savory, spiced meat filling, a true culinary embrace from the ABC islands. While traditionally made by stuffing a whole cheese wheel, our recipe adapts this incredible Aruban national dish for your everyday US kitchen, making it practical without sacrificing any of its rich, authentic flavor. Imagine tender, seasoned meat nestled within a golden, gooey cheese crust – it’s the ultimate comfort food with an exotic twist. Whether you're a seasoned chef or just starting your culinary journey, this Keshi Yena recipe is designed to be approachable, delicious, and a guaranteed crowd-pleaser. Let's get cooking!
Ingredients
Directions
- Prep & Chop
- Preheat your oven to 375°F (190°C) with a rack positioned in the middle.
- Dice your onion, bell pepper, and tomato. Mince the garlic and the hot pepper (remember to remove seeds and membranes for less heat)
- Prepare your meat: if using raw chicken, cook and shred it. If using leftover cooked chicken, ensure it's shredded and ready to go
- Lightly grease a 9x13 inch casserole dish or individual ramekins with butter or oil.
- Heat olive oil or butter in a large skillet or Dutch oven over medium heat. Add the diced onion, bell pepper, and tomato. Sauté for 5-7 minutes until softened and beginning to caramelize.
- Stir in the minced garlic and hot pepper, cooking for another minute until fragrant.
- Add the shredded cooked chicken to the skillet. Cook for a few minutes, stirring to combine and ensure any excess moisture from the meat reduces.
- Stir in the tomato paste, Dijon mustard, ketchup, Worcestershire sauce, chopped green olives, capers, raisins, salt, pepper, and optional nutmeg. Mix everything thoroughly.
- Bring the mixture to a gentle simmer and cook for 5-10 minutes, stirring occasionally, until the filling has thickened significantly. Any liquid should mostly evaporate, leaving a rich, spoonable consistency.
- Taste the filling and adjust seasoning as needed (more salt, a pinch of sugar for sweetness, or a dash of hot sauce for extra heat).
- Remove the filling from the heat and let it cool slightly for about 5-10 minutes. If you're using an egg for binding, now is the time to stir in the lightly beaten egg; ensure the filling isn't too hot, or the egg will scramble.
- Take your thinly sliced Edam or Gouda cheese. Starting from the bottom, layer the cheese slices across the greased casserole dish, overlapping them generously to form a solid "shell."
- Continue layering the cheese up the sides of the dish, ensuring it reaches at least two-thirds of the way up (or to the rim if using a shallower dish). Make sure there are no gaps for the filling to escape. Layering thickly helps create a sturdy crust.
- Spoon the slightly cooled meat filling into the cheese-lined dish. Gently press the filling down to avoid any air pockets, ensuring it's evenly distributed.
- Arrange the remaining cheese slices over the top of the filling in an even layer, completely covering it.
- Optional: For an extra golden crust, you can lightly brush the top cheese layer with a tiny bit of melted butter or a light egg wash.
- Place the casserole dish in the preheated oven.
- Bake for 30-45 minutes. You'll know it's ready when the cheese around the edges is bubbling, and the top is lightly golden with some beautiful browned spots.
- Note for ramekins: If using individual ramekins, start checking them 10-15 minutes earlier, as they will cook faster.
- Optional: If the top isn't as golden as you'd like, you can briefly broil it for 1-2 minutes. Watch it very closely, as cheese can burn quickly under the broiler!
- Once baked, carefully remove the Keshi Yena from the oven. Let it rest for 10-15 minutes before serving. This crucial resting time allows the cheese to set slightly, making it easier to portion and ensuring your slices hold together beautifully.
- Serve the Keshi Yena by scooping or slicing generous portions. It pairs wonderfully with Caribbean rice and beans, simple green salad, or fried plantains for an authentic Aruban meal.
Aruban Keshi Yena Recipe

- Serves: 6 People
- Prepare Time: 30 minutes
- Cooking Time: 45 minutes
- Calories: -
- Difficulty: Easy
Get ready to bring a taste of the Caribbean sunshine right into your kitchen! Today, we're diving into the heart of Aruban cuisine with a truly special dish: Keshi Yena. This isn't just any casserole; it's a creamy, baked cheese shell lovingly wrapped around a savory, spiced meat filling, a true culinary embrace from the ABC islands. While traditionally made by stuffing a whole cheese wheel, our recipe adapts this incredible Aruban national dish for your everyday US kitchen, making it practical without sacrificing any of its rich, authentic flavor. Imagine tender, seasoned meat nestled within a golden, gooey cheese crust – it’s the ultimate comfort food with an exotic twist. Whether you're a seasoned chef or just starting your culinary journey, this Keshi Yena recipe is designed to be approachable, delicious, and a guaranteed crowd-pleaser. Let's get cooking!
Ingredients
Directions
- Prep & Chop
- Preheat your oven to 375°F (190°C) with a rack positioned in the middle.
- Dice your onion, bell pepper, and tomato. Mince the garlic and the hot pepper (remember to remove seeds and membranes for less heat)
- Prepare your meat: if using raw chicken, cook and shred it. If using leftover cooked chicken, ensure it's shredded and ready to go
- Lightly grease a 9x13 inch casserole dish or individual ramekins with butter or oil.
- Heat olive oil or butter in a large skillet or Dutch oven over medium heat. Add the diced onion, bell pepper, and tomato. Sauté for 5-7 minutes until softened and beginning to caramelize.
- Stir in the minced garlic and hot pepper, cooking for another minute until fragrant.
- Add the shredded cooked chicken to the skillet. Cook for a few minutes, stirring to combine and ensure any excess moisture from the meat reduces.
- Stir in the tomato paste, Dijon mustard, ketchup, Worcestershire sauce, chopped green olives, capers, raisins, salt, pepper, and optional nutmeg. Mix everything thoroughly.
- Bring the mixture to a gentle simmer and cook for 5-10 minutes, stirring occasionally, until the filling has thickened significantly. Any liquid should mostly evaporate, leaving a rich, spoonable consistency.
- Taste the filling and adjust seasoning as needed (more salt, a pinch of sugar for sweetness, or a dash of hot sauce for extra heat).
- Remove the filling from the heat and let it cool slightly for about 5-10 minutes. If you're using an egg for binding, now is the time to stir in the lightly beaten egg; ensure the filling isn't too hot, or the egg will scramble.
- Take your thinly sliced Edam or Gouda cheese. Starting from the bottom, layer the cheese slices across the greased casserole dish, overlapping them generously to form a solid "shell."
- Continue layering the cheese up the sides of the dish, ensuring it reaches at least two-thirds of the way up (or to the rim if using a shallower dish). Make sure there are no gaps for the filling to escape. Layering thickly helps create a sturdy crust.
- Spoon the slightly cooled meat filling into the cheese-lined dish. Gently press the filling down to avoid any air pockets, ensuring it's evenly distributed.
- Arrange the remaining cheese slices over the top of the filling in an even layer, completely covering it.
- Optional: For an extra golden crust, you can lightly brush the top cheese layer with a tiny bit of melted butter or a light egg wash.
- Place the casserole dish in the preheated oven.
- Bake for 30-45 minutes. You'll know it's ready when the cheese around the edges is bubbling, and the top is lightly golden with some beautiful browned spots.
- Note for ramekins: If using individual ramekins, start checking them 10-15 minutes earlier, as they will cook faster.
- Optional: If the top isn't as golden as you'd like, you can briefly broil it for 1-2 minutes. Watch it very closely, as cheese can burn quickly under the broiler!
- Once baked, carefully remove the Keshi Yena from the oven. Let it rest for 10-15 minutes before serving. This crucial resting time allows the cheese to set slightly, making it easier to portion and ensuring your slices hold together beautifully.
- Serve the Keshi Yena by scooping or slicing generous portions. It pairs wonderfully with Caribbean rice and beans, simple green salad, or fried plantains for an authentic Aruban meal.
The following nutritional values are per serving (one piece of cake) Calories ~550-650 per serving Carbohydrates ~25-35g per serving Protein ~35-45g per serving Fat ~30-40g per serving Tools and ingredients that can help you cook more easily and consistently. Problem: Shredding cooked chicken can be a messy, time-consuming chore, especially after a long day. Problem: Chopping all those aromatics – onions, bell peppers, garlic – can feel like a never-ending task, particularly if your knife skills aren't top-notch. Problem: Waiting for the filling to reduce and thicken on the stovetop can take a while, especially if you're in a rush. Problem: Finding the right balance of sweet, savory, and briny can sometimes require a bit of experimentation with individual ingredients. Click any ingredient for detailed nutritional information:Recipe Nutritional Values
Additional Information
Recipe Success Tips
Pro Tips for Perfect Keshi Yena
Ingredient Substitutions & Variations
Cultural Variations
Make-Ahead & Storage Instructions
Frequently Asked Questions
Recommended Kitchen Tools
Time-Saving Tools & Ingredients
Agitate: Who wants to spend extra minutes pulling apart hot chicken when you're eager to get dinner on the table?
Solution: Opt for a pre-cooked rotisserie chicken from your local grocery store. Simply remove the skin and bones, and you've got perfectly cooked, flavorful meat ready to shred in minutes. It’s a game-changer for speed!Time-Saving Tools & Ingredients
Agitate: Spending precious prep time meticulously dicing can delay the fun part: cooking and enjoying!
Solution: A food processor with a chopping blade can dice your veggies in seconds. Just be careful not to over-process them into a paste – a few pulses are usually all it takes for a quick, even chop.Time-Saving Tools & Ingredients
Agitate: A watery filling can make your Keshi Yena soggy and less flavorful, and nobody wants to stand over the stove stirring indefinitely.
Solution: Use a wide, heavy-bottomed skillet or Dutch oven for making your filling. The larger surface area allows moisture to evaporate more quickly, speeding up the reduction process and ensuring a perfectly thick, rich filling in less time.Time-Saving Tools & Ingredients
Agitate: Constantly tasting and adjusting can add minutes to your cooking process, and it's easy to overdo one flavor.
Solution: Consider having a pre-mixed "Caribbean seasoning blend" on hand (check labels for gluten-free options). While not a direct substitute for all ingredients, a good blend can provide a foundational flavor profile, allowing you to quickly layer in your specific sweet and briny elements with confidence.Calories per Ingredient
Resources & References
You may also like


Hey there! I’m just someone who seriously loves good food and believes that cooking doesn’t have to be complicated to be amazing. Whether it’s a quick weeknight dinner or a cozy weekend meal, I’m all about sharing easy, tasty recipes that actually work.


