
Kosovo Flija - Layered Pancake Recipe for Dinner
Kosovo Flija - Layered Pancake Recipe for Dinner


- Serves: 8 People
- Prepare Time: 45 minutes
- Cooking Time: 75 minutes
- Calories: -
- Difficulty: Medium
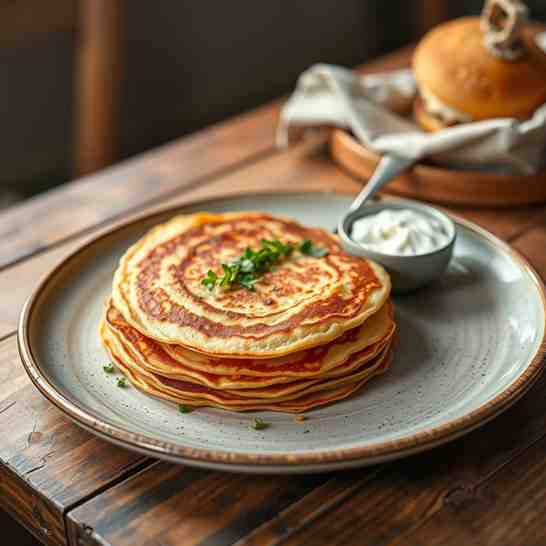
Get ready to discover a truly special dish that’s a cornerstone of Kosovar cuisine: Kosovo Flija (also known as Flia or Fli)! Imagine a sun-patterned, layered batter “pie” that’s incredibly tender, slightly chewy, and brushed with a rich, buttery dairy mixture. It’s not your everyday pancake recipe, but a culinary masterpiece that’s surprisingly simple to make once you get into its unique rhythm.
Flija is a celebration of simple ingredients transformed into something extraordinary. Each delicate layer is cooked and brushed, creating a mesmerizing pattern and an unforgettable texture that’s both crisp on the edges and steamy soft within. It’s a dish that embodies warmth and hospitality, often shared with loved ones during special gatherings. While it might seem like a project, don't be intimidated! The steps are straightforward, and the delicious reward is absolutely worth every moment. This isn't just another one of your dinner recipes; it's an experience waiting to happen in your kitchen.
Ingredients
Directions
- Before You Start: Crucial Setup for Success
- Batter Resting: Once mixed, your batter needs to rest. This allows the flour to fully hydrate, resulting in a smoother, more pliable batter. Aim for a minimum of 30 minutes, but ideally 1-2 hours at room temperature. Keep it covered to prevent a skin from forming.
- Pan Prep: Generously butter or oil your 9-10 inch round pan. A springform pan is highly recommended because its higher rim helps contain the layers and makes removal easy.
- Oven Setup:
- Position an oven rack in the upper third of your oven, about 6-8 inches from the broiler element.
- Set your oven to broil (high setting if you have one).
- Preheat the broiler properly: Let it preheat for at least 10-15 minutes to ensure it’s scorching hot and cooks quickly without drying out the flija.
- "Rotate the pan every cycle" rule: This is critical! Flija cooks unevenly under a broiler. Rotating the pan 180 degrees between each broil cycle ensures even browning and cooking.
- Optional: Place a foil-lined sheet pan on the rack below your flija pan to catch any potential drips.
- Now, let’s make Flija!
- Make the Batter: In a large bowl, whisk together the flour and salt. Gradually add the water, whisking constantly to prevent lumps. Continue whisking until the batter is smooth and the consistency of thin pancake batter – it should easily pour but still have a little body. A simple visual test: dip a spoon, and the batter should coat the back evenly without being too thick or too watery. Cover the bowl and let it rest for at least 30 minutes (or up to 2 hours).
- Make the Dairy Brush Mixture: In a separate small bowl, whisk together the plain yogurt (or sour cream) and melted butter until smooth and well combined. The mixture should be warm enough to be liquid, but not scalding hot, to prevent separation.
- Broil the Base Layer (Full Coverage):
- Pour enough batter into your prepared pan to create a thin, full layer, just enough to cover the bottom. Aim for about ⅛ to ¼ inch thick.
- Place the pan under the preheated broiler. Broil for 1-2 minutes, rotating the pan halfway through, until the batter is set and lightly spotted golden, but not deeply browned. It should look cooked through and slightly puffed. If it browns too fast, lower your rack slightly or switch to a low broil setting.
- Brush Dairy + Pipe the First “Sun Rays”:
- Remove the pan from the oven. Using a pastry brush (or the back of a spoon), lightly brush the cooked base layer with the dairy mixture. Don't overdo it – a thin, even coat is perfect.
- Now, for the "sun rays": Fill a squeeze bottle (or a zip-top bag with a tiny corner snipped off) with the batter. Starting from the outer edge of the pan and working your way inward, pipe concentric lines of batter, creating a spiral or a "sun ray" pattern. The key is to leave gaps between the lines. Aim for rays about ½ to ¾ inch wide, with similar-sized gaps between them. Where to start: Start piping your first ring about ½ inch from the outer rim of the pan, then continue inward. This helps prevent the center from mounding too much.
- Broil, Then Repeat the Rhythm:
- Place the pan back under the broiler. Broil for 1-2 minutes, rotating the pan halfway, until the piped batter layers are set and lightly golden.
- Remove the pan. Brush the newly cooked batter lines with the dairy mixture.
- Now, using your squeeze bottle, pipe new batter lines into the gaps you left in the previous layer. This creates the alternating, interlocking pattern that defines Flija.
- Repeat this "Brush → Fill Gaps → Broil" pattern. You’ll typically do 10-15 cycles for a 9-10 inch pan, depending on how many layers you want and how thin you make them. Each alternating layer fills the gaps from the one before, building up the beautiful sun pattern.
- Final Crisping Step: Once you’ve completed all your layers and the flija has reached your desired height, give the top a final generous brush with the dairy mixture. Return it to the broiler for 1-3 minutes, rotating, until the top is beautifully golden brown and crisp.
- Slice + Serve: Let the flija rest for about 5-10 minutes out of the oven. This allows the layers to set slightly, making for cleaner cuts. Use a sharp knife to cut it into wedges, like a pie. Serve warm with your chosen accompaniments.
Kosovo Flija - Layered Pancake Recipe for Dinner
- Serves: 8 People
- Prepare Time: 45 minutes
- Cooking Time: 75 minutes
- Calories: -
- Difficulty: Medium
Get ready to discover a truly special dish that’s a cornerstone of Kosovar cuisine: Kosovo Flija (also known as Flia or Fli)! Imagine a sun-patterned, layered batter “pie” that’s incredibly tender, slightly chewy, and brushed with a rich, buttery dairy mixture. It’s not your everyday pancake recipe, but a culinary masterpiece that’s surprisingly simple to make once you get into its unique rhythm.
Flija is a celebration of simple ingredients transformed into something extraordinary. Each delicate layer is cooked and brushed, creating a mesmerizing pattern and an unforgettable texture that’s both crisp on the edges and steamy soft within. It’s a dish that embodies warmth and hospitality, often shared with loved ones during special gatherings. While it might seem like a project, don't be intimidated! The steps are straightforward, and the delicious reward is absolutely worth every moment. This isn't just another one of your dinner recipes; it's an experience waiting to happen in your kitchen.
Ingredients
Directions
- Before You Start: Crucial Setup for Success
- Batter Resting: Once mixed, your batter needs to rest. This allows the flour to fully hydrate, resulting in a smoother, more pliable batter. Aim for a minimum of 30 minutes, but ideally 1-2 hours at room temperature. Keep it covered to prevent a skin from forming.
- Pan Prep: Generously butter or oil your 9-10 inch round pan. A springform pan is highly recommended because its higher rim helps contain the layers and makes removal easy.
- Oven Setup:
- Position an oven rack in the upper third of your oven, about 6-8 inches from the broiler element.
- Set your oven to broil (high setting if you have one).
- Preheat the broiler properly: Let it preheat for at least 10-15 minutes to ensure it’s scorching hot and cooks quickly without drying out the flija.
- "Rotate the pan every cycle" rule: This is critical! Flija cooks unevenly under a broiler. Rotating the pan 180 degrees between each broil cycle ensures even browning and cooking.
- Optional: Place a foil-lined sheet pan on the rack below your flija pan to catch any potential drips.
- Now, let’s make Flija!
- Make the Batter: In a large bowl, whisk together the flour and salt. Gradually add the water, whisking constantly to prevent lumps. Continue whisking until the batter is smooth and the consistency of thin pancake batter – it should easily pour but still have a little body. A simple visual test: dip a spoon, and the batter should coat the back evenly without being too thick or too watery. Cover the bowl and let it rest for at least 30 minutes (or up to 2 hours).
- Make the Dairy Brush Mixture: In a separate small bowl, whisk together the plain yogurt (or sour cream) and melted butter until smooth and well combined. The mixture should be warm enough to be liquid, but not scalding hot, to prevent separation.
- Broil the Base Layer (Full Coverage):
- Pour enough batter into your prepared pan to create a thin, full layer, just enough to cover the bottom. Aim for about ⅛ to ¼ inch thick.
- Place the pan under the preheated broiler. Broil for 1-2 minutes, rotating the pan halfway through, until the batter is set and lightly spotted golden, but not deeply browned. It should look cooked through and slightly puffed. If it browns too fast, lower your rack slightly or switch to a low broil setting.
- Brush Dairy + Pipe the First “Sun Rays”:
- Remove the pan from the oven. Using a pastry brush (or the back of a spoon), lightly brush the cooked base layer with the dairy mixture. Don't overdo it – a thin, even coat is perfect.
- Now, for the "sun rays": Fill a squeeze bottle (or a zip-top bag with a tiny corner snipped off) with the batter. Starting from the outer edge of the pan and working your way inward, pipe concentric lines of batter, creating a spiral or a "sun ray" pattern. The key is to leave gaps between the lines. Aim for rays about ½ to ¾ inch wide, with similar-sized gaps between them. Where to start: Start piping your first ring about ½ inch from the outer rim of the pan, then continue inward. This helps prevent the center from mounding too much.
- Broil, Then Repeat the Rhythm:
- Place the pan back under the broiler. Broil for 1-2 minutes, rotating the pan halfway, until the piped batter layers are set and lightly golden.
- Remove the pan. Brush the newly cooked batter lines with the dairy mixture.
- Now, using your squeeze bottle, pipe new batter lines into the gaps you left in the previous layer. This creates the alternating, interlocking pattern that defines Flija.
- Repeat this "Brush → Fill Gaps → Broil" pattern. You’ll typically do 10-15 cycles for a 9-10 inch pan, depending on how many layers you want and how thin you make them. Each alternating layer fills the gaps from the one before, building up the beautiful sun pattern.
- Final Crisping Step: Once you’ve completed all your layers and the flija has reached your desired height, give the top a final generous brush with the dairy mixture. Return it to the broiler for 1-3 minutes, rotating, until the top is beautifully golden brown and crisp.
- Slice + Serve: Let the flija rest for about 5-10 minutes out of the oven. This allows the layers to set slightly, making for cleaner cuts. Use a sharp knife to cut it into wedges, like a pie. Serve warm with your chosen accompaniments.
You may also like


Hey there! I’m just someone who seriously loves good food and believes that cooking doesn’t have to be complicated to be amazing. Whether it’s a quick weeknight dinner or a cozy weekend meal, I’m all about sharing easy, tasty recipes that actually work.


