
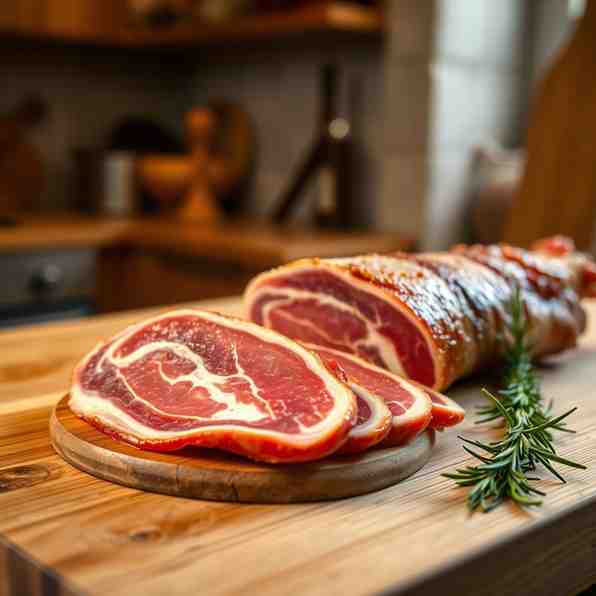
Make iberico de bellota jamon at Home
Make iberico de bellota jamon at Home
- Serves: 50 People
- Prepare Time: 2 hours
- Cooking Time: -
- Calories: -
- Difficulty: Easy
Dreaming of savoring authentic `iberico de bellota jamon` in your own home? The rich, nutty flavor of `Spanish Iberian ham` is truly legendary, celebrated as the `best jamon iberico in Spain` and one of the `famous ham from Spain`. While true `Jamón Ibérico` is deeply tied to specific Iberian pig breeds, their `acorn-fed` diet, and a meticulously long curing process in Spain, the good news is you can absolutely create an incredible `Iberian-style dry-cured ham` right in your kitchen! This isn't about replicating the exact conditions of a Spanish secadero, but rather mastering the traditional dry-curing methods to produce a phenomenal, deeply flavorful `jamon iberico ham` that will impress everyone.
This comprehensive guide is for the patient, passionate DIY cook who loves a culinary challenge and has the ability to control temperature and humidity. If you're ready to embark on a journey that culminates in a whole leg of exquisite, home-cured ham, you're in the right place. However, if you lack the means to maintain a stable, controlled environment, this project might be best left to the professionals. For those ready to dive in, get ready to craft your very own `iberico bellota ham` experience!
Before we dive into making your own `Iberian-style dry-cured ham`, let's quickly clear up some common confusion. What makes `Jamón Ibérico` so special compared to, say, Jamón Serrano? It boils down to a few key differences that profoundly impact flavor and the curing process:
Breed + Diet: `Jamón Ibérico` comes from the black Iberian pig, which often roams freely in oak forests (dehesas) and feeds on acorns (`bellotas`), especially for the prized `iberico de bellota jamon`. This diet and breed lead to intramuscular fat (marbling) that's rich in oleic acid, similar to olive oil. Jamón Serrano, on the other hand, comes from white pigs (like Duroc or Landrace) and has a more conventional diet.
Fat/Marbling: The unique fat of the Iberian pig melts at a lower temperature, giving `iberico bellota ham` its characteristic silky texture and intense, complex flavor. Serrano ham has less marbling and a firmer texture.
Curing Time Expectations: `Jamón Ibérico` requires a significantly longer curing and aging period—often 24 to 48 months, or even longer for larger hams. Serrano hams typically cure for 7 to 18 months. This extended time allows the flavors to deepen and mature.
Tag Colors: You might see colored tags on commercially available `Jamón Ibérico`. These signal its authenticity and quality:
Black Tag: 100% Iberian pig, acorn-fed (the ultimate `iberico de bellota jamon`).
Red Tag: At least 75% Iberian pig, acorn-fed.
Green Tag: At least 50% Iberian pig, pasture-fed or fed on cereals/legumes.
White Tag: At least 50% Iberian pig, fed on cereals/legumes.
Understanding these distinctions helps you appreciate what we're aiming to replicate in style and quality with our home-cured version.
The traditional curing of `Jamón Ibérico` is an art form, a slow dance with time, temperature, and humidity. Here's a brief stage-by-stage explanation of what happens in Spain:
Salting (Salazón): Fresh ham legs are covered in sea salt for about one day per kilo of weight. This extracts moisture, inhibits bacterial growth, and begins the flavor development.
Equalization / Post-Salting Rest (Asentamiento): After salting, the hams are rinsed and allowed to rest in cold, humid conditions for 30-60 days. During this crucial phase, the salt penetrates evenly throughout the meat, and the ham loses more moisture.
Drying (Secado): The hams are then moved to natural drying rooms (secaderos) where they slowly dehydrate, often for 6 to 12 months. Temperature and humidity are carefully controlled, and the ham continues to lose water.
Aging/Maturation (Bodega): Finally, the hams are transferred to underground cellars (bodegas) for the long aging period, which can last from 1 to 4 years. Here, complex flavors and aromas develop, and the ham's texture becomes perfect.
What makes it truly "Iberian" is the unique fat quality of the pig, the extended time, and the specific microclimates of the Iberian Peninsula. At home, we can replicate the process of salting, equalization, drying, and aging, allowing us to create a deeply flavored `Iberian-style dry-cured ham`.
Making `Iberian-style dry-cured ham` at home is a rewarding journey, but it requires specific ingredients and equipment, plus a good dose of patience.
Ingredients
Directions
- Weigh + plan your cure
- Record the exact starting weight of your fresh ham leg in grams or pounds. This is crucial for all calculations and tracking.
- Calculate your salt/cure amounts:
- Total Salt: Aim for 2.5% to 3% of the ham's weight for the initial salting phase. This will be the amount of salt that penetrates the meat, not the amount you apply. For applying salt, you'll need significantly more to pack it.
- Curing Salt #2: This is vital for safety. Use 0.25% of the ham's weight. For example, if your ham is 7000g (7kg), you'd use 17.5g of Curing Salt #2. Measure this very precisely with a jeweler's scale if possible.
- Mix the calculated Curing Salt #2 thoroughly with a small portion (e.g., 1 cup) of your main kosher/sea salt. This ensures even distribution.
- Prep the leg
- Pat the entire ham leg thoroughly dry with paper towels. Any surface moisture can hinder salt penetration and encourage unwanted bacterial growth.
- Trim only what you absolutely must. Keep as much protective skin and fat as possible, especially around the exposed muscle, as this helps prevent case hardening and protects the meat during the long cure. You can lightly score the skin if desired to aid in drainage.
- Salt cure (cold stage)
- In your non-reactive tub or food-safe bin, create a bed of kosher/sea salt (mixed with your curing salt portion).
- Place the ham leg on the salt bed.
- Fully pack and cover the entire ham with the remaining salt, ensuring every surface, especially exposed muscle, is generously coated. You want a thick, protective crust of salt.
- Place the tub in your refrigerator.
- Keep cold the entire time: Maintain a temperature between 34-40°F (1-4°C).
- Flip/rotate on a schedule: Every 2-3 days, flip the ham to ensure even contact with the salt and drainage of purged liquids. The ham will release a lot of moisture.
- Rinse + equalize (cold stage)
- After the calculated salting time (typically 1 day per 1 kg of ham weight, or 0.5 day per 1 lb), remove the ham from the salt.
- Thoroughly rinse off all surface salt under cold running water. Use a brush if necessary to get into crevices.
- Dry the ham thoroughly again with paper towels. You want no visible salt crystals or surface moisture.
- Rest cold so salt distributes evenly: Hang the ham in the refrigerator (or a cold, humid curing chamber, if available) for 2-4 weeks. This "equalization" period allows the salt to migrate and distribute evenly throughout the muscle. Continue to monitor for any unwanted smells or mold.
- Hang + dry (controlled environment)
- Move the ham to your controlled curing space (curing chamber, modified fridge, or a cool, dark basement with stable conditions).
- Hang with airflow: Ensure the ham is hanging freely, allowing air to circulate around all sides.
- Track temp/humidity: Maintain a temperature of 50-65°F (10-18°C) and a humidity of 60-75%. Use your hygrometer/thermometer to monitor this daily.
- Prevent case hardening: If the humidity is too low, the exterior can dry out too quickly, forming a hard crust that traps moisture inside. If this happens, briefly increase humidity or lightly mist the ham. Slow, steady drying is key. The ham should gradually lose weight.
- Age/mature until ready
- Continue controlled drying and aging. This is where the magic happens and flavors develop.
- Use weight-loss checkpoints: The ham is generally considered "ready" when it has lost 30-40% of its original fresh weight. Weigh it periodically (e.g., monthly) and record the loss.
- Manage mold as needed: White, powdery mold is common and often a sign of a healthy cure. Gently wipe it off with a cloth dampened with white vinegar if it becomes excessive. Any green, black, or fuzzy mold should be carefully removed, and the area inspected.
- Finish, slice, and store
- How to test readiness: Beyond weight loss, the ham should feel firm but not rock-hard. You can also use a ham tester (a thin, pointed bone or metal probe) to insert into different parts of the ham; it should come out with a pleasant, mature aroma.
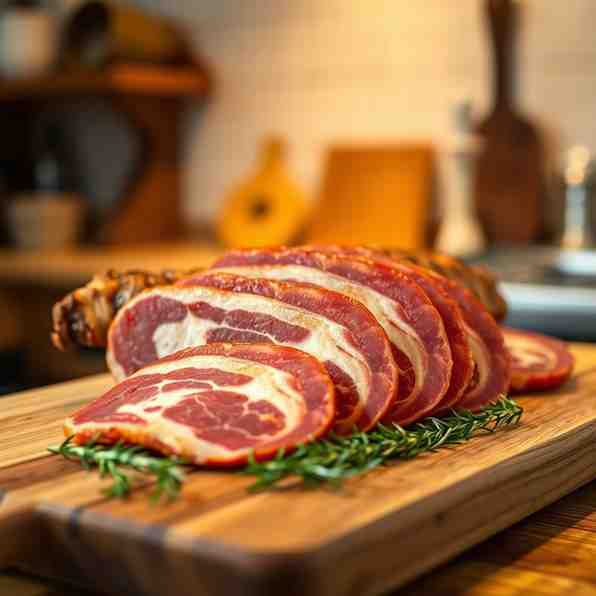
- How to slice paper-thin: For the best experience, slice your `Iberian-style dry-cured ham` paper-thin using a very sharp, long, flexible knife (a jamonero knife is ideal) and a ham stand (jamonero). Slice against the grain where possible.
- Storage: whole leg vs sliced: A whole cured leg can be stored at cool room temperature (60-70°F / 15-21°C) in a dry, well-ventilated area, covered with a clean cloth, for many months. Once sliced, store individual portions tightly wrapped in the refrigerator for up to a few weeks, or freeze for longer storage.
- “You’re on track when…” checkpoints
- Weight loss targets: Your ham is consistently losing weight, aiming for 30-40% total loss from its original fresh weight by the end of the aging period.
- Texture feel: The ham's exterior gradually firms up, and the meat inside feels dense but not overly stiff.
- Aroma expectations: The ham develops a pleasant, savory, slightly nutty aroma. As it ages, the aroma will become more complex and rich.
Make iberico de bellota jamon at Home

- Serves: 50 People
- Prepare Time: 2 hours
- Cooking Time: -
- Calories: -
- Difficulty: Easy
Dreaming of savoring authentic `iberico de bellota jamon` in your own home? The rich, nutty flavor of `Spanish Iberian ham` is truly legendary, celebrated as the `best jamon iberico in Spain` and one of the `famous ham from Spain`. While true `Jamón Ibérico` is deeply tied to specific Iberian pig breeds, their `acorn-fed` diet, and a meticulously long curing process in Spain, the good news is you can absolutely create an incredible `Iberian-style dry-cured ham` right in your kitchen! This isn't about replicating the exact conditions of a Spanish secadero, but rather mastering the traditional dry-curing methods to produce a phenomenal, deeply flavorful `jamon iberico ham` that will impress everyone.
This comprehensive guide is for the patient, passionate DIY cook who loves a culinary challenge and has the ability to control temperature and humidity. If you're ready to embark on a journey that culminates in a whole leg of exquisite, home-cured ham, you're in the right place. However, if you lack the means to maintain a stable, controlled environment, this project might be best left to the professionals. For those ready to dive in, get ready to craft your very own `iberico bellota ham` experience!
Before we dive into making your own `Iberian-style dry-cured ham`, let's quickly clear up some common confusion. What makes `Jamón Ibérico` so special compared to, say, Jamón Serrano? It boils down to a few key differences that profoundly impact flavor and the curing process:
Breed + Diet: `Jamón Ibérico` comes from the black Iberian pig, which often roams freely in oak forests (dehesas) and feeds on acorns (`bellotas`), especially for the prized `iberico de bellota jamon`. This diet and breed lead to intramuscular fat (marbling) that's rich in oleic acid, similar to olive oil. Jamón Serrano, on the other hand, comes from white pigs (like Duroc or Landrace) and has a more conventional diet.
Fat/Marbling: The unique fat of the Iberian pig melts at a lower temperature, giving `iberico bellota ham` its characteristic silky texture and intense, complex flavor. Serrano ham has less marbling and a firmer texture.
Curing Time Expectations: `Jamón Ibérico` requires a significantly longer curing and aging period—often 24 to 48 months, or even longer for larger hams. Serrano hams typically cure for 7 to 18 months. This extended time allows the flavors to deepen and mature.
Tag Colors: You might see colored tags on commercially available `Jamón Ibérico`. These signal its authenticity and quality:
Black Tag: 100% Iberian pig, acorn-fed (the ultimate `iberico de bellota jamon`).
Red Tag: At least 75% Iberian pig, acorn-fed.
Green Tag: At least 50% Iberian pig, pasture-fed or fed on cereals/legumes.
White Tag: At least 50% Iberian pig, fed on cereals/legumes.
Understanding these distinctions helps you appreciate what we're aiming to replicate in style and quality with our home-cured version.
The traditional curing of `Jamón Ibérico` is an art form, a slow dance with time, temperature, and humidity. Here's a brief stage-by-stage explanation of what happens in Spain:
Salting (Salazón): Fresh ham legs are covered in sea salt for about one day per kilo of weight. This extracts moisture, inhibits bacterial growth, and begins the flavor development.
Equalization / Post-Salting Rest (Asentamiento): After salting, the hams are rinsed and allowed to rest in cold, humid conditions for 30-60 days. During this crucial phase, the salt penetrates evenly throughout the meat, and the ham loses more moisture.
Drying (Secado): The hams are then moved to natural drying rooms (secaderos) where they slowly dehydrate, often for 6 to 12 months. Temperature and humidity are carefully controlled, and the ham continues to lose water.
Aging/Maturation (Bodega): Finally, the hams are transferred to underground cellars (bodegas) for the long aging period, which can last from 1 to 4 years. Here, complex flavors and aromas develop, and the ham's texture becomes perfect.
What makes it truly "Iberian" is the unique fat quality of the pig, the extended time, and the specific microclimates of the Iberian Peninsula. At home, we can replicate the process of salting, equalization, drying, and aging, allowing us to create a deeply flavored `Iberian-style dry-cured ham`.
Making `Iberian-style dry-cured ham` at home is a rewarding journey, but it requires specific ingredients and equipment, plus a good dose of patience.
Ingredients
Directions
- Weigh + plan your cure
- Record the exact starting weight of your fresh ham leg in grams or pounds. This is crucial for all calculations and tracking.
- Calculate your salt/cure amounts:
- Total Salt: Aim for 2.5% to 3% of the ham's weight for the initial salting phase. This will be the amount of salt that penetrates the meat, not the amount you apply. For applying salt, you'll need significantly more to pack it.
- Curing Salt #2: This is vital for safety. Use 0.25% of the ham's weight. For example, if your ham is 7000g (7kg), you'd use 17.5g of Curing Salt #2. Measure this very precisely with a jeweler's scale if possible.
- Mix the calculated Curing Salt #2 thoroughly with a small portion (e.g., 1 cup) of your main kosher/sea salt. This ensures even distribution.
- Prep the leg
- Pat the entire ham leg thoroughly dry with paper towels. Any surface moisture can hinder salt penetration and encourage unwanted bacterial growth.
- Trim only what you absolutely must. Keep as much protective skin and fat as possible, especially around the exposed muscle, as this helps prevent case hardening and protects the meat during the long cure. You can lightly score the skin if desired to aid in drainage.
- Salt cure (cold stage)
- In your non-reactive tub or food-safe bin, create a bed of kosher/sea salt (mixed with your curing salt portion).
- Place the ham leg on the salt bed.
- Fully pack and cover the entire ham with the remaining salt, ensuring every surface, especially exposed muscle, is generously coated. You want a thick, protective crust of salt.
- Place the tub in your refrigerator.
- Keep cold the entire time: Maintain a temperature between 34-40°F (1-4°C).
- Flip/rotate on a schedule: Every 2-3 days, flip the ham to ensure even contact with the salt and drainage of purged liquids. The ham will release a lot of moisture.
- Rinse + equalize (cold stage)
- After the calculated salting time (typically 1 day per 1 kg of ham weight, or 0.5 day per 1 lb), remove the ham from the salt.
- Thoroughly rinse off all surface salt under cold running water. Use a brush if necessary to get into crevices.
- Dry the ham thoroughly again with paper towels. You want no visible salt crystals or surface moisture.
- Rest cold so salt distributes evenly: Hang the ham in the refrigerator (or a cold, humid curing chamber, if available) for 2-4 weeks. This "equalization" period allows the salt to migrate and distribute evenly throughout the muscle. Continue to monitor for any unwanted smells or mold.
- Hang + dry (controlled environment)
- Move the ham to your controlled curing space (curing chamber, modified fridge, or a cool, dark basement with stable conditions).
- Hang with airflow: Ensure the ham is hanging freely, allowing air to circulate around all sides.
- Track temp/humidity: Maintain a temperature of 50-65°F (10-18°C) and a humidity of 60-75%. Use your hygrometer/thermometer to monitor this daily.
- Prevent case hardening: If the humidity is too low, the exterior can dry out too quickly, forming a hard crust that traps moisture inside. If this happens, briefly increase humidity or lightly mist the ham. Slow, steady drying is key. The ham should gradually lose weight.
- Age/mature until ready
- Continue controlled drying and aging. This is where the magic happens and flavors develop.
- Use weight-loss checkpoints: The ham is generally considered "ready" when it has lost 30-40% of its original fresh weight. Weigh it periodically (e.g., monthly) and record the loss.
- Manage mold as needed: White, powdery mold is common and often a sign of a healthy cure. Gently wipe it off with a cloth dampened with white vinegar if it becomes excessive. Any green, black, or fuzzy mold should be carefully removed, and the area inspected.
- Finish, slice, and store
- How to test readiness: Beyond weight loss, the ham should feel firm but not rock-hard. You can also use a ham tester (a thin, pointed bone or metal probe) to insert into different parts of the ham; it should come out with a pleasant, mature aroma.
- How to slice paper-thin: For the best experience, slice your `Iberian-style dry-cured ham` paper-thin using a very sharp, long, flexible knife (a jamonero knife is ideal) and a ham stand (jamonero). Slice against the grain where possible.
- Storage: whole leg vs sliced: A whole cured leg can be stored at cool room temperature (60-70°F / 15-21°C) in a dry, well-ventilated area, covered with a clean cloth, for many months. Once sliced, store individual portions tightly wrapped in the refrigerator for up to a few weeks, or freeze for longer storage.
- “You’re on track when…” checkpoints
- Weight loss targets: Your ham is consistently losing weight, aiming for 30-40% total loss from its original fresh weight by the end of the aging period.
- Texture feel: The ham's exterior gradually firms up, and the meat inside feels dense but not overly stiff.
- Aroma expectations: The ham develops a pleasant, savory, slightly nutty aroma. As it ages, the aroma will become more complex and rich.
You may also like


Hey there! I’m just someone who seriously loves good food and believes that cooking doesn’t have to be complicated to be amazing. Whether it’s a quick weeknight dinner or a cozy weekend meal, I’m all about sharing easy, tasty recipes that actually work.


