
Morcilla Blood Sausage at Home
Morcilla Blood Sausage at Home
- Serves: 8 People
- Prepare Time: 60 minutes
- Cooking Time: 40 minutes
- Calories: -
- Difficulty: Medium
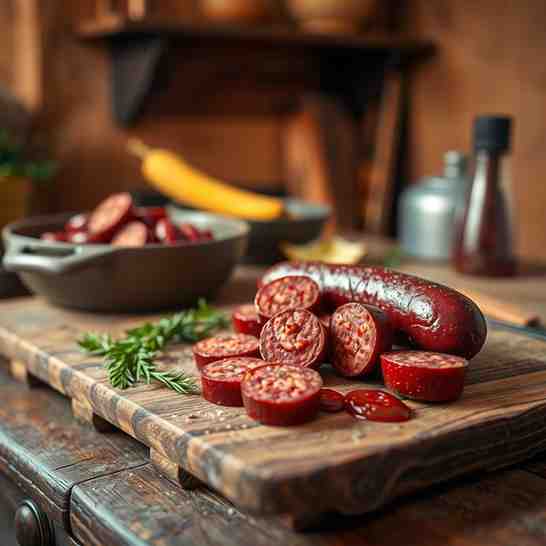
Ever heard of morcilla blood sausage and felt a mix of curiosity and maybe a tiny bit of apprehension? Well, you’re not alone! Yes, this is a sausage made with blood. But trust us, it’s not nearly as scary as it sounds, and it’s an absolute culinary delight. Often called Spanish black pudding, morcilla is a rich, savory sausage made primarily from pork blood, fat, rice, onions, and a beautiful blend of warm spices. It's a staple in Spanish cuisine, beloved for its unique texture and deep flavor.
While there are many regional variations, the Morcilla de Burgos style is particularly famous for its generous inclusion of rice and sweet Horcal onions, creating a creamy yet firm interior that's utterly delicious when pan-fried until crisp. In this definitive guide, you’ll learn exactly what morcilla blood sausage is, how it stands apart from other black puddings, and get a detailed, step-by-step classic Burgos-inspired recipe adapted for your home kitchen. We'll also cover how to cook, serve, and store your homemade morcilla, ensuring you master this incredible delicacy from start to finish. Get ready to impress your taste buds and maybe a few adventurous friends!
Ingredients
Directions
- Equipment You'll Need:
- Meat grinder (optional, if using pre-ground pork or omitting meat)
- Sausage stuffer (or stuffer attachment for your grinder)
- Large mixing bowls
- Spatulas or sturdy mixing spoons
- Digital kitchen scale (for precise ratios)
- Instant-read thermometer
- Large pot or stockpot (at least 8-quart capacity) for poaching
- Cooling racks or sheet pans
- Small Subsection: "Do I absolutely need all this?"While a sausage stuffer and digital scale make the process easier and more consistent, you can still make morcilla without them. If you don't have a stuffer, you can pack the mixture into loaf pans or jars and poach/bake it (it won't be in casing, but the flavor will be the same). A scale ensures accuracy, but measuring cups can work if you're careful. The workflow remains consistent regardless of your exact setup.
- Stage 1 – Prep Casings and Gear
- Rinse and Soak Casings: Thoroughly rinse your natural hog casings inside and out under cool running water to remove excess salt. Soak them in a bowl of fresh, cool water for at least 30 minutes, or longer if they feel stiff. Change the water a few times.
- Chill Equipment: Place your grinder parts (if using), sausage stuffer horn, and mixing bowls in the refrigerator or freezer for at least 30 minutes. Keeping everything cold is crucial for sausage making.
- Stage 2 – Cook the Rice and Onions
- Cook the Rice: Cook your medium-grain rice according to package directions until it's just tender, not mushy. It should still have a slight bite. Drain any excess water immediately and spread the rice on a baking sheet to cool completely. This prevents it from continuing to cook and becoming gummy.
- Sweat the Onions: In a medium skillet, melt a tablespoon of lard or olive oil over low heat. Add the finely diced onions and a pinch of salt. Gently sweat the onions, stirring occasionally, until they are very soft and translucent but not browned (about 10-15 minutes). Browning will change the flavor profile. Spread the cooked onions on a separate plate to cool completely. It is critical that both the rice and onions are fully cooled before mixing with the blood to prevent curdling.
- Stage 3 – Grind the Meat and Fat (Optional)
- Prepare Fat: If using diced fatback, ensure it's very cold. If you choose to include pork shoulder (less traditional for Burgos, which is typically meat-free), grind it through a medium plate (like 6mm) with the diced fat. For a strictly traditional Burgos style, you will only use diced fat, not ground meat. Keep all ground or diced fat very cold.
- Stage 4 – Mix the Blood and Seasoning Base
- Whisk the Blood: In a very large, chilled mixing bowl, whisk the fresh or reconstituted pork blood until it is smooth and uniform, with no lumps.
- Combine Ingredients: Add the salt, all the spice and herb blend, the completely cooled onions, and the completely cooled cooked rice to the blood. Mix thoroughly with a sturdy spatula or your hands until everything is evenly distributed.
- Fold in Fat: Gently fold in the cold diced pork fat (and ground pork, if using). Mix just until combined. Overmixing can lead to a gummy texture. The desired texture should be thick but still pourable, similar to a loose oatmeal or thick batter.
- Stage 5 – Stuff the Sausages
- Load Stuffer: Attach the appropriate stuffing horn to your sausage stuffer and load the morcilla mixture into the stuffer's hopper.
- Stuff Casings: Carefully slide a length of prepared hog casing onto the stuffing horn, leaving a small "tail" at the end. Begin to gently stuff the mixture into the casings, ensuring a consistent fill. Avoid overstuffing, as this can cause bursting during poaching. The sausages should be firm but still have a little give.
- Twist Links: Once you have a continuous length of stuffed sausage, twist it into individual links, about 8-10 inches long. Twist in alternating directions to prevent unraveling.
- Tip Box: Dealing with Air Bubbles: If you notice any air bubbles in your stuffed sausages, use a sterile sausage pricker or a sharp needle to gently prick the casing and release the air. Tie off the ends of your links with butcher's twine.
- Stage 6 – Poach to Set
- Heat Water: Fill your large stockpot with water and heat it to a precise temperature of 78-80°C (172-176°F). Do NOT allow the water to boil, as this will cause the sausages to burst and the blood to curdle. Maintain this temperature using your instant-read thermometer.
- Gently Poach: Carefully lower the morcilla links into the hot water, ensuring they are fully submerged. Do not overcrowd the pot; poach in batches if necessary.
- Cook Time: Poach the sausages for approximately 30-40 minutes, depending on their diameter. The morcilla is done when it feels firm to the touch and an internal temperature of 70-72°C (158-162°F) is reached. Signs of doneness include a darker, opaque appearance throughout. Overcooking can lead to a dry, crumbly texture, while undercooking will leave it too soft.
- Stage 7 – Cool and Store
- Cooling: Carefully lift the poached sausages from the hot water. You can briefly rinse them under cool water to stop the cooking process, then immediately transfer them to cooling racks set over sheet pans. Allow them to cool completely at room temperature, then chill them further in the refrigerator to 8-10°C (47-50°F). Proper cooling prevents bacterial growth and helps the morcilla set.
- Storage:
- Refrigerator: Store cooked morcilla in an airtight container in the fridge for up to 5-7 days.
- Freezer: For longer storage, wrap individual links tightly in plastic wrap, then in aluminum foil, and place them in a freezer-safe bag. Morcilla can be frozen for up to 3 months for best quality. Thaw in the refrigerator before cooking.
Morcilla Blood Sausage at Home
- Serves: 8 People
- Prepare Time: 60 minutes
- Cooking Time: 40 minutes
- Calories: -
- Difficulty: Medium
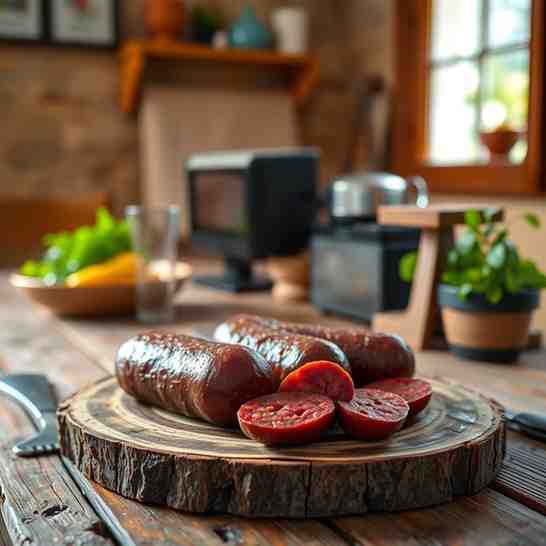
Ever heard of morcilla blood sausage and felt a mix of curiosity and maybe a tiny bit of apprehension? Well, you’re not alone! Yes, this is a sausage made with blood. But trust us, it’s not nearly as scary as it sounds, and it’s an absolute culinary delight. Often called Spanish black pudding, morcilla is a rich, savory sausage made primarily from pork blood, fat, rice, onions, and a beautiful blend of warm spices. It's a staple in Spanish cuisine, beloved for its unique texture and deep flavor.
While there are many regional variations, the Morcilla de Burgos style is particularly famous for its generous inclusion of rice and sweet Horcal onions, creating a creamy yet firm interior that's utterly delicious when pan-fried until crisp. In this definitive guide, you’ll learn exactly what morcilla blood sausage is, how it stands apart from other black puddings, and get a detailed, step-by-step classic Burgos-inspired recipe adapted for your home kitchen. We'll also cover how to cook, serve, and store your homemade morcilla, ensuring you master this incredible delicacy from start to finish. Get ready to impress your taste buds and maybe a few adventurous friends!
Ingredients
Directions
- Equipment You'll Need:
- Meat grinder (optional, if using pre-ground pork or omitting meat)
- Sausage stuffer (or stuffer attachment for your grinder)
- Large mixing bowls
- Spatulas or sturdy mixing spoons
- Digital kitchen scale (for precise ratios)
- Instant-read thermometer
- Large pot or stockpot (at least 8-quart capacity) for poaching
- Cooling racks or sheet pans
- Small Subsection: "Do I absolutely need all this?"While a sausage stuffer and digital scale make the process easier and more consistent, you can still make morcilla without them. If you don't have a stuffer, you can pack the mixture into loaf pans or jars and poach/bake it (it won't be in casing, but the flavor will be the same). A scale ensures accuracy, but measuring cups can work if you're careful. The workflow remains consistent regardless of your exact setup.
- Stage 1 – Prep Casings and Gear
- Rinse and Soak Casings: Thoroughly rinse your natural hog casings inside and out under cool running water to remove excess salt. Soak them in a bowl of fresh, cool water for at least 30 minutes, or longer if they feel stiff. Change the water a few times.
- Chill Equipment: Place your grinder parts (if using), sausage stuffer horn, and mixing bowls in the refrigerator or freezer for at least 30 minutes. Keeping everything cold is crucial for sausage making.
- Stage 2 – Cook the Rice and Onions
- Cook the Rice: Cook your medium-grain rice according to package directions until it's just tender, not mushy. It should still have a slight bite. Drain any excess water immediately and spread the rice on a baking sheet to cool completely. This prevents it from continuing to cook and becoming gummy.
- Sweat the Onions: In a medium skillet, melt a tablespoon of lard or olive oil over low heat. Add the finely diced onions and a pinch of salt. Gently sweat the onions, stirring occasionally, until they are very soft and translucent but not browned (about 10-15 minutes). Browning will change the flavor profile. Spread the cooked onions on a separate plate to cool completely. It is critical that both the rice and onions are fully cooled before mixing with the blood to prevent curdling.
- Stage 3 – Grind the Meat and Fat (Optional)
- Prepare Fat: If using diced fatback, ensure it's very cold. If you choose to include pork shoulder (less traditional for Burgos, which is typically meat-free), grind it through a medium plate (like 6mm) with the diced fat. For a strictly traditional Burgos style, you will only use diced fat, not ground meat. Keep all ground or diced fat very cold.
- Stage 4 – Mix the Blood and Seasoning Base
- Whisk the Blood: In a very large, chilled mixing bowl, whisk the fresh or reconstituted pork blood until it is smooth and uniform, with no lumps.
- Combine Ingredients: Add the salt, all the spice and herb blend, the completely cooled onions, and the completely cooled cooked rice to the blood. Mix thoroughly with a sturdy spatula or your hands until everything is evenly distributed.
- Fold in Fat: Gently fold in the cold diced pork fat (and ground pork, if using). Mix just until combined. Overmixing can lead to a gummy texture. The desired texture should be thick but still pourable, similar to a loose oatmeal or thick batter.
- Stage 5 – Stuff the Sausages
- Load Stuffer: Attach the appropriate stuffing horn to your sausage stuffer and load the morcilla mixture into the stuffer's hopper.
- Stuff Casings: Carefully slide a length of prepared hog casing onto the stuffing horn, leaving a small "tail" at the end. Begin to gently stuff the mixture into the casings, ensuring a consistent fill. Avoid overstuffing, as this can cause bursting during poaching. The sausages should be firm but still have a little give.
- Twist Links: Once you have a continuous length of stuffed sausage, twist it into individual links, about 8-10 inches long. Twist in alternating directions to prevent unraveling.
- Tip Box: Dealing with Air Bubbles: If you notice any air bubbles in your stuffed sausages, use a sterile sausage pricker or a sharp needle to gently prick the casing and release the air. Tie off the ends of your links with butcher's twine.
- Stage 6 – Poach to Set
- Heat Water: Fill your large stockpot with water and heat it to a precise temperature of 78-80°C (172-176°F). Do NOT allow the water to boil, as this will cause the sausages to burst and the blood to curdle. Maintain this temperature using your instant-read thermometer.
- Gently Poach: Carefully lower the morcilla links into the hot water, ensuring they are fully submerged. Do not overcrowd the pot; poach in batches if necessary.
- Cook Time: Poach the sausages for approximately 30-40 minutes, depending on their diameter. The morcilla is done when it feels firm to the touch and an internal temperature of 70-72°C (158-162°F) is reached. Signs of doneness include a darker, opaque appearance throughout. Overcooking can lead to a dry, crumbly texture, while undercooking will leave it too soft.
- Stage 7 – Cool and Store
- Cooling: Carefully lift the poached sausages from the hot water. You can briefly rinse them under cool water to stop the cooking process, then immediately transfer them to cooling racks set over sheet pans. Allow them to cool completely at room temperature, then chill them further in the refrigerator to 8-10°C (47-50°F). Proper cooling prevents bacterial growth and helps the morcilla set.
- Storage:
- Refrigerator: Store cooked morcilla in an airtight container in the fridge for up to 5-7 days.
- Freezer: For longer storage, wrap individual links tightly in plastic wrap, then in aluminum foil, and place them in a freezer-safe bag. Morcilla can be frozen for up to 3 months for best quality. Thaw in the refrigerator before cooking.
You may also like


Hey there! I’m just someone who seriously loves good food and believes that cooking doesn’t have to be complicated to be amazing. Whether it’s a quick weeknight dinner or a cozy weekend meal, I’m all about sharing easy, tasty recipes that actually work.


