
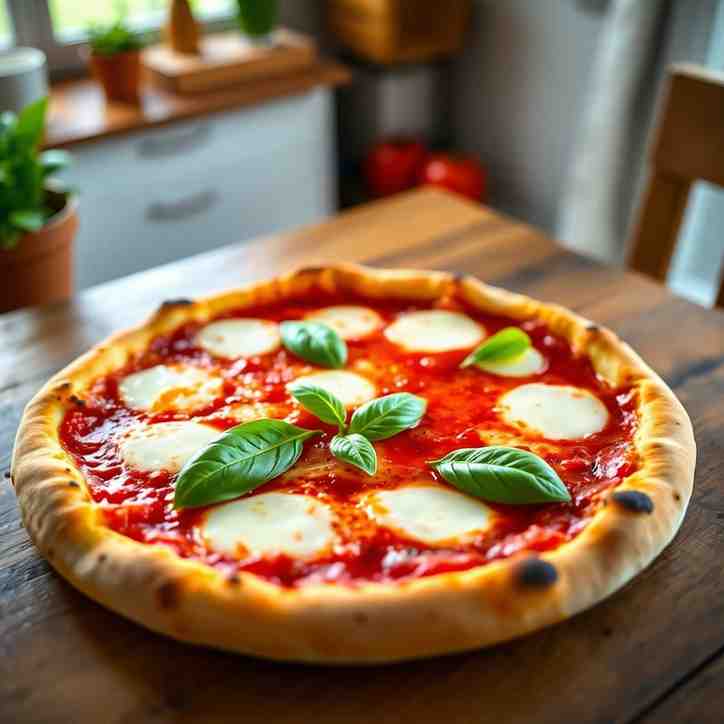
Neapolitan Pizza at Home Margherita Recipe
Neapolitan Pizza at Home Margherita Recipe

- Serves: 4 People
- Prepare Time: 40 minutes
- Cooking Time: 15 minutes
- Calories: -
- Difficulty: Easy
You know that authentic pizza experience – the one with the chewy, puffy, leopard-spotted crust, bursting with fresh tomato and melted mozzarella cheese? It usually feels like something only a fancy pizzeria with a wood oven pizza can achieve. But guess what? You can absolutely make incredible, authentic Neapolitan-style pizza right in your normal home oven! This isn't just another homemade pizza on pizza stone recipe; it's your definitive guide to achieving that pizzeria-quality pie, using simple ingredients and a timeline that actually fits into your life. Get ready to impress yourself and everyone at your table with the best pizza dough for pizza stone and the freshest toppings for homemade pizza. Let's make some magic!
You're probably wondering what makes this recipe special. Here's why you'll fall in love with it:
4-Ingredient Dough: Our dough is inspired by traditional Neapolitan formulas, using just flour, water, salt, and yeast. Simple, pure, perfect.
24-Hour Cold Ferment: This extended chill time is the secret sauce for incredible flavor and that airy, leopard-spotted crust you dream of.
Simple, Classic Toppings: We stick to the essentials: real tomatoes, fresh mozzarella, aromatic basil, and a drizzle of quality olive oil.
Home Oven Ready: This recipe is specifically designed to get you as close as possible to a wood-fired experience, no fancy pizza oven required!
Just a heads-up: while this recipe delivers an amazing Neapolitan-style pizza adapted for home baking, it's not an official VPN (Verace Pizza Napoletana) restaurant formula. It's your ticket to incredible pizza, made easy at home.
You don't need a professional setup for authentic pizza; your home kitchen has most of what you'll need!
Large mixing bowl
Digital kitchen scale (seriously, it makes a difference! But don't worry, we'll give cup measures as a backup)
Dough scraper
Kitchen towel or plastic wrap
Pizza peel or a flat cutting board (for transferring pizzas)
Don't have a neapolitan pizza stone or steel? You can still get fantastic results!
Option 1: Inverted Heavy Baking Sheet: Simply flip a heavy-duty baking sheet upside down and preheat it in your oven. It acts like a makeshift stone!
Option 2: Cast-Iron Skillet Method: Preheat a cast-iron skillet inside your oven. Stretch your dough a bit smaller to fit, then transfer it directly into the hot skillet for baking.
These options are simple tweaks to the same great recipe, ensuring everyone can make this pizza!
Ingredients
Directions
- Mix & Autolyse the Dough (Day 1, 20 minutes)
- If using active dry yeast, hydrate it in about ¼ cup of the room temperature water for 5-10 minutes until foamy. If using instant yeast, you can mix it directly with the flour.
- In your large mixing bowl, combine the 00 flour and fine sea salt. Give it a quick whisk.
- Pour in the water (and hydrated yeast if applicable). Mix with a spoon or your hands until a shaggy, wet dough forms and no dry flour remains.
- Cover the bowl with a kitchen towel or plastic wrap and let it rest for 15-20 minutes. This "autolyse" step allows the flour to fully hydrate, making the dough easier to knead later. It should look a bit rough and sticky.
- Knead & First Fermentation
- After the autolyse, turn the shaggy dough out onto a lightly floured surface. Knead using your preferred method (a simple slap and fold works wonders, or a traditional knead). The goal is to develop gluten until the dough is smooth, elastic, and passes the "windowpane test" (you can stretch a small piece thin enough to see light through it without tearing). This usually takes 5-10 minutes.
- Lightly oil your mixing bowl, place the dough inside, and turn it once to coat. Cover tightly with plastic wrap or a lid.
- Let the dough rise at room temperature for 1-2 hours, or until it's noticeably puffed up, but not necessarily doubled.
- Transfer the covered bowl to the refrigerator for its cold ferment. This should be for 18–24 hours, but can go as short as 8 hours or as long as 48 hours. The longer, the more flavor!
- Divide & Ball the Dough (Day 2)
- About 3-4 hours before you want to bake, take the dough out of the fridge. Let it warm up slightly on the counter for 30 minutes.
- Gently turn the dough out onto a lightly floured surface. Using a dough scraper, divide the dough into 2-3 equal pieces by weight (about 250-350g each, depending on your desired pizza size).
- Form each piece into a tight, smooth ball. You can do this by gently pulling the edges under the dough to create surface tension, or by cupping your hand over the dough and rolling it in a circular motion on the counter.
- Place the dough balls in a lightly floured tray, a lidded container, or on a baking sheet covered loosely with plastic wrap. Ensure they have space to expand.
- Let them proof at room temperature for 1–3 hours, or until they are relaxed, puffy, and soft to the touch. This final proof is crucial for a light, airy crust.
- Make the Simple Tomato Sauce
- If using whole peeled tomatoes, gently crush them with your hands or pulse briefly in a food processor (don't over-blend, you want some texture!). If using crushed, you're good to go.
- Stir in the extra-virgin olive oil, minced garlic (if using), salt, and optional pinch of sugar.
- Taste and adjust seasoning. This sauce can be used no-cook for a fresher flavor, or you can simmer it gently for 10-15 minutes for a slightly richer, more developed taste. If simmering, let it cool completely before using. The goal is a fairly thin sauce, not thick like pasta sauce.
- Preheat Your Oven the Right Way
This is CRITICAL for achieving that Neapolitan-style char and quick bake!- Place your baking stone or steel (or inverted heavy baking sheet, or cast-iron skillet) on the top or middle rack of your oven.
- Preheat your oven as high as it possibly goes (ideally 500–550°F / 260-290°C).
- Let it preheat for at least 45–60 minutes, or even longer, to ensure your baking surface is screaming hot. This extreme heat is what mimics a professional pizza oven.
- Stretch the Dough Like a Pizzaiolo
- Generously flour your work surface and your hands. Gently transfer one dough ball to the floured surface.
- Start by pressing out the center of the dough with your fingertips, working outwards, leaving a roughly 1-inch rim around the edge untouched. This will become your puffy crust.
- Lift the dough and gently stretch it using the backs of your hands or knuckles, rotating it as you go. Gravity is your friend here! Aim for a 10-12 inch circle.
- Visual cues: The dough should be thin in the center but still have a distinct, slightly thicker rim. Avoid thin spots or tearing. If it resists, let it rest for a minute, then continue.Never use a rolling pin – it pushes out all the precious air bubbles!
- Top & Bake the Pizza
- Once stretched, quickly transfer your dough to a lightly floured pizza peel or a floured, upside-down baking sheet. Work swiftly!
- Spread a thin, even layer of your simple tomato sauce over the center, leaving the rim bare. Remember, less is more with Neapolitan pizza.
- Evenly distribute torn pieces of fresh mozzarella cheese pizza and a few fresh basil leaves over the sauce.
- Bake Time:
- Stone/Steel Method: Carefully slide the pizza onto the preheated stone/steel. Bake for 6–8 minutes, or until the crust is puffed and beautifully charred, and the cheese is bubbly. For extra char, you can carefully move it under the broiler for 30-60 seconds at the very end (watch it like a hawk!).
- Pan/Skillet Method: If using an inverted baking sheet, slide it on. If using a cast-iron skillet, carefully transfer the dough into the preheated skillet. Bake for 8–10+ minutes, rotating halfway through for even color.
- Once baked, use your peel to transfer the pizza to a cutting board.
- Finish with a generous drizzle of extra-virgin olive oil, a sprinkle of flaky salt, and a few more fresh basil leaves.
- Slice, Serve & Enjoy
- Let the pizza rest for 1–2 minutes after baking. This allows the cheese to set slightly and prevents scalding.
- Slice into wedges with a pizza cutter.
- Serve immediately! For a true Neapolitan experience, it's often eaten with a knife and fork, or folded in half ("a libretto") for a delightful "NY fold" style bite. Enjoy your authentic pizza!
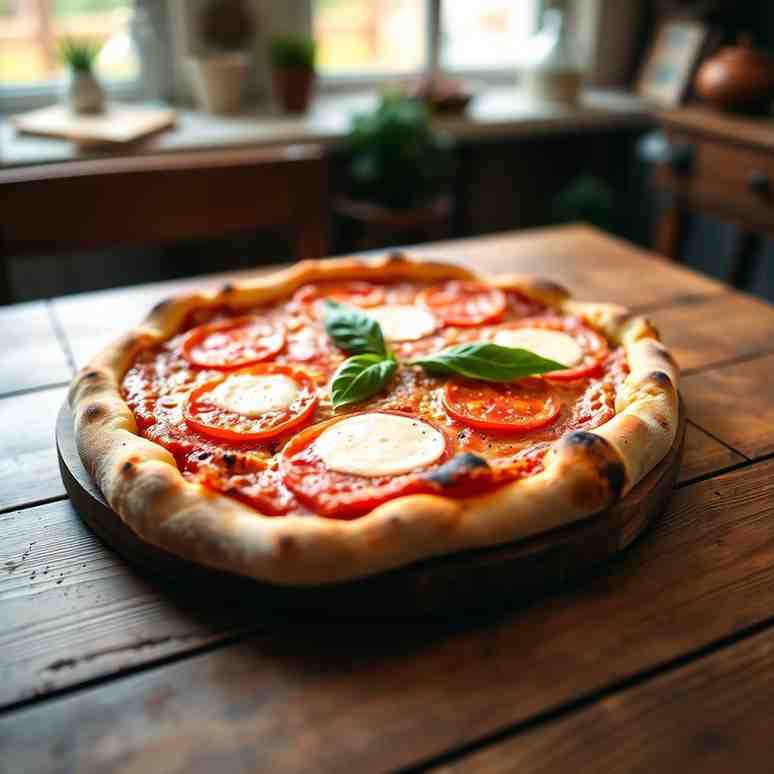
Neapolitan Pizza at Home Margherita Recipe
- Serves: 4 People
- Prepare Time: 40 minutes
- Cooking Time: 15 minutes
- Calories: -
- Difficulty: Easy
You know that authentic pizza experience – the one with the chewy, puffy, leopard-spotted crust, bursting with fresh tomato and melted mozzarella cheese? It usually feels like something only a fancy pizzeria with a wood oven pizza can achieve. But guess what? You can absolutely make incredible, authentic Neapolitan-style pizza right in your normal home oven! This isn't just another homemade pizza on pizza stone recipe; it's your definitive guide to achieving that pizzeria-quality pie, using simple ingredients and a timeline that actually fits into your life. Get ready to impress yourself and everyone at your table with the best pizza dough for pizza stone and the freshest toppings for homemade pizza. Let's make some magic!
You're probably wondering what makes this recipe special. Here's why you'll fall in love with it:
4-Ingredient Dough: Our dough is inspired by traditional Neapolitan formulas, using just flour, water, salt, and yeast. Simple, pure, perfect.
24-Hour Cold Ferment: This extended chill time is the secret sauce for incredible flavor and that airy, leopard-spotted crust you dream of.
Simple, Classic Toppings: We stick to the essentials: real tomatoes, fresh mozzarella, aromatic basil, and a drizzle of quality olive oil.
Home Oven Ready: This recipe is specifically designed to get you as close as possible to a wood-fired experience, no fancy pizza oven required!
Just a heads-up: while this recipe delivers an amazing Neapolitan-style pizza adapted for home baking, it's not an official VPN (Verace Pizza Napoletana) restaurant formula. It's your ticket to incredible pizza, made easy at home.
You don't need a professional setup for authentic pizza; your home kitchen has most of what you'll need!
Large mixing bowl
Digital kitchen scale (seriously, it makes a difference! But don't worry, we'll give cup measures as a backup)
Dough scraper
Kitchen towel or plastic wrap
Pizza peel or a flat cutting board (for transferring pizzas)
Don't have a neapolitan pizza stone or steel? You can still get fantastic results!
Option 1: Inverted Heavy Baking Sheet: Simply flip a heavy-duty baking sheet upside down and preheat it in your oven. It acts like a makeshift stone!
Option 2: Cast-Iron Skillet Method: Preheat a cast-iron skillet inside your oven. Stretch your dough a bit smaller to fit, then transfer it directly into the hot skillet for baking.
These options are simple tweaks to the same great recipe, ensuring everyone can make this pizza!
Ingredients
Directions
- Mix & Autolyse the Dough (Day 1, 20 minutes)
- If using active dry yeast, hydrate it in about ¼ cup of the room temperature water for 5-10 minutes until foamy. If using instant yeast, you can mix it directly with the flour.
- In your large mixing bowl, combine the 00 flour and fine sea salt. Give it a quick whisk.
- Pour in the water (and hydrated yeast if applicable). Mix with a spoon or your hands until a shaggy, wet dough forms and no dry flour remains.
- Cover the bowl with a kitchen towel or plastic wrap and let it rest for 15-20 minutes. This "autolyse" step allows the flour to fully hydrate, making the dough easier to knead later. It should look a bit rough and sticky.
- Knead & First Fermentation
- After the autolyse, turn the shaggy dough out onto a lightly floured surface. Knead using your preferred method (a simple slap and fold works wonders, or a traditional knead). The goal is to develop gluten until the dough is smooth, elastic, and passes the "windowpane test" (you can stretch a small piece thin enough to see light through it without tearing). This usually takes 5-10 minutes.
- Lightly oil your mixing bowl, place the dough inside, and turn it once to coat. Cover tightly with plastic wrap or a lid.
- Let the dough rise at room temperature for 1-2 hours, or until it's noticeably puffed up, but not necessarily doubled.
- Transfer the covered bowl to the refrigerator for its cold ferment. This should be for 18–24 hours, but can go as short as 8 hours or as long as 48 hours. The longer, the more flavor!
- Divide & Ball the Dough (Day 2)
- About 3-4 hours before you want to bake, take the dough out of the fridge. Let it warm up slightly on the counter for 30 minutes.
- Gently turn the dough out onto a lightly floured surface. Using a dough scraper, divide the dough into 2-3 equal pieces by weight (about 250-350g each, depending on your desired pizza size).
- Form each piece into a tight, smooth ball. You can do this by gently pulling the edges under the dough to create surface tension, or by cupping your hand over the dough and rolling it in a circular motion on the counter.
- Place the dough balls in a lightly floured tray, a lidded container, or on a baking sheet covered loosely with plastic wrap. Ensure they have space to expand.
- Let them proof at room temperature for 1–3 hours, or until they are relaxed, puffy, and soft to the touch. This final proof is crucial for a light, airy crust.
- Make the Simple Tomato Sauce
- If using whole peeled tomatoes, gently crush them with your hands or pulse briefly in a food processor (don't over-blend, you want some texture!). If using crushed, you're good to go.
- Stir in the extra-virgin olive oil, minced garlic (if using), salt, and optional pinch of sugar.
- Taste and adjust seasoning. This sauce can be used no-cook for a fresher flavor, or you can simmer it gently for 10-15 minutes for a slightly richer, more developed taste. If simmering, let it cool completely before using. The goal is a fairly thin sauce, not thick like pasta sauce.
- Preheat Your Oven the Right Way
This is CRITICAL for achieving that Neapolitan-style char and quick bake!- Place your baking stone or steel (or inverted heavy baking sheet, or cast-iron skillet) on the top or middle rack of your oven.
- Preheat your oven as high as it possibly goes (ideally 500–550°F / 260-290°C).
- Let it preheat for at least 45–60 minutes, or even longer, to ensure your baking surface is screaming hot. This extreme heat is what mimics a professional pizza oven.
- Stretch the Dough Like a Pizzaiolo
- Generously flour your work surface and your hands. Gently transfer one dough ball to the floured surface.
- Start by pressing out the center of the dough with your fingertips, working outwards, leaving a roughly 1-inch rim around the edge untouched. This will become your puffy crust.
- Lift the dough and gently stretch it using the backs of your hands or knuckles, rotating it as you go. Gravity is your friend here! Aim for a 10-12 inch circle.
- Visual cues: The dough should be thin in the center but still have a distinct, slightly thicker rim. Avoid thin spots or tearing. If it resists, let it rest for a minute, then continue.Never use a rolling pin – it pushes out all the precious air bubbles!
- Top & Bake the Pizza
- Once stretched, quickly transfer your dough to a lightly floured pizza peel or a floured, upside-down baking sheet. Work swiftly!
- Spread a thin, even layer of your simple tomato sauce over the center, leaving the rim bare. Remember, less is more with Neapolitan pizza.
- Evenly distribute torn pieces of fresh mozzarella cheese pizza and a few fresh basil leaves over the sauce.
- Bake Time:
- Stone/Steel Method: Carefully slide the pizza onto the preheated stone/steel. Bake for 6–8 minutes, or until the crust is puffed and beautifully charred, and the cheese is bubbly. For extra char, you can carefully move it under the broiler for 30-60 seconds at the very end (watch it like a hawk!).
- Pan/Skillet Method: If using an inverted baking sheet, slide it on. If using a cast-iron skillet, carefully transfer the dough into the preheated skillet. Bake for 8–10+ minutes, rotating halfway through for even color.
- Once baked, use your peel to transfer the pizza to a cutting board.
- Finish with a generous drizzle of extra-virgin olive oil, a sprinkle of flaky salt, and a few more fresh basil leaves.
- Slice, Serve & Enjoy
- Let the pizza rest for 1–2 minutes after baking. This allows the cheese to set slightly and prevents scalding.
- Slice into wedges with a pizza cutter.
- Serve immediately! For a true Neapolitan experience, it's often eaten with a knife and fork, or folded in half ("a libretto") for a delightful "NY fold" style bite. Enjoy your authentic pizza!
The following nutritional values are per serving (one piece of cake) Calories ~350-450 kcal Carbohydrates ~45-55g Protein ~15-20g Fat ~10-15g Time-Saving Tools & Ingredients H3: Digital Kitchen ScaleP (Problem): Guessing measurements with cups can lead to inconsistent dough hydration, making your pizza either too sticky or too stiff. Time-Saving Tools & Ingredients H3: Digital Kitchen Scale Click any ingredient for detailed nutritional information:Recipe Nutritional Values
Additional Information
Recipe Success Tips
Ingredient Substitutions & Variations
Cultural Variations
Make-Ahead & Storage Instructions
Frequently Asked Questions
Recommended Kitchen Tools
Kitchen Tool
Calories per Ingredient
Resources & References
You may also like


Hey there! I’m just someone who seriously loves good food and believes that cooking doesn’t have to be complicated to be amazing. Whether it’s a quick weeknight dinner or a cozy weekend meal, I’m all about sharing easy, tasty recipes that actually work.


