
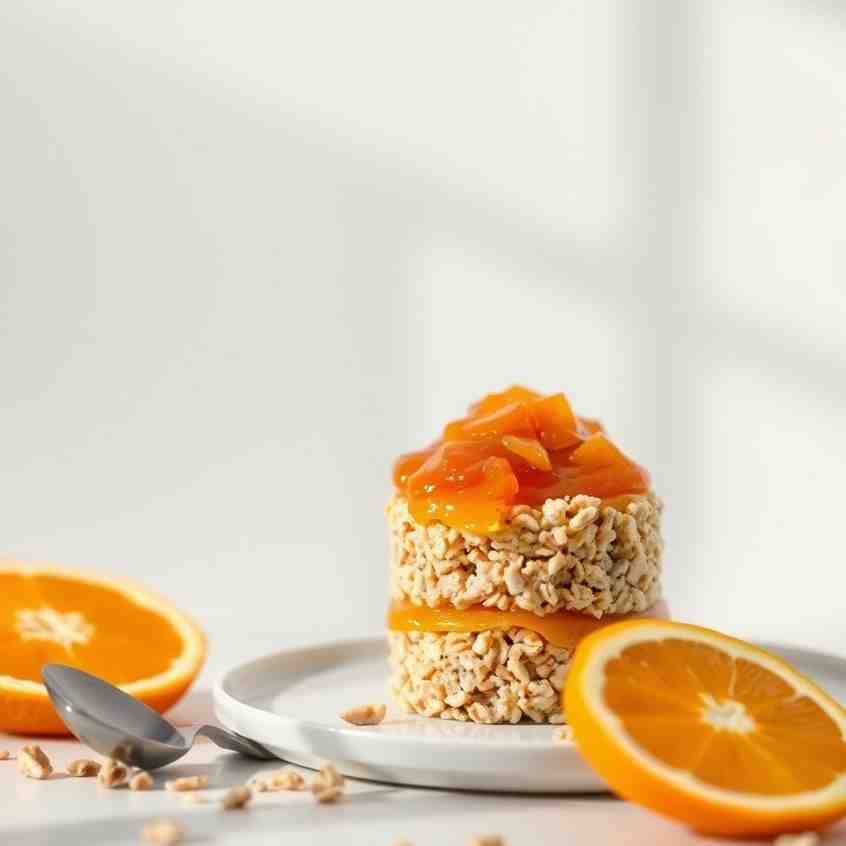
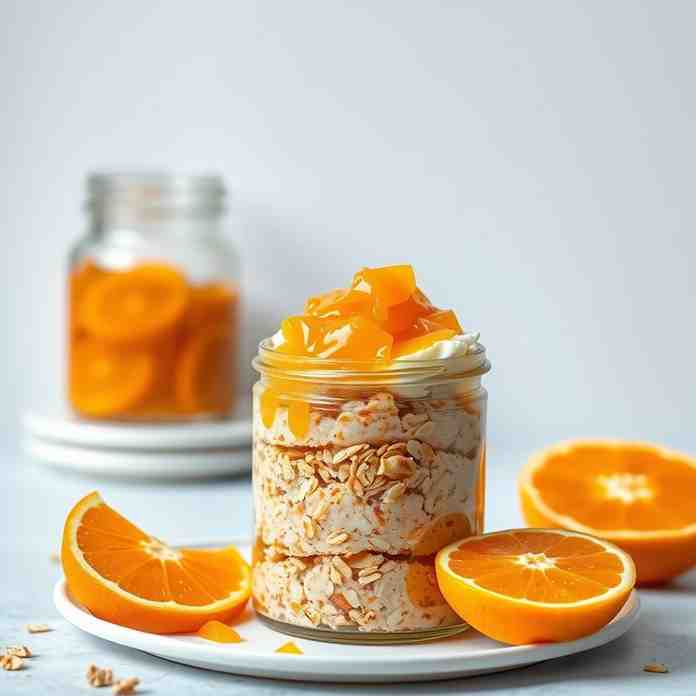
Orange Overnight Oats - Jersey Marmalade
Orange Overnight Oats - Jersey Marmalade
- Serves: 4 People
- Prepare Time: 45 minutes
- Cooking Time: 1 hour 45 m
- Calories: -
- Difficulty: Medium
Hey there, fellow food lovers! Are you ready to whip up something truly special that tastes better from scratch? We're diving into the wonderful world of homemade marmalade with our definitive Jersey Orange Marmalade recipe. Forget those overly bitter, store-bought versions – this classic recipe promises a bright, citrusy spread that’s perfectly balanced and incredibly reliable. It’s designed for real home kitchens, just like yours, making it a straightforward and rewarding project you can tackle right in your New Jersey (or anywhere!) home. This isn't just any orange marmalade; it’s a celebration of fresh and easy recipes, transforming simple oranges into a golden, shimmering jewel that’ll make your mornings sing.
What is marmalade? Marmalade is a fruit preserve made from citrus fruit, sugar, and water, characterized by its translucent jelly and suspended pieces of fruit peel.
What you’ll do: You’ll start by prepping and slicing fresh oranges, soaking them to soften the peel, then simmering, boiling to the perfect gel point, and finally, jarring your delicious creation.
What you’ll need: Just a few simple ingredients – oranges, lemon, sugar, and water – along with a big, trusty pot.
Ingredients
Directions
- Prep the Citrus (Standardize the Cut)
- Wash + Scrub: Thoroughly wash and scrub your oranges and lemon as described in the "Prep Note" above.
- Slice Strategy:
- Remove ends: Slice off both ends of each orange and the lemon.
- Cut into quarters: Stand each fruit on one cut end and cut it lengthwise into quarters.
- Slice into thin 1/8-inch pieces: Working with one quarter at a time, lay it flat on your cutting board and slice it crosswise into very thin 1/8-inch pieces. Don't stress too much about measuring; aim for pieces about the thickness of a couple of quarters stacked together. This thin cut helps reduce bitterness and ensures tender peel.
- Remove seeds as you go: As you slice, you’ll encounter seeds. Pick them out and place them in a small, separate bowl. (These seeds contain pectin, so don't discard them just yet!)
- Pith rule: The pith is the white, spongy layer between the peel and the fruit. While you want to remove any thick, excessively spongy pith, it's okay (and even beneficial for pectin) to leave a little bit of the whitish albedo (the inner part of the peel) on the peel itself.
- Soak (8–24 hours)
- Place all your sliced oranges and lemon, along with the collected seeds (tied loosely in a cheesecloth or muslin bag), into your large heavy pot.
- Pour the 8 cups of water over the fruit.
- Why soaking helps: This crucial step softens the citrus peel, making it wonderfully tender when cooked, and also helps extract more pectin from the fruit and seeds, leading to a better set.
- Where to soak: Cover the pot and let it soak at room temperature for at least 8 hours, or preferably overnight (up to 24 hours). If your kitchen is very warm, you can soak it in the fridge.
- Simmer Until Peel is Tender
- After soaking, remove the cheesecloth bag with the seeds (gently squeeze it to get all the pectin-rich liquid back into the pot, then discard the seeds).
- Bring the fruit and water mixture to a boil over medium-high heat, then reduce the heat to a gentle simmer.
- Simmer cue: Continue to simmer uncovered for 45-60 minutes, stirring occasionally, until the orange peel is incredibly tender. You should be able to easily cut a piece of peel with a spoon with just slight resistance.
- Foam: Don't stress too much about foam at this stage; a little foam is normal and will be addressed later.
- Add Sugar and Cook to Gel Point
- Once the peel is tender, add all 6 cups of granulated sugar to the pot. Stir gently until the sugar is completely dissolved.
- Increase the heat to medium-high and bring the mixture to a full, rolling boil that cannot be stirred down.
- What temperature to target: If using a candy thermometer, cook the marmalade until it reaches 220-222°F (104-105°C).
- What you’ll see happening in the pot: As the marmalade cooks, it will thicken, and the bubbles will become smaller, more numerous, and glassy-looking. The color will deepen to a rich, translucent amber. This stage can take anywhere from 15-45 minutes, depending on your stove and pot.
- Confirm Set (3 Checks)This is the moment of truth! Don't rely on just one method.
- Thermometer check: If you've hit 220-222°F (104-105°C), you're likely there.
- Freezer plate “clean trail” check: Place a small plate in the freezer before you start cooking. When you think the marmalade is ready, spoon a small amount onto the cold plate. Let it sit for 30 seconds, then push it with your finger. If it wrinkles and leaves a "clean trail" (meaning it doesn't immediately flow back together), it's ready.
- Visual cue: bubbles and texture change: Look for thick, syrupy bubbles and a noticeable change in the marmalade's texture – it will look less watery and more glossy.
- Jar it
- Once the marmalade has reached its set point, remove the pot from the heat.
- Skim off any foam from the surface with a clean spoon.
- Carefully ladle the hot marmalade into clean, hot jars, leaving 1/4 inch of headspace (the space between the marmalade and the rim of the jar).
- Wipe jar rims clean, apply lids, and screw on bands until fingertip-tight.
- Cooling and “set” time: Let the jars cool undisturbed on your counter for 12-24 hours. The marmalade will continue to firm up as it cools and sets. Once fully cooled, check for proper seals (lids should be concave and not flex when pressed).
Orange Overnight Oats - Jersey Marmalade

- Serves: 4 People
- Prepare Time: 45 minutes
- Cooking Time: 1 hour 45 m
- Calories: -
- Difficulty: Medium
Hey there, fellow food lovers! Are you ready to whip up something truly special that tastes better from scratch? We're diving into the wonderful world of homemade marmalade with our definitive Jersey Orange Marmalade recipe. Forget those overly bitter, store-bought versions – this classic recipe promises a bright, citrusy spread that’s perfectly balanced and incredibly reliable. It’s designed for real home kitchens, just like yours, making it a straightforward and rewarding project you can tackle right in your New Jersey (or anywhere!) home. This isn't just any orange marmalade; it’s a celebration of fresh and easy recipes, transforming simple oranges into a golden, shimmering jewel that’ll make your mornings sing.
What is marmalade? Marmalade is a fruit preserve made from citrus fruit, sugar, and water, characterized by its translucent jelly and suspended pieces of fruit peel.
What you’ll do: You’ll start by prepping and slicing fresh oranges, soaking them to soften the peel, then simmering, boiling to the perfect gel point, and finally, jarring your delicious creation.
What you’ll need: Just a few simple ingredients – oranges, lemon, sugar, and water – along with a big, trusty pot.
Ingredients
Directions
- Prep the Citrus (Standardize the Cut)
- Wash + Scrub: Thoroughly wash and scrub your oranges and lemon as described in the "Prep Note" above.
- Slice Strategy:
- Remove ends: Slice off both ends of each orange and the lemon.
- Cut into quarters: Stand each fruit on one cut end and cut it lengthwise into quarters.
- Slice into thin 1/8-inch pieces: Working with one quarter at a time, lay it flat on your cutting board and slice it crosswise into very thin 1/8-inch pieces. Don't stress too much about measuring; aim for pieces about the thickness of a couple of quarters stacked together. This thin cut helps reduce bitterness and ensures tender peel.
- Remove seeds as you go: As you slice, you’ll encounter seeds. Pick them out and place them in a small, separate bowl. (These seeds contain pectin, so don't discard them just yet!)
- Pith rule: The pith is the white, spongy layer between the peel and the fruit. While you want to remove any thick, excessively spongy pith, it's okay (and even beneficial for pectin) to leave a little bit of the whitish albedo (the inner part of the peel) on the peel itself.
- Soak (8–24 hours)
- Place all your sliced oranges and lemon, along with the collected seeds (tied loosely in a cheesecloth or muslin bag), into your large heavy pot.
- Pour the 8 cups of water over the fruit.
- Why soaking helps: This crucial step softens the citrus peel, making it wonderfully tender when cooked, and also helps extract more pectin from the fruit and seeds, leading to a better set.
- Where to soak: Cover the pot and let it soak at room temperature for at least 8 hours, or preferably overnight (up to 24 hours). If your kitchen is very warm, you can soak it in the fridge.
- Simmer Until Peel is Tender
- After soaking, remove the cheesecloth bag with the seeds (gently squeeze it to get all the pectin-rich liquid back into the pot, then discard the seeds).
- Bring the fruit and water mixture to a boil over medium-high heat, then reduce the heat to a gentle simmer.
- Simmer cue: Continue to simmer uncovered for 45-60 minutes, stirring occasionally, until the orange peel is incredibly tender. You should be able to easily cut a piece of peel with a spoon with just slight resistance.
- Foam: Don't stress too much about foam at this stage; a little foam is normal and will be addressed later.
- Add Sugar and Cook to Gel Point
- Once the peel is tender, add all 6 cups of granulated sugar to the pot. Stir gently until the sugar is completely dissolved.
- Increase the heat to medium-high and bring the mixture to a full, rolling boil that cannot be stirred down.
- What temperature to target: If using a candy thermometer, cook the marmalade until it reaches 220-222°F (104-105°C).
- What you’ll see happening in the pot: As the marmalade cooks, it will thicken, and the bubbles will become smaller, more numerous, and glassy-looking. The color will deepen to a rich, translucent amber. This stage can take anywhere from 15-45 minutes, depending on your stove and pot.
- Confirm Set (3 Checks)This is the moment of truth! Don't rely on just one method.
- Thermometer check: If you've hit 220-222°F (104-105°C), you're likely there.
- Freezer plate “clean trail” check: Place a small plate in the freezer before you start cooking. When you think the marmalade is ready, spoon a small amount onto the cold plate. Let it sit for 30 seconds, then push it with your finger. If it wrinkles and leaves a "clean trail" (meaning it doesn't immediately flow back together), it's ready.
- Visual cue: bubbles and texture change: Look for thick, syrupy bubbles and a noticeable change in the marmalade's texture – it will look less watery and more glossy.
- Jar it
- Once the marmalade has reached its set point, remove the pot from the heat.
- Skim off any foam from the surface with a clean spoon.
- Carefully ladle the hot marmalade into clean, hot jars, leaving 1/4 inch of headspace (the space between the marmalade and the rim of the jar).
- Wipe jar rims clean, apply lids, and screw on bands until fingertip-tight.
- Cooling and “set” time: Let the jars cool undisturbed on your counter for 12-24 hours. The marmalade will continue to firm up as it cools and sets. Once fully cooled, check for proper seals (lids should be concave and not flex when pressed).
You may also like


Hey there! I’m just someone who seriously loves good food and believes that cooking doesn’t have to be complicated to be amazing. Whether it’s a quick weeknight dinner or a cozy weekend meal, I’m all about sharing easy, tasty recipes that actually work.


