 | CulinaryCreationss alt=")
Pâté en Pot Recipe - Classic French Meat Pie (Easy & Authentic)
Pâté en Pot Recipe - Classic French Meat Pie (Easy & Authentic)

- Serves: 8 People
- Prepare Time: 45 minutes
- Cooking Time: 55 minutes
- Calories: -
- Difficulty: Medium
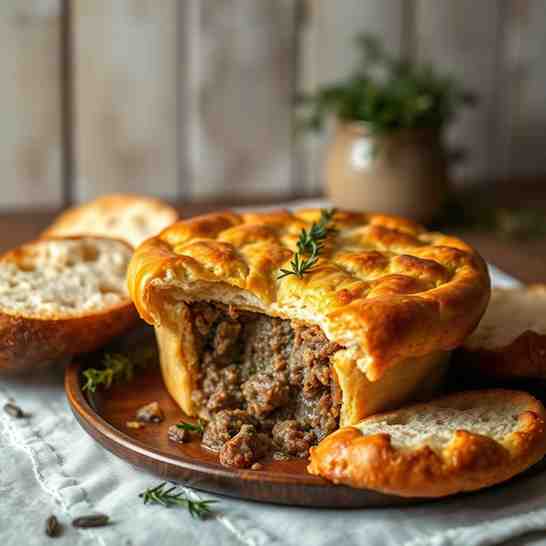
Craving a taste of tradition? Our Pâté en Pot recipe brings the comforting, savory flavors of a classic French-Canadian meat pie right to your kitchen! Imagine a flaky, golden crust encasing a rich, warm-spiced pork filling – it's the ultimate holiday comfort food or a hearty Sunday dinner. This reliable French pork pâté en pot is perfect for first-timers and experienced bakers alike, designed to build your confidence with clear steps, helpful texture checkpoints, and even freezer-friendly options. We'll guide you through making a truly superior, comprehensive homemade Pâté en Pot that’s sure to become a family favorite.
Before we dive in, let’s clear up a common question: "Is pâté en pot the same as tourtière?" Yes, it absolutely is! "Pâté en Pot," "tourtière," and "pâté à la viande" are all regional terms for this beloved French-Canadian meat pie. While some deep-layered, long-bake regional versions exist, our best Pâté en Pot recipe focuses on the more accessible, tourtière-style pie you're likely searching for – a single-crust bottom, meaty filling, and a beautiful top crust. No need to feel lost; we’re making the classic, savory pork pie you've been dreaming of! You'll discover an authentic Pâté en Pot recipe that delivers on flavor, texture, and pure comfort.
Ingredients
Directions
- Make/Prep the Crust If you’re making homemade pie dough, prepare it according to your recipe, divide it into two discs, and ensure it’s thoroughly chilled for at least 30 minutes. This chilling process is crucial for a flaky, tender crust. If you're using store-bought refrigerated pie crusts, keep them in the fridge until you’re ready to assemble the pie. They need to stay cold to prevent tearing and maintain their structure.
- Cook the Potatoes (for our chosen strategy) Place the ¼-inch cubed russet potato in a small saucepan and cover with cold water by about an inch. Bring to a boil, then reduce heat and simmer until the potatoes are just tender but still hold their shape (about 5-7 minutes). You want them cooked through but not mushy. Drain the potatoes, reserving about ½ cup of the cooking liquid if you prefer to use it instead of broth for a subtle potato flavor. Set aside.
- Build the Filling In a large skillet or Dutch oven, heat the olive oil or butter over medium heat. Add the finely diced onion and sweat it until softened and translucent, about 5-7 minutes. This step is important for developing a sweet base flavor. Add the minced garlic and cook for another minute until fragrant.
- Increase the heat to medium-high. Add the ground pork and ground beef/veal to the skillet. Break up the meat with a spoon and brown it thoroughly, about 8-10 minutes. Drain off any excess fat, leaving just a tablespoon or two for flavor.
- Stir in the dried thyme, allspice, cloves, nutmeg, and optional cinnamon. Cook for 1 minute, stirring constantly, to toast the spices and release their aroma.
- Add the cooked potato cubes and 1 ½ cups of broth (or reserved potato water) to the skillet. Bring the mixture to a gentle simmer. Reduce the heat to low, cover, and cook for 15-20 minutes, allowing the flavors to meld and the liquid to reduce slightly. Stir occasionally.
- Texture Checkpoint (the moment most recipes skip) After simmering, remove the lid and give the filling a good stir. The perfect filling should be moist but not watery, and it should hold together well when pressed with a spoon – sliceable, not crumbly. There should be very little free-standing liquid. If it looks too wet, continue to simmer uncovered for a few more minutes to reduce the liquid. If it seems too dry, add an extra splash of broth (1-2 tablespoons at a time) until it reaches the desired consistency. Taste and adjust salt and pepper as needed. Remember, the salt is crucial for bringing out the spice profile.
- Cool the Filling (so the crust stays flaky) Transfer the hot filling to a shallow dish or baking sheet and spread it out. Let it cool completely to room temperature, which typically takes at least 30-60 minutes. Cooling the filling is vital: if you put hot filling into a cold pie crust, it will melt the butter in the dough, leading to a soggy, less flaky bottom crust. You can speed this up by placing it in the refrigerator (uncovered) for 20-30 minutes, stirring occasionally.
- Assemble
- Preheat your oven to 400°F (200°C).
- On a lightly floured surface, roll out one disc of pie dough (or unroll one store-bought crust) to a 12-inch circle. Carefully transfer it to a 9-inch deep-dish pie plate. Trim the edges, leaving about a ½-inch overhang.
- Spoon the cooled filling evenly into the pie crust.
- Roll out the second disc of pie dough (or unroll the second store-bought crust) and place it over the filling. Trim the top crust to match the bottom overhang.
- Press the edges of the top and bottom crusts together firmly to seal. You can crimp the edges decoratively with your fingers or a fork.
- Cut several slits (vents) in the top crust to allow steam to escape during baking. This prevents the crust from puffing up excessively and helps ensure an evenly baked pie.
- Brush the entire top crust with the egg wash. This gives the pie a beautiful golden-brown color and helps to seal the edges further.
- Bake + Rest Place the assembled pie on a baking sheet (this catches any drips and helps prevent a soggy bottom). Bake for 20 minutes at 400°F (200°C).
- Reduce the oven temperature to 375°F (190°C) and continue to bake for another 30-35 minutes, or until the crust is deeply golden brown and the filling is bubbling gently. If the crust starts browning too quickly, you can loosely tent the edges with aluminum foil.
- Once baked, remove the pie from the oven and let it rest on a wire rack for at least 20-30 minutes before slicing. This rest time is crucial for the filling to set, ensuring clean, beautiful slices.
Pâté en Pot Recipe - Classic French Meat Pie (Easy & Authentic)
1.jpg)
- Serves: 8 People
- Prepare Time: 45 minutes
- Cooking Time: 55 minutes
- Calories: -
- Difficulty: Medium
Craving a taste of tradition? Our Pâté en Pot recipe brings the comforting, savory flavors of a classic French-Canadian meat pie right to your kitchen! Imagine a flaky, golden crust encasing a rich, warm-spiced pork filling – it's the ultimate holiday comfort food or a hearty Sunday dinner. This reliable French pork pâté en pot is perfect for first-timers and experienced bakers alike, designed to build your confidence with clear steps, helpful texture checkpoints, and even freezer-friendly options. We'll guide you through making a truly superior, comprehensive homemade Pâté en Pot that’s sure to become a family favorite.
Before we dive in, let’s clear up a common question: "Is pâté en pot the same as tourtière?" Yes, it absolutely is! "Pâté en Pot," "tourtière," and "pâté à la viande" are all regional terms for this beloved French-Canadian meat pie. While some deep-layered, long-bake regional versions exist, our best Pâté en Pot recipe focuses on the more accessible, tourtière-style pie you're likely searching for – a single-crust bottom, meaty filling, and a beautiful top crust. No need to feel lost; we’re making the classic, savory pork pie you've been dreaming of! You'll discover an authentic Pâté en Pot recipe that delivers on flavor, texture, and pure comfort.
Ingredients
Directions
- Make/Prep the Crust If you’re making homemade pie dough, prepare it according to your recipe, divide it into two discs, and ensure it’s thoroughly chilled for at least 30 minutes. This chilling process is crucial for a flaky, tender crust. If you're using store-bought refrigerated pie crusts, keep them in the fridge until you’re ready to assemble the pie. They need to stay cold to prevent tearing and maintain their structure.
- Cook the Potatoes (for our chosen strategy) Place the ¼-inch cubed russet potato in a small saucepan and cover with cold water by about an inch. Bring to a boil, then reduce heat and simmer until the potatoes are just tender but still hold their shape (about 5-7 minutes). You want them cooked through but not mushy. Drain the potatoes, reserving about ½ cup of the cooking liquid if you prefer to use it instead of broth for a subtle potato flavor. Set aside.
- Build the Filling In a large skillet or Dutch oven, heat the olive oil or butter over medium heat. Add the finely diced onion and sweat it until softened and translucent, about 5-7 minutes. This step is important for developing a sweet base flavor. Add the minced garlic and cook for another minute until fragrant.
- Increase the heat to medium-high. Add the ground pork and ground beef/veal to the skillet. Break up the meat with a spoon and brown it thoroughly, about 8-10 minutes. Drain off any excess fat, leaving just a tablespoon or two for flavor.
- Stir in the dried thyme, allspice, cloves, nutmeg, and optional cinnamon. Cook for 1 minute, stirring constantly, to toast the spices and release their aroma.
- Add the cooked potato cubes and 1 ½ cups of broth (or reserved potato water) to the skillet. Bring the mixture to a gentle simmer. Reduce the heat to low, cover, and cook for 15-20 minutes, allowing the flavors to meld and the liquid to reduce slightly. Stir occasionally.
- Texture Checkpoint (the moment most recipes skip) After simmering, remove the lid and give the filling a good stir. The perfect filling should be moist but not watery, and it should hold together well when pressed with a spoon – sliceable, not crumbly. There should be very little free-standing liquid. If it looks too wet, continue to simmer uncovered for a few more minutes to reduce the liquid. If it seems too dry, add an extra splash of broth (1-2 tablespoons at a time) until it reaches the desired consistency. Taste and adjust salt and pepper as needed. Remember, the salt is crucial for bringing out the spice profile.
- Cool the Filling (so the crust stays flaky) Transfer the hot filling to a shallow dish or baking sheet and spread it out. Let it cool completely to room temperature, which typically takes at least 30-60 minutes. Cooling the filling is vital: if you put hot filling into a cold pie crust, it will melt the butter in the dough, leading to a soggy, less flaky bottom crust. You can speed this up by placing it in the refrigerator (uncovered) for 20-30 minutes, stirring occasionally.
- Assemble
- Preheat your oven to 400°F (200°C).
- On a lightly floured surface, roll out one disc of pie dough (or unroll one store-bought crust) to a 12-inch circle. Carefully transfer it to a 9-inch deep-dish pie plate. Trim the edges, leaving about a ½-inch overhang.
- Spoon the cooled filling evenly into the pie crust.
- Roll out the second disc of pie dough (or unroll the second store-bought crust) and place it over the filling. Trim the top crust to match the bottom overhang.
- Press the edges of the top and bottom crusts together firmly to seal. You can crimp the edges decoratively with your fingers or a fork.
- Cut several slits (vents) in the top crust to allow steam to escape during baking. This prevents the crust from puffing up excessively and helps ensure an evenly baked pie.
- Brush the entire top crust with the egg wash. This gives the pie a beautiful golden-brown color and helps to seal the edges further.
- Bake + Rest Place the assembled pie on a baking sheet (this catches any drips and helps prevent a soggy bottom). Bake for 20 minutes at 400°F (200°C).
- Reduce the oven temperature to 375°F (190°C) and continue to bake for another 30-35 minutes, or until the crust is deeply golden brown and the filling is bubbling gently. If the crust starts browning too quickly, you can loosely tent the edges with aluminum foil.
- Once baked, remove the pie from the oven and let it rest on a wire rack for at least 20-30 minutes before slicing. This rest time is crucial for the filling to set, ensuring clean, beautiful slices.
You may also like


Hey there! I’m just someone who seriously loves good food and believes that cooking doesn’t have to be complicated to be amazing. Whether it’s a quick weeknight dinner or a cozy weekend meal, I’m all about sharing easy, tasty recipes that actually work.


