
Finnish Pulla - A Treat for Quick & Easy Healthy Meal Planning
Finnish Pulla - A Treat for Quick & Easy Healthy Meal Planning

- Serves: 10 People
- Prepare Time: 45 minutes
- Cooking Time: 25 minutes
- Calories: -
- Difficulty: Medium
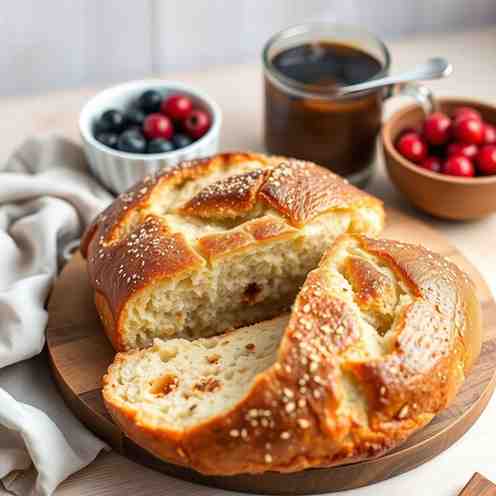
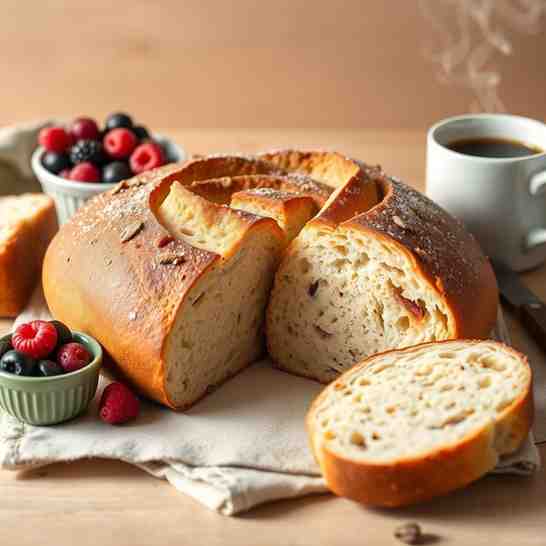
Welcome to the comforting world of Finnish Pulla! Imagine a lightly sweet, cardamom-scented bread, so soft and buttery it practically melts in your mouth. This isn't just any sweet bread; it's a beloved Finnish coffee bread, cherished for its delicate flavor and irresistible texture. Americans adore Pulla because it offers that perfect balance – it's rich and satisfying without being overly sugary, making it a delightful treat that can fit beautifully into your `quick and easy healthy meal` planning when enjoyed thoughtfully.
This recipe focuses on crafting one beautiful, braided loaf, crowned with sparkling pearl sugar (or a perfect substitute you probably have in your pantry!). We'll guide you through every step, from mixing the dough to achieving that golden-brown finish, ensuring your Pulla is nothing short of perfect. Get ready to fill your home with the most incredible aroma and enjoy a slice of Finnish tradition!
Total Time: 3 hours 30 minutes (includes rise times)
Hands-On Time: 45 minutes
Yield: 1 loaf (approx. 10-12 slices)
Best for: Weekend baking, brunch, coffee breaks, or a comforting anytime treat.
Nutrition Snapshot: calories + sugar per slice (estimated, see full nutrition panel below)
"Pulla" is simply the Finnish word for sweet yeasted breads or buns. While you might encounter variations like cinnamon-roll style (called korvapuusti), this recipe focuses on the classic braided loaf Pulla. It's the quintessential Finnish coffee bread, often enjoyed with a cup of kahvi (coffee) and good company. We're keeping it simple and traditional with this one-loaf wonder.
Ingredients
Directions
- Prep the cardamomIf using green cardamom pods, gently crush about 15-20 pods in a mortar and pestle or with the back of a knife. Remove the green husks and finely grind the black seeds. This quick method ensures the freshest, most vibrant cardamom flavor. If using pre-ground cardamom, simply measure out 1 teaspoon and set aside.
- Mix + knead the doughIn a large bowl (or the bowl of a stand mixer), combine the warmed milk and 1 teaspoon of sugar. Sprinkle the instant yeast over the top and let it sit for 5-10 minutes until foamy. This shows your yeast is active!Add the remaining ¼ cup (50g) sugar, egg, salt, and freshly ground cardamom to the yeast mixture. Stir to combine. Pour in the cooled melted butter.Gradually add 3 ½ cups (420g) of the flour, mixing on low speed with a dough hook (or with a wooden spoon) until just combined.Increase speed to medium-low and knead for 8-10 minutes, or knead by hand on a lightly floured surface for 10-15 minutes. The dough should become smooth, elastic, and slightly tacky to the touch. It shouldn't stick excessively to your hands or the bowl.
- "Stop signs":
- Too wet? If the dough is still very sticky after kneading, add the remaining flour 1 tablespoon at a time until it reaches the desired smooth, slightly tacky consistency.
- Too dry? If the dough feels stiff or crumbly, add milk 1 teaspoon at a time until it becomes pliable and smooth.
- Dough Feel Mini-Guide: A perfect dough will feel soft and pliable, like a baby's bottom. When stretched slowly, it should form a thin, translucent "windowpane" without tearing, indicating proper gluten development.
- First riseLightly grease a large bowl with a little oil. Transfer the dough to the bowl, turning it once to coat. Cover the bowl tightly with plastic wrap or a clean kitchen towel.Let the dough rise in a warm, draft-free place for 1 to 1 ½ hours, or until it has visibly doubled in size.
- What “doubled” looks like: The dough will look puffy and significantly larger, filling the bowl. You can gently poke it with a floured finger; if the indentation remains, it's ready.
- What to do if your kitchen is cold: Place the bowl in a slightly warm (but turned off) oven, or near a sunny window. You can also place the bowl in a larger bowl of warm water.
- Shape a 3‑strand braid (the confidence section)Lightly flour your work surface. Gently punch down the risen dough to release the air.Divide the dough evenly into three equal pieces.Roll each piece into a rope about 18-20 inches long. Try to make them all the same length and thickness for an even braid.Lay the three ropes side-by-side, parallel to each other. Pinch the ends together firmly at one end.Loosely braid the ropes together. It's crucial to braid loosely so the loaf has room to expand during its second rise without tearing.Once braided, gently tuck the pinched ends under the loaf to create a neat finish.Carefully transfer the braided loaf to a large baking sheet lined with parchment paper.
- Super Simple Braid Diagram (Verbal Description):
- Lay ropes parallel: Left (L), Middle (M), Right (R).
- Take R and cross it over M. (Now order is L, R, M)
- Take L and cross it over R. (Now order is R, L, M)
- Repeat: take the new rightmost strand and cross it over the middle.
- Common Braid Mistakes
- Too Tight: Braid looks compressed, not airy. Result: Loaf splits during baking.
- Uneven Ropes: One strand is thinner/shorter. Result: Uneven baking, lopsided loaf.
- Ends Untucked: Ends unravel during baking. Result: Messy appearance.
- Second riseLoosely cover the braided loaf on the baking sheet with plastic wrap or a clean kitchen towel.Let it rise in a warm, draft-free place for another 30-45 minutes, or until it looks visibly puffy.
- What “puffy” looks like (so you don’t underproof): The loaf should look noticeably fuller and softer, almost marshmallow-like, but not quite doubled in size. A gentle poke should leave a very slight indentation that slowly springs back. Underproofing leads to a dense loaf.
- Egg wash + toppingPreheat your oven to 375°F (190°C).In a small bowl, whisk together the egg yolk and 1 tablespoon of milk or water to create the egg wash.Gently brush the entire surface of the risen pulla loaf with the egg wash. This gives it that beautiful golden sheen.Generously sprinkle the pearl sugar over the top of the loaf.
- Pearl sugar substitute note: If you don't have pearl sugar, turbinado sugar (sugar in the raw) or even lightly crushed sugar cubes work wonderfully for a similar textural crunch.
- Bake (with burn prevention)Place the baking sheet with the pulla on the middle rack of your preheated oven.Bake for 20-30 minutes, or until the loaf is deep golden brown and an instant-read thermometer inserted into the thickest part reads 195-200°F (90-93°C).
- Clear Burn-Prevention Checklist:
- Middle Rack Guidance: Always bake on the middle rack for even heat distribution.
- Doneness: Look for a rich, deep golden-brown color. The internal temperature is your best friend for perfect doneness.
- If browning too fast: If the top is getting too dark before the internal temperature is reached, loosely tent the loaf with aluminum foil for the remaining baking time. This prevents scorching without steaming the bread.
- Why it happens: Ovens vary, and sugar in the dough can promote faster browning.
- Keep it softOnce baked, immediately transfer the pulla to a wire rack.While still warm, gently brush the entire surface of the loaf with a little extra melted butter (about 1-2 tablespoons). This adds flavor and helps keep the crust soft.For extra softness, you can briefly cover the warm loaf with a clean kitchen towel for 10-15 minutes as it cools.Allow the pulla to cool completely on the wire rack before slicing. Cooling before slicing prevents the interior from gumming up and ensures a clean cut.
Finnish Pulla - A Treat for Quick & Easy Healthy Meal Planning
- Serves: 10 People
- Prepare Time: 45 minutes
- Cooking Time: 25 minutes
- Calories: -
- Difficulty: Medium
Welcome to the comforting world of Finnish Pulla! Imagine a lightly sweet, cardamom-scented bread, so soft and buttery it practically melts in your mouth. This isn't just any sweet bread; it's a beloved Finnish coffee bread, cherished for its delicate flavor and irresistible texture. Americans adore Pulla because it offers that perfect balance – it's rich and satisfying without being overly sugary, making it a delightful treat that can fit beautifully into your `quick and easy healthy meal` planning when enjoyed thoughtfully.
This recipe focuses on crafting one beautiful, braided loaf, crowned with sparkling pearl sugar (or a perfect substitute you probably have in your pantry!). We'll guide you through every step, from mixing the dough to achieving that golden-brown finish, ensuring your Pulla is nothing short of perfect. Get ready to fill your home with the most incredible aroma and enjoy a slice of Finnish tradition!
Total Time: 3 hours 30 minutes (includes rise times)
Hands-On Time: 45 minutes
Yield: 1 loaf (approx. 10-12 slices)
Best for: Weekend baking, brunch, coffee breaks, or a comforting anytime treat.
Nutrition Snapshot: calories + sugar per slice (estimated, see full nutrition panel below)
"Pulla" is simply the Finnish word for sweet yeasted breads or buns. While you might encounter variations like cinnamon-roll style (called korvapuusti), this recipe focuses on the classic braided loaf Pulla. It's the quintessential Finnish coffee bread, often enjoyed with a cup of kahvi (coffee) and good company. We're keeping it simple and traditional with this one-loaf wonder.Ingredients
Directions
- Prep the cardamomIf using green cardamom pods, gently crush about 15-20 pods in a mortar and pestle or with the back of a knife. Remove the green husks and finely grind the black seeds. This quick method ensures the freshest, most vibrant cardamom flavor. If using pre-ground cardamom, simply measure out 1 teaspoon and set aside.
- Mix + knead the doughIn a large bowl (or the bowl of a stand mixer), combine the warmed milk and 1 teaspoon of sugar. Sprinkle the instant yeast over the top and let it sit for 5-10 minutes until foamy. This shows your yeast is active!Add the remaining ¼ cup (50g) sugar, egg, salt, and freshly ground cardamom to the yeast mixture. Stir to combine. Pour in the cooled melted butter.Gradually add 3 ½ cups (420g) of the flour, mixing on low speed with a dough hook (or with a wooden spoon) until just combined.Increase speed to medium-low and knead for 8-10 minutes, or knead by hand on a lightly floured surface for 10-15 minutes. The dough should become smooth, elastic, and slightly tacky to the touch. It shouldn't stick excessively to your hands or the bowl.
- "Stop signs":
- Too wet? If the dough is still very sticky after kneading, add the remaining flour 1 tablespoon at a time until it reaches the desired smooth, slightly tacky consistency.
- Too dry? If the dough feels stiff or crumbly, add milk 1 teaspoon at a time until it becomes pliable and smooth.
- Dough Feel Mini-Guide: A perfect dough will feel soft and pliable, like a baby's bottom. When stretched slowly, it should form a thin, translucent "windowpane" without tearing, indicating proper gluten development.
- First riseLightly grease a large bowl with a little oil. Transfer the dough to the bowl, turning it once to coat. Cover the bowl tightly with plastic wrap or a clean kitchen towel.Let the dough rise in a warm, draft-free place for 1 to 1 ½ hours, or until it has visibly doubled in size.
- What “doubled” looks like: The dough will look puffy and significantly larger, filling the bowl. You can gently poke it with a floured finger; if the indentation remains, it's ready.
- What to do if your kitchen is cold: Place the bowl in a slightly warm (but turned off) oven, or near a sunny window. You can also place the bowl in a larger bowl of warm water.
- Shape a 3‑strand braid (the confidence section)Lightly flour your work surface. Gently punch down the risen dough to release the air.Divide the dough evenly into three equal pieces.Roll each piece into a rope about 18-20 inches long. Try to make them all the same length and thickness for an even braid.Lay the three ropes side-by-side, parallel to each other. Pinch the ends together firmly at one end.Loosely braid the ropes together. It's crucial to braid loosely so the loaf has room to expand during its second rise without tearing.Once braided, gently tuck the pinched ends under the loaf to create a neat finish.Carefully transfer the braided loaf to a large baking sheet lined with parchment paper.
- Super Simple Braid Diagram (Verbal Description):
- Lay ropes parallel: Left (L), Middle (M), Right (R).
- Take R and cross it over M. (Now order is L, R, M)
- Take L and cross it over R. (Now order is R, L, M)
- Repeat: take the new rightmost strand and cross it over the middle.
- Common Braid Mistakes
- Too Tight: Braid looks compressed, not airy. Result: Loaf splits during baking.
- Uneven Ropes: One strand is thinner/shorter. Result: Uneven baking, lopsided loaf.
- Ends Untucked: Ends unravel during baking. Result: Messy appearance.
- Second riseLoosely cover the braided loaf on the baking sheet with plastic wrap or a clean kitchen towel.Let it rise in a warm, draft-free place for another 30-45 minutes, or until it looks visibly puffy.
- What “puffy” looks like (so you don’t underproof): The loaf should look noticeably fuller and softer, almost marshmallow-like, but not quite doubled in size. A gentle poke should leave a very slight indentation that slowly springs back. Underproofing leads to a dense loaf.
- Egg wash + toppingPreheat your oven to 375°F (190°C).In a small bowl, whisk together the egg yolk and 1 tablespoon of milk or water to create the egg wash.Gently brush the entire surface of the risen pulla loaf with the egg wash. This gives it that beautiful golden sheen.Generously sprinkle the pearl sugar over the top of the loaf.
- Pearl sugar substitute note: If you don't have pearl sugar, turbinado sugar (sugar in the raw) or even lightly crushed sugar cubes work wonderfully for a similar textural crunch.
- Bake (with burn prevention)Place the baking sheet with the pulla on the middle rack of your preheated oven.Bake for 20-30 minutes, or until the loaf is deep golden brown and an instant-read thermometer inserted into the thickest part reads 195-200°F (90-93°C).
- Clear Burn-Prevention Checklist:
- Middle Rack Guidance: Always bake on the middle rack for even heat distribution.
- Doneness: Look for a rich, deep golden-brown color. The internal temperature is your best friend for perfect doneness.
- If browning too fast: If the top is getting too dark before the internal temperature is reached, loosely tent the loaf with aluminum foil for the remaining baking time. This prevents scorching without steaming the bread.
- Why it happens: Ovens vary, and sugar in the dough can promote faster browning.
- Keep it softOnce baked, immediately transfer the pulla to a wire rack.While still warm, gently brush the entire surface of the loaf with a little extra melted butter (about 1-2 tablespoons). This adds flavor and helps keep the crust soft.For extra softness, you can briefly cover the warm loaf with a clean kitchen towel for 10-15 minutes as it cools.Allow the pulla to cool completely on the wire rack before slicing. Cooling before slicing prevents the interior from gumming up and ensures a clean cut.
- Super Simple Braid Diagram (Verbal Description):
You may also like
- Super Simple Braid Diagram (Verbal Description):


Hey there! I’m just someone who seriously loves good food and believes that cooking doesn’t have to be complicated to be amazing. Whether it’s a quick weeknight dinner or a cozy weekend meal, I’m all about sharing easy, tasty recipes that actually work.


