
Sour Dill Pickles - Make Crunchy, Tangy Goodness
Sour Dill Pickles - Make Crunchy, Tangy Goodness
- Serves: 2 People
- Prepare Time: 20 minutes
- Cooking Time: -
- Calories: -
- Difficulty: Easy
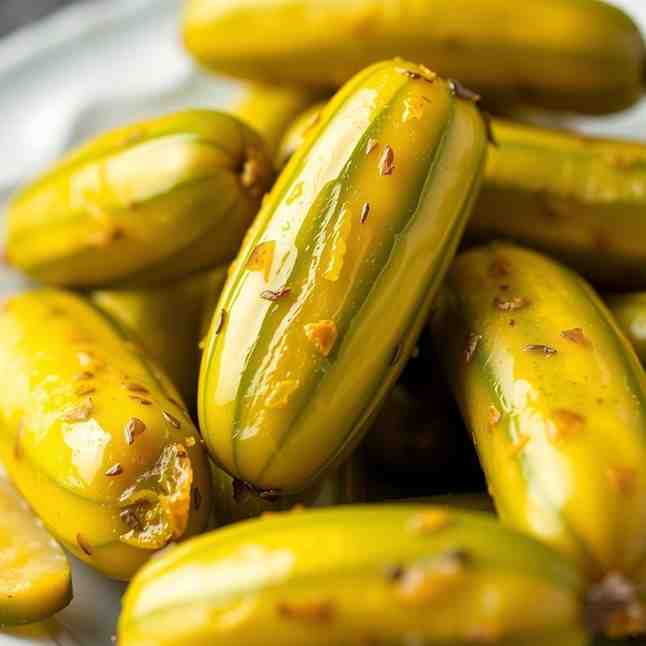
Ever dreamt of making those perfectly crunchy sour dill pickles that taste like they came straight from an old-school deli? You know, the kind that pack a real tangy punch and burst with garlicky, dilly goodness? Forget those limp, vinegar-soaked imposters! We're talking about true, fermented cucumber pickles here, made simply with salt brine, fresh ingredients, and a little patience.
This isn't just another pickled cucumber recipe; it's your go-to guide for achieving consistently fantastic results. Whether you're a first-timer eager to dive into the world of fermentation or someone who’s tired of ending up with soft, disappointing pickles, this simple cucumber pickle method is designed for you. Get ready for bold flavors, satisfying crunch, and a batch of pickles that will make your taste buds sing. Let’s get fermenting!
Ingredients
Directions
- Prep Your Cucumbers: Wash your pickling cucumbers thoroughly under cold water. Trim off just the blossom end (the end opposite the stem) as it contains enzymes that can soften pickles. Keep them cold while you prepare other ingredients.
- Make Your Brine: In a large bowl or pitcher, combine the filtered water and pickling salt. Stir vigorously until the salt is completely dissolved. This ensures even salinity for a safe and consistent ferment.
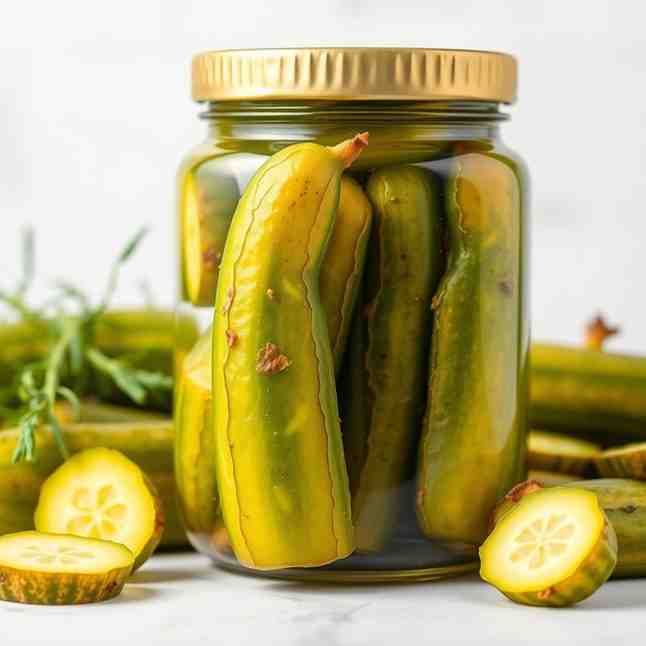
- Pack Your Jar: Grab a clean, wide-mouth quart-sized canning jar (or two). Place half of your dill and garlic cloves at the bottom of the jar. If using optional spices or tannin leaves, add them now. Tightly pack your prepped cucumbers vertically into the jar. You might need to cut larger cucumbers into spears or chips if they don't fit whole. Once the jar is about halfway full, add the remaining dill, garlic, and any other spices, then continue packing the rest of the cucumbers, leaving about 1-2 inches of headspace from the rim.
- Pour Brine & Submerge: Carefully pour the prepared salt brine over the cucumbers, ensuring they are completely submerged. This is the most crucial step for safety! Use a fermentation weight (a glass weight or a small, clean, heavy jar) to keep all the cucumbers and aromatics fully under the brine. If anything floats above the brine, it can be exposed to air and potentially mold.
- Ferment at Room Temp: Cover your jar loosely with a lid (or use an airlock if you have one) to allow gases to escape. Place the jar in a cool, dark spot at room temperature, ideally between 68-75°F (20-24°C). Higher temperatures will speed up fermentation, lower temperatures will slow it down.
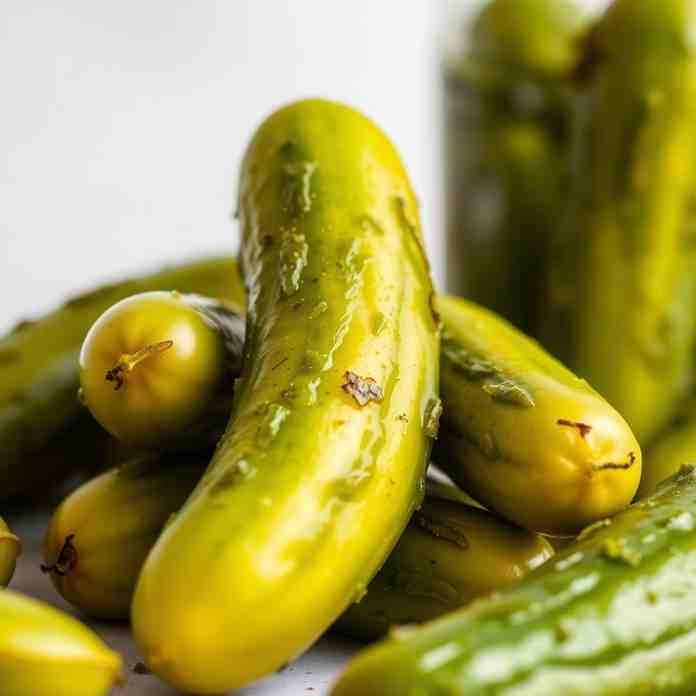
- Taste & Refrigerate: Begin tasting your pickles after about 3-4 days. They will be lightly pickled, bright, and snappy. Continue fermenting for up to 2-3 weeks for a deeper sour flavor and more "funk." Once they reach your desired taste, remove the fermentation weight, secure the lid tightly, and transfer the jar to the refrigerator to significantly slow down the fermentation process.
- Storage in Fridge: Always ensure the pickles remain submerged under the brine in the refrigerator. Use a clean fork or tongs to retrieve them.
Sour Dill Pickles - Make Crunchy, Tangy Goodness
- Serves: 2 People
- Prepare Time: 20 minutes
- Cooking Time: -
- Calories: -
- Difficulty: Easy
Ever dreamt of making those perfectly crunchy sour dill pickles that taste like they came straight from an old-school deli? You know, the kind that pack a real tangy punch and burst with garlicky, dilly goodness? Forget those limp, vinegar-soaked imposters! We're talking about true, fermented cucumber pickles here, made simply with salt brine, fresh ingredients, and a little patience.
This isn't just another pickled cucumber recipe; it's your go-to guide for achieving consistently fantastic results. Whether you're a first-timer eager to dive into the world of fermentation or someone who’s tired of ending up with soft, disappointing pickles, this simple cucumber pickle method is designed for you. Get ready for bold flavors, satisfying crunch, and a batch of pickles that will make your taste buds sing. Let’s get fermenting!
Ingredients
Directions
- Prep Your Cucumbers: Wash your pickling cucumbers thoroughly under cold water. Trim off just the blossom end (the end opposite the stem) as it contains enzymes that can soften pickles. Keep them cold while you prepare other ingredients.
- Make Your Brine: In a large bowl or pitcher, combine the filtered water and pickling salt. Stir vigorously until the salt is completely dissolved. This ensures even salinity for a safe and consistent ferment.
- Pack Your Jar: Grab a clean, wide-mouth quart-sized canning jar (or two). Place half of your dill and garlic cloves at the bottom of the jar. If using optional spices or tannin leaves, add them now. Tightly pack your prepped cucumbers vertically into the jar. You might need to cut larger cucumbers into spears or chips if they don't fit whole. Once the jar is about halfway full, add the remaining dill, garlic, and any other spices, then continue packing the rest of the cucumbers, leaving about 1-2 inches of headspace from the rim.
- Pour Brine & Submerge: Carefully pour the prepared salt brine over the cucumbers, ensuring they are completely submerged. This is the most crucial step for safety! Use a fermentation weight (a glass weight or a small, clean, heavy jar) to keep all the cucumbers and aromatics fully under the brine. If anything floats above the brine, it can be exposed to air and potentially mold.
- Ferment at Room Temp: Cover your jar loosely with a lid (or use an airlock if you have one) to allow gases to escape. Place the jar in a cool, dark spot at room temperature, ideally between 68-75°F (20-24°C). Higher temperatures will speed up fermentation, lower temperatures will slow it down.
- Taste & Refrigerate: Begin tasting your pickles after about 3-4 days. They will be lightly pickled, bright, and snappy. Continue fermenting for up to 2-3 weeks for a deeper sour flavor and more "funk." Once they reach your desired taste, remove the fermentation weight, secure the lid tightly, and transfer the jar to the refrigerator to significantly slow down the fermentation process.
- Storage in Fridge: Always ensure the pickles remain submerged under the brine in the refrigerator. Use a clean fork or tongs to retrieve them.
You may also like


Hey there! I’m just someone who seriously loves good food and believes that cooking doesn’t have to be complicated to be amazing. Whether it’s a quick weeknight dinner or a cozy weekend meal, I’m all about sharing easy, tasty recipes that actually work.


