
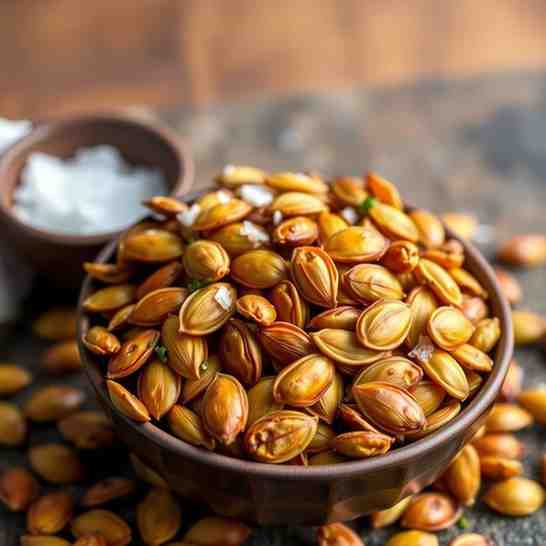
Roasted Pumpkin Seeds - Get Crispy, Crunchy Perfection
Roasted Pumpkin Seeds - Get Crispy, Crunchy Perfection

- Serves: 4 People
- Prepare Time: 15 minutes
- Cooking Time: 20-30 minut
- Calories: -
- Difficulty: Easy
Ever wonder how to get those perfectly roasted and salted pumpkin seeds—the ones that are actually crunchy, not chewy? You're in the right place! This isn't just another recipe; it's your definitive guide to achieving crispy, satisfyingly crunchy pumpkin seeds every single time, whether you're using seeds from your Halloween carving pumpkin or any other winter squash. Say goodbye to soggy, disappointing seeds and hello to your new favorite snack!
Dry Well: Moisture is the enemy of crunch!
Single Layer: Give them space to roast evenly.
Stir Regularly: Prevents burning and promotes even toasting.
The secret to truly crunchy pumpkin seeds, rather than chewy ones, often comes down to one critical factor: moisture. Many methods leave too much moisture in the seeds, leading to a tough, rubbery texture. Our method focuses on thorough drying and precise roasting techniques to evaporate that moisture completely, ensuring your toasted pumpkin seeds achieve that irresistible crispness you crave.
Ingredients
Directions
- Scoop + SeparateFirst things first, get those seeds out! If you're working with a carving pumpkin, cut off the lid and use a large spoon or ice cream scoop to scrape out the seeds and stringy pulp. Don't worry about getting every last bit of pulp off just yet. For a super easy trick, place the scooped-out seeds and pulp into a large bowl of water. The seeds will float, making it simple to separate them from the heavier pulp strands by gently swishing your hand around.
- Clean (fast) + Dry (the part that matters)Once separated, transfer your seeds to a colander and rinse them thoroughly under cold running water. Use your fingers to rub away any remaining bits of pumpkin pulp. This is crucial for flavor and preventing burning. Now for the most important part: drying! Lay the clean seeds out on a clean kitchen towel (or paper towels).
- Towel-dry hard! You want them to feel as dry as possible to the touch. If you have an extra 10-15 minutes, spread them on a clean baking sheet and let them air-dry further. The drier they are now, the crispier they'll be later.
- SeasonIn a medium bowl, toss your well-dried seeds with 1-2 teaspoons of olive oil (or your chosen oil/melted butter) and 1/2 teaspoon of fine sea salt. The oil helps the salt stick and promotes even browning. We're keeping the seasoning simple at this stage to avoid any spices burning in the oven. You can always add more flavor after roasting!
- Roast (single canonical oven method)Preheat your oven to 300°F (150°C) and position an oven rack in the middle. Line a rimmed baking sheet with parchment paper for easy cleanup (or use a bare pan). Spread the seasoned pumpkin seeds in a single, even layer on the prepared baking sheet. It's important not to overcrowd the pan; if necessary, use two baking sheets. Roast for 20-30 minutes, stirring the seeds every 10 minutes to ensure even toasting and prevent burning.
- Done-ness Checklist:
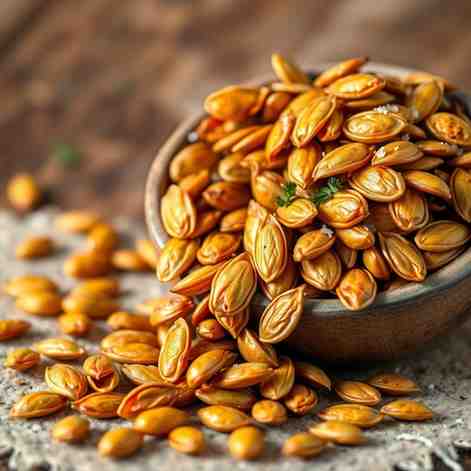
- Color: They should be golden brown, not just pale yellow.
- Smell: You'll smell a wonderfully nutty, toasted aroma.
- Bite Test: The ultimate test! Carefully take one out, let it cool for a moment, and bite into it. It should be perfectly crisp and crunchy, not chewy.
- Pepitas Note: If you are using pepitas (shelled roasted pumpkin seeds) instead of whole seeds, they will roast much faster. Start checking them at 10-12 minutes, as they can go from perfectly toasted to burnt very quickly due to their smaller size and lack of shell.
- Cool (crunch finishes here)Once your seeds are perfectly golden and crunchy, remove the baking sheet from the oven. Let the roasted pumpkin seeds cool completely on the pan for at least 5-10 minutes. This cooling period is essential—the seeds will continue to crisp up as they cool. If you plan to add any additional spices or sugar blends that might burn in the oven, now is the time to sprinkle them on!
Roasted Pumpkin Seeds - Get Crispy, Crunchy Perfection
- Serves: 4 People
- Prepare Time: 15 minutes
- Cooking Time: 20-30 minut
- Calories: -
- Difficulty: Easy
Ever wonder how to get those perfectly roasted and salted pumpkin seeds—the ones that are actually crunchy, not chewy? You're in the right place! This isn't just another recipe; it's your definitive guide to achieving crispy, satisfyingly crunchy pumpkin seeds every single time, whether you're using seeds from your Halloween carving pumpkin or any other winter squash. Say goodbye to soggy, disappointing seeds and hello to your new favorite snack!
Dry Well: Moisture is the enemy of crunch!
Single Layer: Give them space to roast evenly.
Stir Regularly: Prevents burning and promotes even toasting.
The secret to truly crunchy pumpkin seeds, rather than chewy ones, often comes down to one critical factor: moisture. Many methods leave too much moisture in the seeds, leading to a tough, rubbery texture. Our method focuses on thorough drying and precise roasting techniques to evaporate that moisture completely, ensuring your toasted pumpkin seeds achieve that irresistible crispness you crave.
Ingredients
Directions
- Scoop + SeparateFirst things first, get those seeds out! If you're working with a carving pumpkin, cut off the lid and use a large spoon or ice cream scoop to scrape out the seeds and stringy pulp. Don't worry about getting every last bit of pulp off just yet. For a super easy trick, place the scooped-out seeds and pulp into a large bowl of water. The seeds will float, making it simple to separate them from the heavier pulp strands by gently swishing your hand around.
- Clean (fast) + Dry (the part that matters)Once separated, transfer your seeds to a colander and rinse them thoroughly under cold running water. Use your fingers to rub away any remaining bits of pumpkin pulp. This is crucial for flavor and preventing burning. Now for the most important part: drying! Lay the clean seeds out on a clean kitchen towel (or paper towels).
- Towel-dry hard! You want them to feel as dry as possible to the touch. If you have an extra 10-15 minutes, spread them on a clean baking sheet and let them air-dry further. The drier they are now, the crispier they'll be later.
- SeasonIn a medium bowl, toss your well-dried seeds with 1-2 teaspoons of olive oil (or your chosen oil/melted butter) and 1/2 teaspoon of fine sea salt. The oil helps the salt stick and promotes even browning. We're keeping the seasoning simple at this stage to avoid any spices burning in the oven. You can always add more flavor after roasting!
- Roast (single canonical oven method)Preheat your oven to 300°F (150°C) and position an oven rack in the middle. Line a rimmed baking sheet with parchment paper for easy cleanup (or use a bare pan). Spread the seasoned pumpkin seeds in a single, even layer on the prepared baking sheet. It's important not to overcrowd the pan; if necessary, use two baking sheets. Roast for 20-30 minutes, stirring the seeds every 10 minutes to ensure even toasting and prevent burning.
- Done-ness Checklist:
- Color: They should be golden brown, not just pale yellow.
- Smell: You'll smell a wonderfully nutty, toasted aroma.
- Bite Test: The ultimate test! Carefully take one out, let it cool for a moment, and bite into it. It should be perfectly crisp and crunchy, not chewy.
- Pepitas Note: If you are using pepitas (shelled roasted pumpkin seeds) instead of whole seeds, they will roast much faster. Start checking them at 10-12 minutes, as they can go from perfectly toasted to burnt very quickly due to their smaller size and lack of shell.
- Cool (crunch finishes here)Once your seeds are perfectly golden and crunchy, remove the baking sheet from the oven. Let the roasted pumpkin seeds cool completely on the pan for at least 5-10 minutes. This cooling period is essential—the seeds will continue to crisp up as they cool. If you plan to add any additional spices or sugar blends that might burn in the oven, now is the time to sprinkle them on!
You may also like


Hey there! I’m just someone who seriously loves good food and believes that cooking doesn’t have to be complicated to be amazing. Whether it’s a quick weeknight dinner or a cozy weekend meal, I’m all about sharing easy, tasty recipes that actually work.


