
Istrian Pršut - Croatia's Best Dishes
Istrian Pršut - Croatia's Best Dishes
- Serves: 15 People
- Prepare Time: 2-3 hours (
- Cooking Time: 12-18 month
- Calories: -
- Difficulty: Easy
Welcome, food lovers, to a journey into the heart of Croatian culinary tradition! If you're exploring the `best croatian dishes`, you've undoubtedly encountered mentions of Istrian Pršut – a dry-cured ham that's more than just food; it's a centuries-old art form. This isn't your average `ham cooking instructions` guide; we're diving deep into the authentic process of making this exquisite delicacy right at home. Forget quick `simple dish recipes` or `make at home recipes` that only skim the surface. We're here to bridge the gap between cultural storytelling and the technical mastery required to create this iconic cured meat. From selecting the perfect pork leg to the intricate dance of curing and aging, this comprehensive guide will equip you with everything you need to understand and potentially craft your own Istrian Pršut. Get ready to uncover the secrets behind one of Croatia's most treasured `best recipes to make` and elevate your home cooking to an entirely new level.
This section details the traditional, extensive process of making Istrian Pršut from scratch. Please note: this is a long-term, complex project requiring specific conditions and meticulous attention to detail and safety.
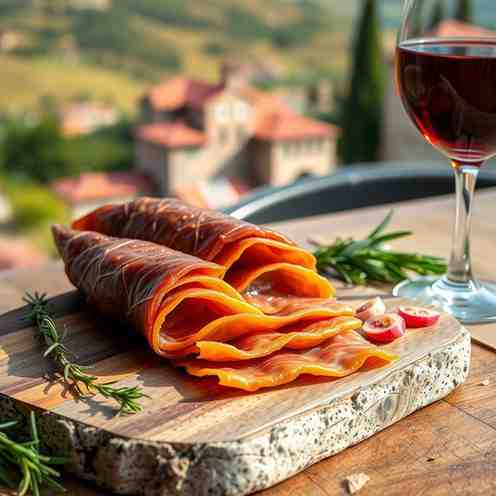
Istrian Pršut (pr-SHOOT) is a dry-cured ham, distinct from other European hams due to its unique preparation, which often involves deboning, rubbing with a specific blend of sea salt, pepper, and local herbs, and then air-drying for an extended period without smoking.
Ingredients
Directions
- Phase 1: Preparation & Salting (Approx. 2-3 Weeks)
- Select Your Pork Leg: Start with the best quality pork leg you can find. It should be fresh, well-marbled, and from a reputable source. Ensure the hoof is removed.
- Trim and Debone (Optional but Traditional): Carefully trim any excess fat, leaving a uniform layer. Traditionally, Istrian Pršut is deboned, creating a flatter, easier-to-slice product. If deboning, ensure the cavity is clean and open. This step requires skill to avoid damaging the meat.
- Initial Salting: Thoroughly rub the entire surface of the pork leg with coarse sea salt. Pay special attention to any crevices or the deboned cavity. Use a generous amount, ensuring every part is covered. The salt acts as a preservative and draws out moisture.
- First Curing Period (7-10 days): Place the salted pork leg in a large, non-reactive container. Keep it in a cool environment (ideally 35-40°F / 2-4°C). The salt will begin to draw out moisture, forming a brine at the bottom of the container.
- Re-salting & Pressing: After 7-10 days, remove the ham. Discard any accumulated brine. Lightly rinse the ham if desired, then pat it thoroughly dry. Reapply a fresh layer of coarse sea salt, ensuring full coverage. Place the ham back in the container, and this time, apply heavy weights on top (e.g., 50-70 lbs / 23-32 kg). This pressing helps to further expel moisture and shape the ham.
- Second Curing Period (7-10 days): Continue curing under weight in the cool environment. Periodically check for accumulating brine and drain it. The total salting period typically lasts between 14-21 days, depending on the size of the ham and desired saltiness.
- Phase 2: Washing, Seasoning & Initial Drying (Approx. 1-2 Months)
- Wash the Ham: Once the salting period is complete, thoroughly wash the ham under cold running water to remove all excess salt from the surface. This is crucial to prevent the ham from becoming too salty.
- Dry & Shape: Pat the ham meticulously dry with clean cloths. This is a critical step; any remaining surface moisture can lead to spoilage. If deboned, carefully reshape the ham, tying it tightly with butcher's twine to maintain its form.
- Apply Spice Rub: Mix your freshly ground black pepper with any optional crushed garlic, rosemary, or other herbs. Generously rub this mixture all over the surface of the ham. This not only adds flavor but also helps deter insects during the initial drying phase.
- Initial Drying/Resting (1-2 months): Hang the ham in a cool, well-ventilated, and dry space. The ideal temperature is around 50-60°F (10-15°C) with moderate humidity (60-70%). Good airflow is essential. During this period, the ham will continue to lose moisture, and its surface will start to harden. Regularly inspect the ham for any signs of mold (white mold is generally acceptable and can be wiped off; black or green mold is a concern).
- Phase 3: Aging (Approx. 9-15 Months)
- The Long Wait: This is the longest and most crucial phase. The ham will continue to dry and mature, developing its characteristic flavor and aroma. The aging environment should remain cool and relatively stable.
- Fat Application (Optional): Some traditional methods involve applying a mixture of pork fat, flour, and pepper (called "smalec") to the exposed cut surfaces of the ham (not the skin) after a few months of drying. This helps to prevent the outer layers from drying out too quickly, allowing the interior to cure more evenly.
- Regular Inspection: Continue to inspect the ham regularly for any issues. The surface will become darker and firmer.
- Testing for Readiness: Experienced producers often use a special needle (a "fiore") to pierce the ham in different spots and smell it to determine its readiness. A fully aged Istrian Pršut will have a rich, complex aroma. The total aging time can vary from 9 months for smaller hams to 18 months or even longer for larger ones.
Istrian Pršut - Croatia's Best Dishes
- Serves: 15 People
- Prepare Time: 2-3 hours (
- Cooking Time: 12-18 month
- Calories: -
- Difficulty: Easy
Welcome, food lovers, to a journey into the heart of Croatian culinary tradition! If you're exploring the `best croatian dishes`, you've undoubtedly encountered mentions of Istrian Pršut – a dry-cured ham that's more than just food; it's a centuries-old art form. This isn't your average `ham cooking instructions` guide; we're diving deep into the authentic process of making this exquisite delicacy right at home. Forget quick `simple dish recipes` or `make at home recipes` that only skim the surface. We're here to bridge the gap between cultural storytelling and the technical mastery required to create this iconic cured meat. From selecting the perfect pork leg to the intricate dance of curing and aging, this comprehensive guide will equip you with everything you need to understand and potentially craft your own Istrian Pršut. Get ready to uncover the secrets behind one of Croatia's most treasured `best recipes to make` and elevate your home cooking to an entirely new level.
This section details the traditional, extensive process of making Istrian Pršut from scratch. Please note: this is a long-term, complex project requiring specific conditions and meticulous attention to detail and safety.
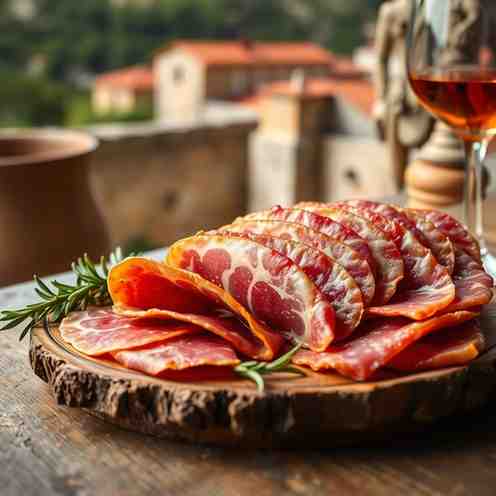
Istrian Pršut (pr-SHOOT) is a dry-cured ham, distinct from other European hams due to its unique preparation, which often involves deboning, rubbing with a specific blend of sea salt, pepper, and local herbs, and then air-drying for an extended period without smoking.
Ingredients
Directions
- Phase 1: Preparation & Salting (Approx. 2-3 Weeks)
- Select Your Pork Leg: Start with the best quality pork leg you can find. It should be fresh, well-marbled, and from a reputable source. Ensure the hoof is removed.
- Trim and Debone (Optional but Traditional): Carefully trim any excess fat, leaving a uniform layer. Traditionally, Istrian Pršut is deboned, creating a flatter, easier-to-slice product. If deboning, ensure the cavity is clean and open. This step requires skill to avoid damaging the meat.
- Initial Salting: Thoroughly rub the entire surface of the pork leg with coarse sea salt. Pay special attention to any crevices or the deboned cavity. Use a generous amount, ensuring every part is covered. The salt acts as a preservative and draws out moisture.
- First Curing Period (7-10 days): Place the salted pork leg in a large, non-reactive container. Keep it in a cool environment (ideally 35-40°F / 2-4°C). The salt will begin to draw out moisture, forming a brine at the bottom of the container.
- Re-salting & Pressing: After 7-10 days, remove the ham. Discard any accumulated brine. Lightly rinse the ham if desired, then pat it thoroughly dry. Reapply a fresh layer of coarse sea salt, ensuring full coverage. Place the ham back in the container, and this time, apply heavy weights on top (e.g., 50-70 lbs / 23-32 kg). This pressing helps to further expel moisture and shape the ham.
- Second Curing Period (7-10 days): Continue curing under weight in the cool environment. Periodically check for accumulating brine and drain it. The total salting period typically lasts between 14-21 days, depending on the size of the ham and desired saltiness.
- Phase 2: Washing, Seasoning & Initial Drying (Approx. 1-2 Months)
- Wash the Ham: Once the salting period is complete, thoroughly wash the ham under cold running water to remove all excess salt from the surface. This is crucial to prevent the ham from becoming too salty.
- Dry & Shape: Pat the ham meticulously dry with clean cloths. This is a critical step; any remaining surface moisture can lead to spoilage. If deboned, carefully reshape the ham, tying it tightly with butcher's twine to maintain its form.
- Apply Spice Rub: Mix your freshly ground black pepper with any optional crushed garlic, rosemary, or other herbs. Generously rub this mixture all over the surface of the ham. This not only adds flavor but also helps deter insects during the initial drying phase.
- Initial Drying/Resting (1-2 months): Hang the ham in a cool, well-ventilated, and dry space. The ideal temperature is around 50-60°F (10-15°C) with moderate humidity (60-70%). Good airflow is essential. During this period, the ham will continue to lose moisture, and its surface will start to harden. Regularly inspect the ham for any signs of mold (white mold is generally acceptable and can be wiped off; black or green mold is a concern).
- Phase 3: Aging (Approx. 9-15 Months)
- The Long Wait: This is the longest and most crucial phase. The ham will continue to dry and mature, developing its characteristic flavor and aroma. The aging environment should remain cool and relatively stable.
- Fat Application (Optional): Some traditional methods involve applying a mixture of pork fat, flour, and pepper (called "smalec") to the exposed cut surfaces of the ham (not the skin) after a few months of drying. This helps to prevent the outer layers from drying out too quickly, allowing the interior to cure more evenly.
- Regular Inspection: Continue to inspect the ham regularly for any issues. The surface will become darker and firmer.
- Testing for Readiness: Experienced producers often use a special needle (a "fiore") to pierce the ham in different spots and smell it to determine its readiness. A fully aged Istrian Pršut will have a rich, complex aroma. The total aging time can vary from 9 months for smaller hams to 18 months or even longer for larger ones.
You may also like


Hey there! I’m just someone who seriously loves good food and believes that cooking doesn’t have to be complicated to be amazing. Whether it’s a quick weeknight dinner or a cozy weekend meal, I’m all about sharing easy, tasty recipes that actually work.


