
Skerpikjøt - Make Faroese Air-Dried Lamb at Home
Skerpikjøt - Make Faroese Air-Dried Lamb at Home
- Serves: 30 People
- Prepare Time: 1 hour
- Cooking Time: 0 minutes
- Calories: -
- Difficulty: Easy
Ever heard of meat that’s been dried by the salty sea air for months, developing flavors unlike anything else? That’s Skerpikjøt, the incredible Faroese air-dried lamb! This isn't just any preserved meat; it's a culinary hallmark of the remote Faroe Islands, deeply tied to their history and unique climate. Before we dive in, let's be clear: this guide is for making a delicious, traditional food for people to enjoy, not pet food.
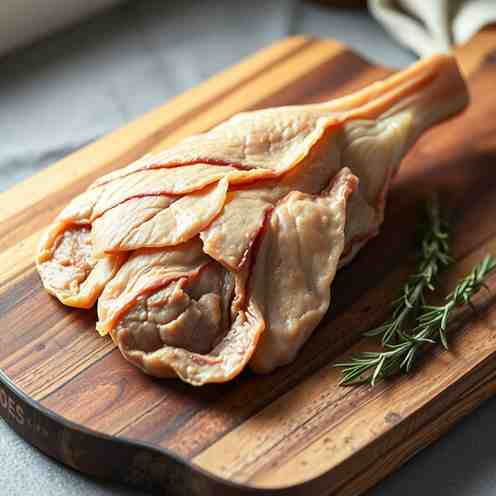
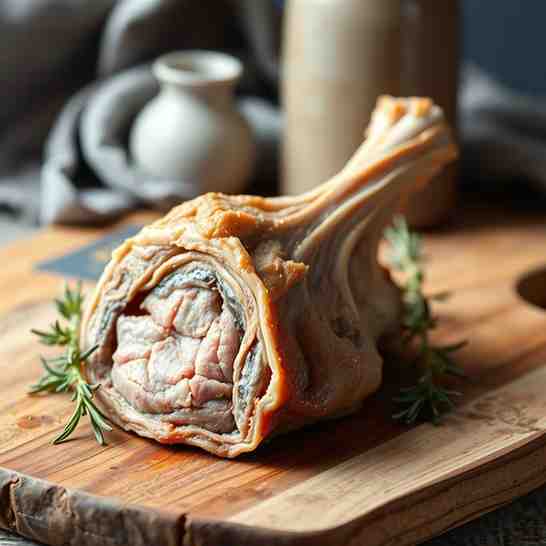
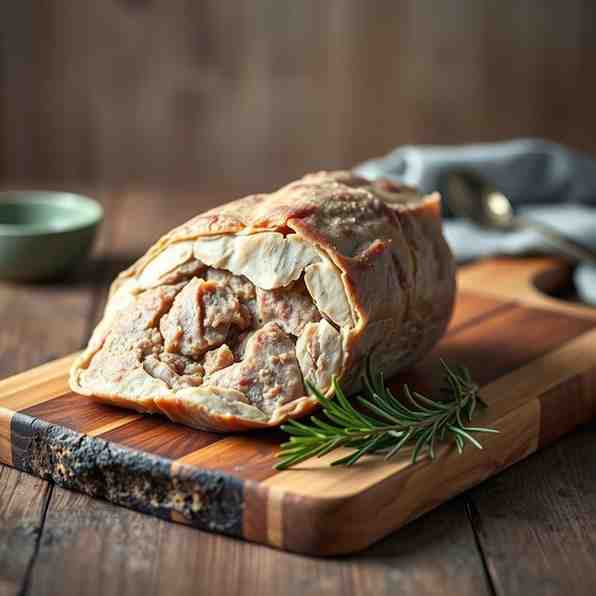
So, what exactly is Skerpikjøt? In one sentence, it’s lamb (or mutton) that has been naturally wind-dried and fermented in specialized sheds, transforming it into a deeply savory, often pungent, and incredibly flavorful delicacy. The taste is complex – think intensely umami, with earthy, sometimes slightly gamey, and distinctly fermented notes. The aroma can be quite strong, reflecting its unique aging process, but it’s a smell beloved by Faroese locals. Traditionally, it's served in paper-thin slices, often on dark rye bread with a smear of butter, letting its rich flavor take center stage. Ready to explore this fascinating tradition and perhaps even try a safe, home-adapted version? Let’s go!
Ingredients
Directions
- Trim + Weigh the Lamb: Carefully trim off any excess fat from your lamb leg or shank, leaving a thin layer for flavor. Weigh the lamb precisely. This weight is crucial for calculating your salt and optional sugar amounts.
- Salt Cure: In a clean, non-reactive container or a large food-grade bag, generously rub the calculated amount of Kosher salt (and optional sugar/aromatics) all over the lamb, ensuring even coverage. Make sure to get into any crevices. Place the lamb in the container or bag, cover it, and refrigerate for 7-10 days. During this time, the salt will draw out moisture, and the meat will begin its curing process. Flip the lamb every day or two to ensure even curing.
- Rinse/Dry + Rest: After the curing period, remove the lamb and thoroughly rinse off all the salt under cold running water. Pat it completely dry with clean paper towels. This surface drying step is vital for preventing unwanted mold. Let it rest uncovered on a rack in the refrigerator for 24-48 hours to allow the surface to dry even further and equalize.
- Hang + Dry in Controlled Conditions: Prepare your dedicated drying space. Target a temperature range of 50-60°F (10-15°C) and a humidity level of 70-80%. Hang the lamb using your hook or twine, ensuring good air circulation around all sides. Position a small fan to provide gentle, consistent airflow, but avoid direct strong blasts.
- Monitor + Rotate: This is where patience and vigilance come in! Weekly, check your lamb. Look for any signs of unwanted mold (green, black, or fuzzy). White, powdery mold (often called "harmless bloom") is generally okay, but anything else needs attention. Gently wipe down the meat with a clean cloth dampened with white vinegar if needed. Rotate the lamb periodically to ensure even drying.
- When It’s Ready: The drying process can take anywhere from 2 to 6 months, depending on the size of your lamb cut, your drying conditions, and your desired level of fermentation/dryness.
- Skerpikjøt is ready when it feels firm to the touch throughout and has lost a significant amount of its original weight (typically 30-50%). The aroma should be deep, savory, and complex – not rotten or putrid. Cut a small test slice from the thickest part; it should be consistently firm.
- How to Slice: Once ready, use a very sharp knife to slice the Skerpikjøt paper-thin, always cutting across the grain. This ensures the best texture and maximizes flavor.
- How to Serve: The traditional way is simple and perfect: serve your thin slices on dark rye bread with a little butter.Timeline Checkpoints:
- Week 1: Initial salt cure and setup in the drying chamber.
- Weeks 2–4: The surface of the lamb will start to dry and firm up, and the initial fermentation process begins. You might notice some surface changes.
- Month 2+: Deeper flavor development occurs as the meat continues to dry and ferment. The texture will become noticeably firmer.
- “Done” Window: Typically 2-6 months. Factors like the size of your lamb cut, the temperature and humidity in your drying chamber, and the amount of airflow will all affect the precise timing. Smaller cuts will dry faster.
Skerpikjøt - Make Faroese Air-Dried Lamb at Home
- Serves: 30 People
- Prepare Time: 1 hour
- Cooking Time: 0 minutes
- Calories: -
- Difficulty: Easy
Ever heard of meat that’s been dried by the salty sea air for months, developing flavors unlike anything else? That’s Skerpikjøt, the incredible Faroese air-dried lamb! This isn't just any preserved meat; it's a culinary hallmark of the remote Faroe Islands, deeply tied to their history and unique climate. Before we dive in, let's be clear: this guide is for making a delicious, traditional food for people to enjoy, not pet food.
So, what exactly is Skerpikjøt? In one sentence, it’s lamb (or mutton) that has been naturally wind-dried and fermented in specialized sheds, transforming it into a deeply savory, often pungent, and incredibly flavorful delicacy. The taste is complex – think intensely umami, with earthy, sometimes slightly gamey, and distinctly fermented notes. The aroma can be quite strong, reflecting its unique aging process, but it’s a smell beloved by Faroese locals. Traditionally, it's served in paper-thin slices, often on dark rye bread with a smear of butter, letting its rich flavor take center stage. Ready to explore this fascinating tradition and perhaps even try a safe, home-adapted version? Let’s go!
Ingredients
Directions
- Trim + Weigh the Lamb: Carefully trim off any excess fat from your lamb leg or shank, leaving a thin layer for flavor. Weigh the lamb precisely. This weight is crucial for calculating your salt and optional sugar amounts.
- Salt Cure: In a clean, non-reactive container or a large food-grade bag, generously rub the calculated amount of Kosher salt (and optional sugar/aromatics) all over the lamb, ensuring even coverage. Make sure to get into any crevices. Place the lamb in the container or bag, cover it, and refrigerate for 7-10 days. During this time, the salt will draw out moisture, and the meat will begin its curing process. Flip the lamb every day or two to ensure even curing.
- Rinse/Dry + Rest: After the curing period, remove the lamb and thoroughly rinse off all the salt under cold running water. Pat it completely dry with clean paper towels. This surface drying step is vital for preventing unwanted mold. Let it rest uncovered on a rack in the refrigerator for 24-48 hours to allow the surface to dry even further and equalize.
- Hang + Dry in Controlled Conditions: Prepare your dedicated drying space. Target a temperature range of 50-60°F (10-15°C) and a humidity level of 70-80%. Hang the lamb using your hook or twine, ensuring good air circulation around all sides. Position a small fan to provide gentle, consistent airflow, but avoid direct strong blasts.
- Monitor + Rotate: This is where patience and vigilance come in! Weekly, check your lamb. Look for any signs of unwanted mold (green, black, or fuzzy). White, powdery mold (often called "harmless bloom") is generally okay, but anything else needs attention. Gently wipe down the meat with a clean cloth dampened with white vinegar if needed. Rotate the lamb periodically to ensure even drying.
- When It’s Ready: The drying process can take anywhere from 2 to 6 months, depending on the size of your lamb cut, your drying conditions, and your desired level of fermentation/dryness.
- Skerpikjøt is ready when it feels firm to the touch throughout and has lost a significant amount of its original weight (typically 30-50%). The aroma should be deep, savory, and complex – not rotten or putrid. Cut a small test slice from the thickest part; it should be consistently firm.
- How to Slice: Once ready, use a very sharp knife to slice the Skerpikjøt paper-thin, always cutting across the grain. This ensures the best texture and maximizes flavor.
- How to Serve: The traditional way is simple and perfect: serve your thin slices on dark rye bread with a little butter.Timeline Checkpoints:
- Week 1: Initial salt cure and setup in the drying chamber.
- Weeks 2–4: The surface of the lamb will start to dry and firm up, and the initial fermentation process begins. You might notice some surface changes.
- Month 2+: Deeper flavor development occurs as the meat continues to dry and ferment. The texture will become noticeably firmer.
- “Done” Window: Typically 2-6 months. Factors like the size of your lamb cut, the temperature and humidity in your drying chamber, and the amount of airflow will all affect the precise timing. Smaller cuts will dry faster.
You may also like


Hey there! I’m just someone who seriously loves good food and believes that cooking doesn’t have to be complicated to be amazing. Whether it’s a quick weeknight dinner or a cozy weekend meal, I’m all about sharing easy, tasty recipes that actually work.


