
Skerpikjøt Recipe - Make Safe Faroese Dried Lamb at Home
Skerpikjøt Recipe - Make Safe Faroese Dried Lamb at Home
- Serves: 8 People
- Prepare Time: 20 minutes
- Cooking Time: 12-24 hours
- Calories: -
- Difficulty: Medium
Ever heard of skerpikjøt? It's the legendary, wind-dried, and fermented lamb meat from the Faroe Islands that's captured the curiosity of foodies worldwide. Imagine a flavor that’s deeply savory, intensely lamby, and uniquely complex, all thanks to the island's wild winds and salty sea air. While the traditional process involves specific conditions that are hard (and often unsafe) to replicate at home, this article brings you a skerpikjøt recipe that's safe, delicious, and captures the essence of Faroese dried lamb. Get ready to dive into the world of wind-dried mutton and discover how you can create an incredible, concentrated lamb experience right in your own kitchen!
Ingredients
Directions
- Prep Overview:
- Yield: 8-12 servings (as it's intensely flavored and sliced thin)
- Prep Time: 20 minutes
- Drying Time: 12-24 hours (depending on your equipment and desired dryness)
- Storage: See "Make-Ahead & Storage Instructions" below.
- Method:
- Trim & Slice the Lamb: Start by patting your boneless lamb leg completely dry with paper towels. This is super important! Using a sharp knife, trim off any remaining silverskin or large pockets of fat. Aim for a relatively uniform piece of lamb. Now, slice the lamb into pieces about 1/2 to 3/4 inch thick. Thinner slices will dry faster, thicker slices will retain more moisture but take longer.
- Salt Cure/Marinade: In a small bowl, mix together the coarse salt, granulated sugar, black pepper, and any optional add-ins (juniper, bay leaf, garlic powder). Place the lamb slices in a non-reactive dish or a large zip-top bag. Generously rub the salt and sugar mixture all over each piece of lamb, ensuring it's completely coated. Cover the dish or seal the bag and refrigerate for 24 hours. This initial cure draws out moisture and begins to flavor the meat.
- Heat Step for Safety: After 24 hours, remove the lamb from the fridge. Rinse off all the curing mixture under cold running water. Pat the lamb pieces thoroughly dry again with paper towels. This is another crucial step to prevent excess saltiness and promote even drying. Arrange the lamb pieces in a single layer on a wire rack set over a baking sheet. Place this in an oven preheated to 200°F (93°C) or a dehydrator set to its highest safe meat setting (usually 160°F/71°C). The goal here is to bring the internal temperature of the lamb to 160°F (71°C) to kill any potential bacteria. Use an instant-read thermometer to check the thickest part of a few pieces. This usually takes about 1-2 hours in an oven.
- Drying: Once the lamb reaches 160°F (71°C) internally, reduce your oven temperature to its lowest setting (ideally 150°F/65°C or even lower if your oven allows, propping the door open slightly with a wooden spoon for airflow if needed). If using a dehydrator, keep it at 160°F (71°C). Continue drying the lamb for 10-22 more hours, or until it reaches your desired dryness. Ensure good airflow around all pieces; you might need to rotate the rack or flip the pieces occasionally.
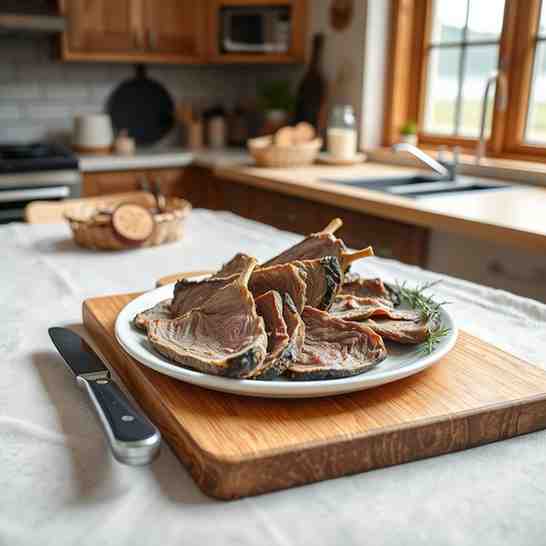
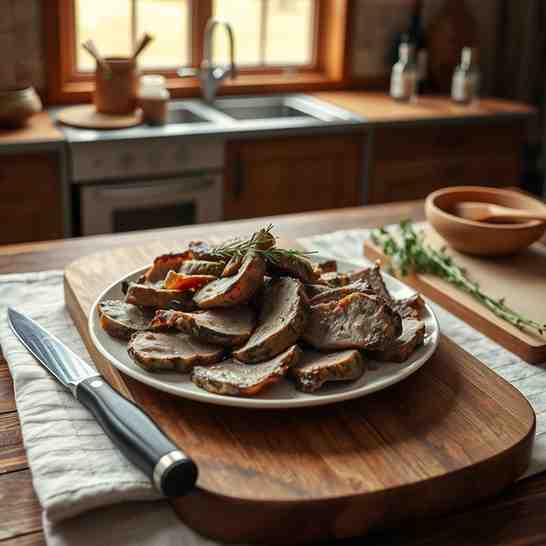
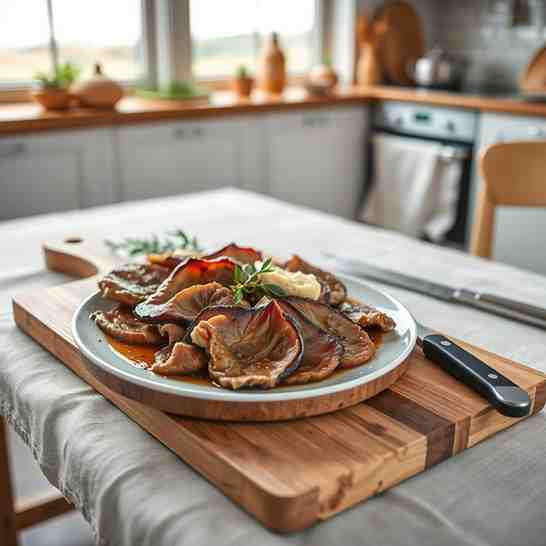
- Rest & Slice: Once the lamb is dried to your liking (see "What 'Done' Looks Like" below), remove it from the oven or dehydrator. Let it cool completely on the wire rack at room temperature for at least 1-2 hours. This resting period helps the texture equalize and makes it easier to slice. Once rested, use a very sharp knife to slice the dried lamb against the grain into paper-thin pieces.
- What "Done" Looks Like:
- Texture Cues: The finished Faroese dried lamb should be firm to the touch, not squishy or soft. It should have a leathery, slightly pliable texture, similar to a very dense jerky, but still chewable.
- Bend Test / Chew Cues: When you bend a slice, it shouldn't snap cleanly like a potato chip, but it also shouldn't feel raw or wet. It should bend and tear, offering some resistance. When you chew it, it should be firm and chewy, with a concentrated lamb flavor, but not rubbery or overly tough.
- Color Cues: The color will deepen significantly, turning a darker reddish-brown. There should be no signs of pinkness in the center, indicating it's fully cooked and dried.
Skerpikjøt Recipe - Make Safe Faroese Dried Lamb at Home
- Serves: 8 People
- Prepare Time: 20 minutes
- Cooking Time: 12-24 hours
- Calories: -
- Difficulty: Medium
Ever heard of skerpikjøt? It's the legendary, wind-dried, and fermented lamb meat from the Faroe Islands that's captured the curiosity of foodies worldwide. Imagine a flavor that’s deeply savory, intensely lamby, and uniquely complex, all thanks to the island's wild winds and salty sea air. While the traditional process involves specific conditions that are hard (and often unsafe) to replicate at home, this article brings you a skerpikjøt recipe that's safe, delicious, and captures the essence of Faroese dried lamb. Get ready to dive into the world of wind-dried mutton and discover how you can create an incredible, concentrated lamb experience right in your own kitchen!
Ingredients
Directions
- Prep Overview:
- Yield: 8-12 servings (as it's intensely flavored and sliced thin)
- Prep Time: 20 minutes
- Drying Time: 12-24 hours (depending on your equipment and desired dryness)
- Storage: See "Make-Ahead & Storage Instructions" below.
- Method:
- Trim & Slice the Lamb: Start by patting your boneless lamb leg completely dry with paper towels. This is super important! Using a sharp knife, trim off any remaining silverskin or large pockets of fat. Aim for a relatively uniform piece of lamb. Now, slice the lamb into pieces about 1/2 to 3/4 inch thick. Thinner slices will dry faster, thicker slices will retain more moisture but take longer.
- Salt Cure/Marinade: In a small bowl, mix together the coarse salt, granulated sugar, black pepper, and any optional add-ins (juniper, bay leaf, garlic powder). Place the lamb slices in a non-reactive dish or a large zip-top bag. Generously rub the salt and sugar mixture all over each piece of lamb, ensuring it's completely coated. Cover the dish or seal the bag and refrigerate for 24 hours. This initial cure draws out moisture and begins to flavor the meat.
- Heat Step for Safety: After 24 hours, remove the lamb from the fridge. Rinse off all the curing mixture under cold running water. Pat the lamb pieces thoroughly dry again with paper towels. This is another crucial step to prevent excess saltiness and promote even drying. Arrange the lamb pieces in a single layer on a wire rack set over a baking sheet. Place this in an oven preheated to 200°F (93°C) or a dehydrator set to its highest safe meat setting (usually 160°F/71°C). The goal here is to bring the internal temperature of the lamb to 160°F (71°C) to kill any potential bacteria. Use an instant-read thermometer to check the thickest part of a few pieces. This usually takes about 1-2 hours in an oven.
- Drying: Once the lamb reaches 160°F (71°C) internally, reduce your oven temperature to its lowest setting (ideally 150°F/65°C or even lower if your oven allows, propping the door open slightly with a wooden spoon for airflow if needed). If using a dehydrator, keep it at 160°F (71°C). Continue drying the lamb for 10-22 more hours, or until it reaches your desired dryness. Ensure good airflow around all pieces; you might need to rotate the rack or flip the pieces occasionally.
- Rest & Slice: Once the lamb is dried to your liking (see "What 'Done' Looks Like" below), remove it from the oven or dehydrator. Let it cool completely on the wire rack at room temperature for at least 1-2 hours. This resting period helps the texture equalize and makes it easier to slice. Once rested, use a very sharp knife to slice the dried lamb against the grain into paper-thin pieces.
- What "Done" Looks Like:
- Texture Cues: The finished Faroese dried lamb should be firm to the touch, not squishy or soft. It should have a leathery, slightly pliable texture, similar to a very dense jerky, but still chewable.
- Bend Test / Chew Cues: When you bend a slice, it shouldn't snap cleanly like a potato chip, but it also shouldn't feel raw or wet. It should bend and tear, offering some resistance. When you chew it, it should be firm and chewy, with a concentrated lamb flavor, but not rubbery or overly tough.
- Color Cues: The color will deepen significantly, turning a darker reddish-brown. There should be no signs of pinkness in the center, indicating it's fully cooked and dried.
You may also like


Hey there! I’m just someone who seriously loves good food and believes that cooking doesn’t have to be complicated to be amazing. Whether it’s a quick weeknight dinner or a cozy weekend meal, I’m all about sharing easy, tasty recipes that actually work.


