
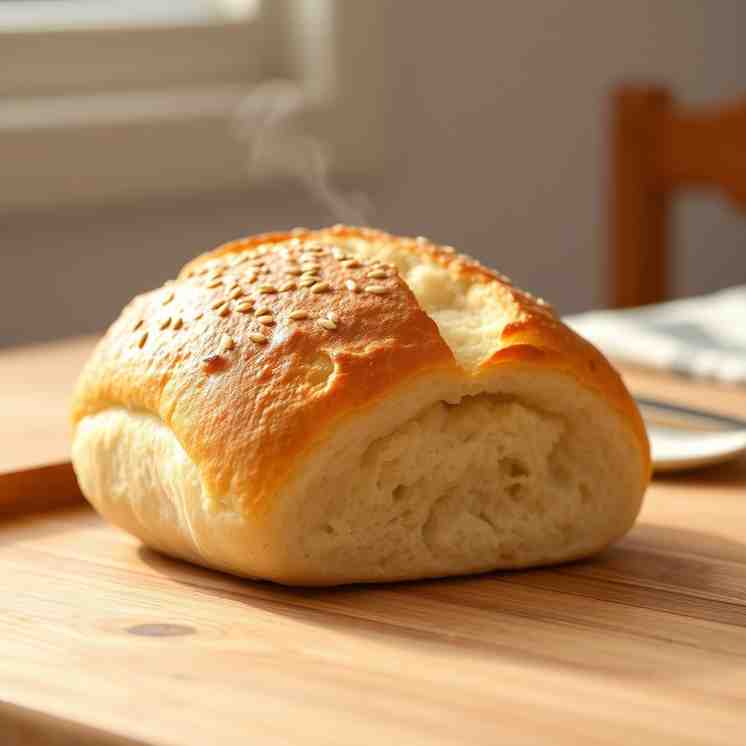
Bake Fluffy Tokoch Turkish Bread at Home Today
Bake Fluffy Tokoch Turkish Bread at Home Today
- Serves: 8 People
- Prepare Time: 20 minutes
- Cooking Time: 20-25 minut
- Calories: -
- Difficulty: Medium
Ever craved that incredibly fluffy, soft Turkish bakery bread with the gorgeous diamond pattern? You know, the one that smells amazing and just begs to be torn into? Well, get ready, because today we’re diving into making Tokoch: A Hearty Turkish Bread right in your own kitchen! This isn't just any ``home baked bread``; it’s a truly satisfying loaf that’s surprisingly straightforward to achieve, even if you’re new to ``oven baked bread``.
There’s nothing quite like the warmth and aroma of freshly ``home cooked bread``, and this Tokoch recipe delivers big on both. It’s hearty enough to stand alone, perfect for scooping up dips, or making into a fantastic sandwich. We’ll guide you through every step, from mastering the ``dough of bread`` to getting that perfect golden crust, so you can enjoy this authentic taste ``at home bread``.
Just a quick note on the name: while you might search for "Tokoch," many people are actually looking for this specific style of fluffy, patterned Turkish bakery bread. So, rest assured, you've found the perfect recipe for what you're craving!
Ingredients
Directions
- Mix Your Dough:
- In your large mixing bowl, combine the warm water, warm milk, instant yeast, and sugar (or honey). Give it a quick stir and let it sit for 5 minutes until it looks a little foamy – this tells you your ``yeast for bread`` is active!
- Stir in the salt and olive oil.
- Gradually add the flour, mixing with a wooden spoon or your hands until a shaggy, sticky ``dough of bread`` forms. It won't be smooth yet, and it will definitely be sticky – that's exactly what we want for this fluffy ``baked yeast bread``!
- First Rise (Bulk Fermentation):
- Lightly oil a clean bowl (or use the same one if it's large enough). Transfer your sticky ``dough of bread`` to it, turning once to coat.
- Cover the bowl tightly with plastic wrap or a damp kitchen towel.
- Let it rise in a warm spot for 60-90 minutes, or until it has roughly doubled in size and you see little bubbles on the surface. This is where the magic of ``yeast and dough`` really begins!
- Shape Your Loaf:
- Gently turn the risen dough out onto a lightly floured surface. Avoid adding too much extra flour, as this can make your ``home baked bread`` dense. A bench scraper or spatula can help you manage the stickiness.
- Gently pat or stretch the dough into a round or oval shape, about 10-12 inches in diameter and about 1 inch thick. Try to maintain some of the air bubbles.
- Carefully transfer the shaped dough to a baking sheet lined with parchment paper.
- Second Rise (Proofing):
- Cover the shaped dough loosely with plastic wrap or a damp towel.
- Let it rise for another 20-30 minutes. It should look noticeably puffy and slightly increased in size. This shorter proof gives it a final lift before baking.
- Create the Signature Pattern:
- Right before baking, lightly wet your fingertips with water.
- Gently but firmly press a diamond pattern into the dough, going almost all the way down to the baking sheet. Start by making parallel lines in one direction, then cross them with parallel lines in the other direction.
- Pro Tip: Give the pattern a quick re-press right before it goes into the oven to ensure it holds its shape during baking.
- Wash & Seed:
- In a small bowl, whisk together the egg yolk and yogurt for the wash.
- Gently brush the entire surface of the dough with this mixture. This gives your ``oven baked bread`` that beautiful, glossy shine.
- Sprinkle generously with sesame seeds and nigella seeds (if using). Gently press the seeds into the dough so they stick.
- Bake with High Heat & Steam:
- While your dough is doing its second rise, preheat your oven to 450°F (230°C). Place your empty small metal pan on the bottom rack of the oven to heat up.
- Carefully slide the baking sheet with your bread into the hot oven. Pour about 1/2 cup of hot water into the preheated metal pan (careful, it will create instant steam!). Quickly close the oven door.
- Bake for 20-25 minutes, or until the bread is deeply golden brown and sounds hollow when tapped on the bottom. An internal temperature of 200-210°F (93-99°C) means it's perfectly done. This steam trick helps create an amazing crust and a super soft interior for your ``bread for oven``!
- Cool & Serve:
- Transfer the freshly baked Tokoch to a wire rack immediately.
- Let it cool for at least 15-20 minutes before slicing or tearing into it. This short cooling period is crucial; it allows the internal structure to set, preventing a gummy crumb. Enjoy your warm, fluffy ``home baked bread``!
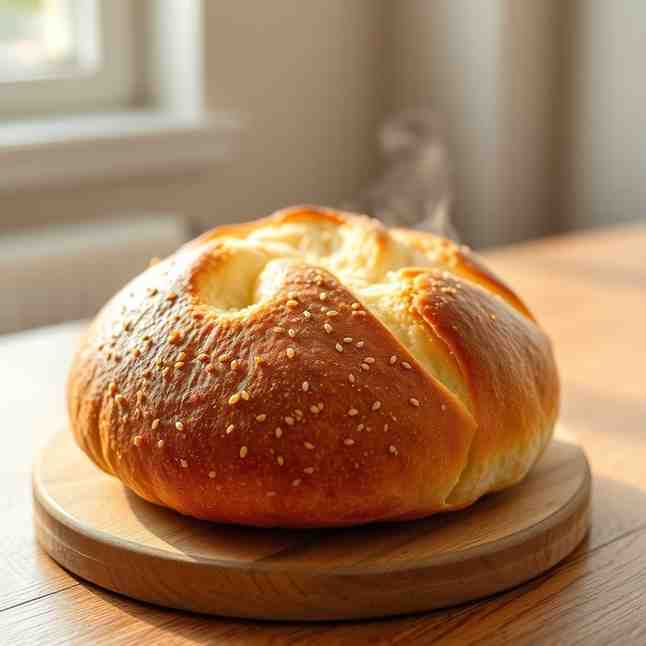
Bake Fluffy Tokoch Turkish Bread at Home Today

- Serves: 8 People
- Prepare Time: 20 minutes
- Cooking Time: 20-25 minut
- Calories: -
- Difficulty: Medium
Ever craved that incredibly fluffy, soft Turkish bakery bread with the gorgeous diamond pattern? You know, the one that smells amazing and just begs to be torn into? Well, get ready, because today we’re diving into making Tokoch: A Hearty Turkish Bread right in your own kitchen! This isn't just any ``home baked bread``; it’s a truly satisfying loaf that’s surprisingly straightforward to achieve, even if you’re new to ``oven baked bread``.
There’s nothing quite like the warmth and aroma of freshly ``home cooked bread``, and this Tokoch recipe delivers big on both. It’s hearty enough to stand alone, perfect for scooping up dips, or making into a fantastic sandwich. We’ll guide you through every step, from mastering the ``dough of bread`` to getting that perfect golden crust, so you can enjoy this authentic taste ``at home bread``.
Just a quick note on the name: while you might search for "Tokoch," many people are actually looking for this specific style of fluffy, patterned Turkish bakery bread. So, rest assured, you've found the perfect recipe for what you're craving!
Ingredients
Directions
- Mix Your Dough:
- In your large mixing bowl, combine the warm water, warm milk, instant yeast, and sugar (or honey). Give it a quick stir and let it sit for 5 minutes until it looks a little foamy – this tells you your ``yeast for bread`` is active!
- Stir in the salt and olive oil.
- Gradually add the flour, mixing with a wooden spoon or your hands until a shaggy, sticky ``dough of bread`` forms. It won't be smooth yet, and it will definitely be sticky – that's exactly what we want for this fluffy ``baked yeast bread``!
- First Rise (Bulk Fermentation):
- Lightly oil a clean bowl (or use the same one if it's large enough). Transfer your sticky ``dough of bread`` to it, turning once to coat.
- Cover the bowl tightly with plastic wrap or a damp kitchen towel.
- Let it rise in a warm spot for 60-90 minutes, or until it has roughly doubled in size and you see little bubbles on the surface. This is where the magic of ``yeast and dough`` really begins!
- Shape Your Loaf:
- Gently turn the risen dough out onto a lightly floured surface. Avoid adding too much extra flour, as this can make your ``home baked bread`` dense. A bench scraper or spatula can help you manage the stickiness.
- Gently pat or stretch the dough into a round or oval shape, about 10-12 inches in diameter and about 1 inch thick. Try to maintain some of the air bubbles.
- Carefully transfer the shaped dough to a baking sheet lined with parchment paper.
- Second Rise (Proofing):
- Cover the shaped dough loosely with plastic wrap or a damp towel.
- Let it rise for another 20-30 minutes. It should look noticeably puffy and slightly increased in size. This shorter proof gives it a final lift before baking.
- Create the Signature Pattern:
- Right before baking, lightly wet your fingertips with water.
- Gently but firmly press a diamond pattern into the dough, going almost all the way down to the baking sheet. Start by making parallel lines in one direction, then cross them with parallel lines in the other direction.
- Pro Tip: Give the pattern a quick re-press right before it goes into the oven to ensure it holds its shape during baking.
- Wash & Seed:
- In a small bowl, whisk together the egg yolk and yogurt for the wash.
- Gently brush the entire surface of the dough with this mixture. This gives your ``oven baked bread`` that beautiful, glossy shine.
- Sprinkle generously with sesame seeds and nigella seeds (if using). Gently press the seeds into the dough so they stick.
- Bake with High Heat & Steam:
- While your dough is doing its second rise, preheat your oven to 450°F (230°C). Place your empty small metal pan on the bottom rack of the oven to heat up.
- Carefully slide the baking sheet with your bread into the hot oven. Pour about 1/2 cup of hot water into the preheated metal pan (careful, it will create instant steam!). Quickly close the oven door.
- Bake for 20-25 minutes, or until the bread is deeply golden brown and sounds hollow when tapped on the bottom. An internal temperature of 200-210°F (93-99°C) means it's perfectly done. This steam trick helps create an amazing crust and a super soft interior for your ``bread for oven``!
- Cool & Serve:
- Transfer the freshly baked Tokoch to a wire rack immediately.
- Let it cool for at least 15-20 minutes before slicing or tearing into it. This short cooling period is crucial; it allows the internal structure to set, preventing a gummy crumb. Enjoy your warm, fluffy ``home baked bread``!
You may also like


Hey there! I’m just someone who seriously loves good food and believes that cooking doesn’t have to be complicated to be amazing. Whether it’s a quick weeknight dinner or a cozy weekend meal, I’m all about sharing easy, tasty recipes that actually work.


