
Bake the Best Chocolate Layer Cake - Torta Tre Monti Recipe
Bake the Best Chocolate Layer Cake - Torta Tre Monti Recipe
- Serves: 10 People
- Prepare Time: 45 minutes
- Cooking Time: 25 minutes
- Calories: -
- Difficulty: Medium
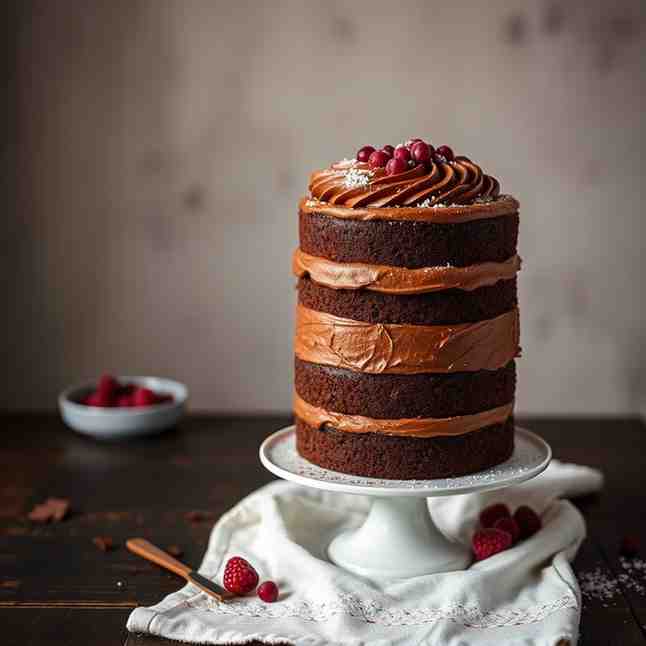
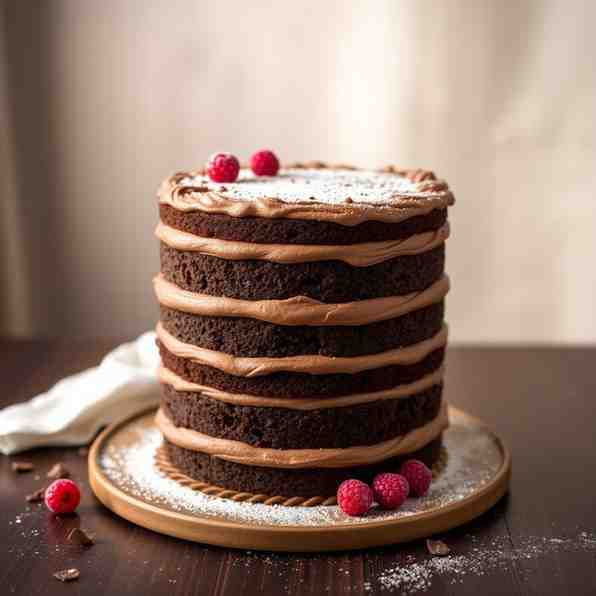
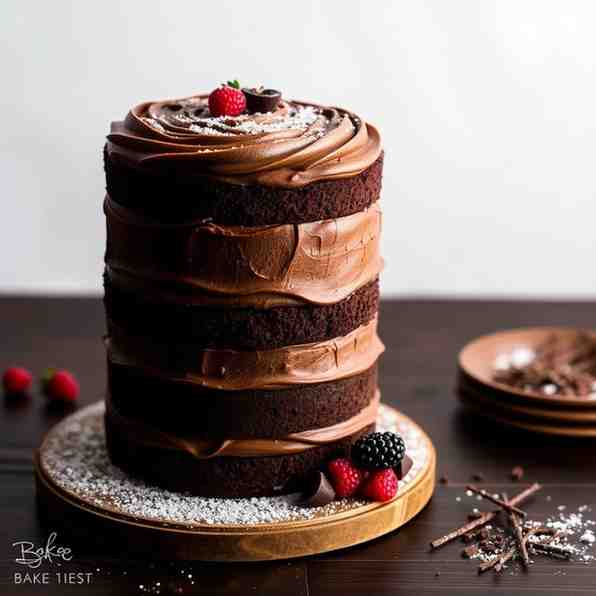
Ever dreamt of a decadent chocolate layer cake that’s as rich in history as it is in flavor? Look no further than Torta Tre Monti, San Marino's national treasure! This isn't just any three-layered cake; it's a culinary masterpiece inspired by the three peaks of Monte Titano, the iconic mountains that define the tiny, ancient republic of San Marino. Each layer of this exquisite dessert tells a story, much like the winding streets and historic fortresses of its homeland. Culturally, Torta Tre Monti is more than just a sweet treat; it's a symbol of national pride, often enjoyed during celebrations and family gatherings, representing the enduring spirit and rich heritage of San Marino. What makes this particular chocolate cake truly unique is its harmonious blend of crisp wafer layers, creamy hazelnut chocolate filling, and a luxurious dark chocolate glaze, creating a symphony of textures and flavors that will transport your taste buds straight to the heart of Italy's oldest republic. Get ready to bake the best chocolate cake you've ever tasted!
Ingredients
Directions
- Preparing the Wafers
- Preheat & Prep: Preheat your oven to 350°F (175°C). Line two 8-inch round cake pans with parchment paper and lightly grease.
- Dry Ingredients: In a large bowl, whisk together the flour, granulated sugar, baking powder, and salt.
- Wet Ingredients: In a separate bowl, cream together the softened butter, egg, and vanilla extract until light and fluffy.
- Combine: Gradually add the dry ingredients to the wet ingredients, mixing until just combined. Add milk, one tablespoon at a time, until the dough comes together and is soft but not sticky.
- Roll & Bake: Divide the dough into three equal portions. On a lightly floured surface or between two sheets of parchment paper, roll out each portion into an 8-inch circle, about ⅛-inch thick. Carefully transfer one wafer circle to a prepared cake pan. Prick the surface several times with a fork to prevent bubbling.
- Baking Times & Temperature: Bake for 12-15 minutes, or until lightly golden brown and crisp. Remove from the oven and immediately transfer the wafer to a wire rack to cool completely. Repeat with the remaining two dough portions, baking them one at a time. Pro Tip: If you only have one pan, let it cool slightly between batches.
- Making the Hazelnut Cream
- Custard Base: In a medium saucepan, whisk together the milk, granulated sugar, cornstarch, and egg yolks until smooth.
- Cook Cream: Heat the mixture over medium heat, whisking constantly, until it thickens and comes to a gentle boil. Continue to cook for 1 minute, stirring, then remove from heat.
- Melt Chocolate & Hazelnut Spread: Immediately stir in the chopped dark chocolate until completely melted and smooth. Then, stir in the hazelnut spread until fully incorporated.
- Cool & Fold: Transfer the cream to a bowl, cover the surface directly with plastic wrap to prevent a skin from forming, and let it cool completely to room temperature. Once cooled, gently fold in the whipped heavy cream and chopped toasted hazelnuts (if using) until light and airy. This helps achieve the right consistency and a balanced flavor.
- Assembling the Cake
- First Layer: Place one cooled wafer layer on your serving plate or cake stand.
- Apply Cream: Spread about one-third of the hazelnut chocolate cream evenly over the wafer, extending to the edges.
- Second Layer: Carefully place the second wafer layer on top of the cream.
- Repeat: Spread another one-third of the cream over the second wafer.
- Final Layer: Top with the third wafer layer. Tips for smooth layers: Use an offset spatula and apply gentle, even pressure as you spread the cream. Ensure your wafers are fully cooled to prevent the cream from melting.
- Final Touches
- Prepare Glaze: In a small saucepan, heat the heavy cream for the glaze over medium heat until it just begins to simmer. Remove from heat and immediately add the chopped dark chocolate and butter. Let sit for 2-3 minutes, then whisk until smooth and glossy.
- Glaze the Cake: Pour the warm glaze over the top of the cake, allowing it to drip attractively down the sides. Use an offset spatula to gently smooth the top if needed.
- Chill: Refrigerate the cake for at least 2-3 hours, or preferably overnight, to allow the layers to set and the flavors to meld beautifully. This is crucial for keeping the layers firm.
Bake the Best Chocolate Layer Cake - Torta Tre Monti Recipe
- Serves: 10 People
- Prepare Time: 45 minutes
- Cooking Time: 25 minutes
- Calories: -
- Difficulty: Medium
Ever dreamt of a decadent chocolate layer cake that’s as rich in history as it is in flavor? Look no further than Torta Tre Monti, San Marino's national treasure! This isn't just any three-layered cake; it's a culinary masterpiece inspired by the three peaks of Monte Titano, the iconic mountains that define the tiny, ancient republic of San Marino. Each layer of this exquisite dessert tells a story, much like the winding streets and historic fortresses of its homeland. Culturally, Torta Tre Monti is more than just a sweet treat; it's a symbol of national pride, often enjoyed during celebrations and family gatherings, representing the enduring spirit and rich heritage of San Marino. What makes this particular chocolate cake truly unique is its harmonious blend of crisp wafer layers, creamy hazelnut chocolate filling, and a luxurious dark chocolate glaze, creating a symphony of textures and flavors that will transport your taste buds straight to the heart of Italy's oldest republic. Get ready to bake the best chocolate cake you've ever tasted!
Ingredients
Directions
- Preparing the Wafers
- Preheat & Prep: Preheat your oven to 350°F (175°C). Line two 8-inch round cake pans with parchment paper and lightly grease.
- Dry Ingredients: In a large bowl, whisk together the flour, granulated sugar, baking powder, and salt.
- Wet Ingredients: In a separate bowl, cream together the softened butter, egg, and vanilla extract until light and fluffy.
- Combine: Gradually add the dry ingredients to the wet ingredients, mixing until just combined. Add milk, one tablespoon at a time, until the dough comes together and is soft but not sticky.
- Roll & Bake: Divide the dough into three equal portions. On a lightly floured surface or between two sheets of parchment paper, roll out each portion into an 8-inch circle, about ⅛-inch thick. Carefully transfer one wafer circle to a prepared cake pan. Prick the surface several times with a fork to prevent bubbling.
- Baking Times & Temperature: Bake for 12-15 minutes, or until lightly golden brown and crisp. Remove from the oven and immediately transfer the wafer to a wire rack to cool completely. Repeat with the remaining two dough portions, baking them one at a time. Pro Tip: If you only have one pan, let it cool slightly between batches.
- Making the Hazelnut Cream
- Custard Base: In a medium saucepan, whisk together the milk, granulated sugar, cornstarch, and egg yolks until smooth.
- Cook Cream: Heat the mixture over medium heat, whisking constantly, until it thickens and comes to a gentle boil. Continue to cook for 1 minute, stirring, then remove from heat.
- Melt Chocolate & Hazelnut Spread: Immediately stir in the chopped dark chocolate until completely melted and smooth. Then, stir in the hazelnut spread until fully incorporated.
- Cool & Fold: Transfer the cream to a bowl, cover the surface directly with plastic wrap to prevent a skin from forming, and let it cool completely to room temperature. Once cooled, gently fold in the whipped heavy cream and chopped toasted hazelnuts (if using) until light and airy. This helps achieve the right consistency and a balanced flavor.
- Assembling the Cake
- First Layer: Place one cooled wafer layer on your serving plate or cake stand.
- Apply Cream: Spread about one-third of the hazelnut chocolate cream evenly over the wafer, extending to the edges.
- Second Layer: Carefully place the second wafer layer on top of the cream.
- Repeat: Spread another one-third of the cream over the second wafer.
- Final Layer: Top with the third wafer layer. Tips for smooth layers: Use an offset spatula and apply gentle, even pressure as you spread the cream. Ensure your wafers are fully cooled to prevent the cream from melting.
- Final Touches
- Prepare Glaze: In a small saucepan, heat the heavy cream for the glaze over medium heat until it just begins to simmer. Remove from heat and immediately add the chopped dark chocolate and butter. Let sit for 2-3 minutes, then whisk until smooth and glossy.
- Glaze the Cake: Pour the warm glaze over the top of the cake, allowing it to drip attractively down the sides. Use an offset spatula to gently smooth the top if needed.
- Chill: Refrigerate the cake for at least 2-3 hours, or preferably overnight, to allow the layers to set and the flavors to meld beautifully. This is crucial for keeping the layers firm.
You may also like


Hey there! I’m just someone who seriously loves good food and believes that cooking doesn’t have to be complicated to be amazing. Whether it’s a quick weeknight dinner or a cozy weekend meal, I’m all about sharing easy, tasty recipes that actually work.


