 - Easy Dehydrator Recipe | CulinaryCreationss alt=")
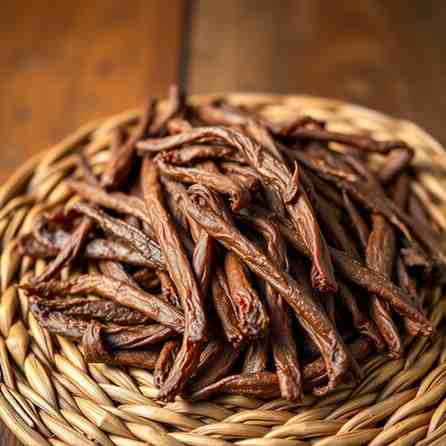
Umncweba (Swazi Dried Beef) - Easy Dehydrator Recipe
Umncweba (Swazi Dried Beef) - Easy Dehydrator Recipe

- Serves: 6 People
- Prepare Time: 25 minutes
- Cooking Time: 10 hours
- Calories: -
- Difficulty: Medium
Imagine a savory, chewy snack that packs a punch of flavor and tradition! That's exactly what you get with Umncweba, a beloved Swazi dried meat delicacy. This isn't just any dried beef; it's a wonderfully dried spiced beef that's perfect for satisfying cravings or adding a unique touch to your meals. Traditionally, Umncweba is made by sun-drying salted and spiced meat strips, but for consistent, safe, and delicious results right in your kitchen, we're going to show you an easy dehydrator or oven method. Get ready to enjoy a taste of Eswatini with confidence!
Ingredients
Directions
- Step A — Slice and Season
- Choose Your Cut: Start with a lean cut of beef like top round, eye of round, or flank steak. Trim off any visible fat, as fat can spoil quickly during drying and affect the shelf life of your Umncweba.
- Slice Against the Grain: For a chewier texture, slice the beef with the grain. For a more tender, easier-to-chew result, slice it against the grain. Aim for uniform strips about ¼-inch (0.6 cm) thick. Consistency in thickness is key for even drying!
- Step B — Marinate (Flavor + Moisture Control)
- Mix Seasonings: In a medium bowl, combine the salt, black pepper, ground coriander, paprika, vinegar, Worcestershire sauce, garlic powder, and chili flakes (if using). Stir well until a paste forms.
- Coat the Meat: Add the sliced beef strips to the seasoning mixture. Using food-safe gloves (optional but recommended), massage the mixture thoroughly into every piece of meat, ensuring each strip is well coated.
- Marinate Safely: Cover the bowl tightly and refrigerate for at least 6 hours, or ideally 12-24 hours. This allows the flavors to penetrate the meat and the salt to begin its curing process.
- Step C — Safety Heat Step (Simple + Clear)
- Pre-Dry Heat Treatment: Before drying, you can perform a safety heat step to reduce potential bacteria. Preheat your oven to 160°F (71°C).
- Quick Bake: Arrange the marinated beef strips in a single layer on a wire rack set over a baking sheet. Bake for 10-15 minutes, or until the internal temperature of the meat reaches 160°F (71°C). Use an instant-read thermometer to check. This step is optional but highly recommended for food safety. Remove from oven and proceed to drying.
- Step D — Dry
- Set Up Your Equipment:
- Dehydrator: Arrange the beef strips on your dehydrator trays in a single layer, making sure they don't touch or overlap. Set the dehydrator temperature to 145°F (63°C).
- Oven: If using an oven with a convection setting, arrange the strips on a wire rack set over a baking sheet. Set the oven to its lowest temperature, typically around 140-170°F (60-77°C), and prop the door open slightly with a wooden spoon to allow moisture to escape. Use the convection setting if available, as it helps with airflow.
- Drying Time: Dry the Umncweba for 6-12 hours. The exact time will depend on your equipment, the thickness of your meat strips, and your desired level of dryness. Thinner strips will dry faster than thicker ones.
- "Done" Tests:
- Bend Test: A properly dried piece of Umncweba should bend without breaking and feel leathery, but not brittle.
- Surface Feel: The surface should be dry to the touch, not sticky or moist.
- Tear Test: Tear a piece in half. There should be no wet spots or moisture visible inside. If you see any, continue drying.
- Step E — Rest + Store
- Cool Down: Once dried to your liking, turn off your dehydrator or oven and let the Umncweba cool completely at room temperature for at least an hour. This helps prevent condensation during storage.
- Storage Options:
- Counter (Short Term): If your Umncweba is very dry and your environment is cool and low in humidity, it can be stored in an airtight container at room temperature for up to 1-2 weeks.
- Refrigerator (Mid Term): For longer storage, place the Umncweba in an airtight container or a vacuum-sealed bag in the refrigerator for up to 1-2 months.
- Freezer (Long Term): For the longest shelf life, freeze Umncweba in an airtight, freezer-safe bag or container for up to 6 months.
Umncweba (Swazi Dried Beef) - Easy Dehydrator Recipe
---Easy-Dehydrator-Recipe.jpg)
- Serves: 6 People
- Prepare Time: 25 minutes
- Cooking Time: 10 hours
- Calories: -
- Difficulty: Medium
Imagine a savory, chewy snack that packs a punch of flavor and tradition! That's exactly what you get with Umncweba, a beloved Swazi dried meat delicacy. This isn't just any dried beef; it's a wonderfully dried spiced beef that's perfect for satisfying cravings or adding a unique touch to your meals. Traditionally, Umncweba is made by sun-drying salted and spiced meat strips, but for consistent, safe, and delicious results right in your kitchen, we're going to show you an easy dehydrator or oven method. Get ready to enjoy a taste of Eswatini with confidence!
Ingredients
Directions
- Step A — Slice and Season
- Choose Your Cut: Start with a lean cut of beef like top round, eye of round, or flank steak. Trim off any visible fat, as fat can spoil quickly during drying and affect the shelf life of your Umncweba.
- Slice Against the Grain: For a chewier texture, slice the beef with the grain. For a more tender, easier-to-chew result, slice it against the grain. Aim for uniform strips about ¼-inch (0.6 cm) thick. Consistency in thickness is key for even drying!
- Step B — Marinate (Flavor + Moisture Control)
- Mix Seasonings: In a medium bowl, combine the salt, black pepper, ground coriander, paprika, vinegar, Worcestershire sauce, garlic powder, and chili flakes (if using). Stir well until a paste forms.
- Coat the Meat: Add the sliced beef strips to the seasoning mixture. Using food-safe gloves (optional but recommended), massage the mixture thoroughly into every piece of meat, ensuring each strip is well coated.
- Marinate Safely: Cover the bowl tightly and refrigerate for at least 6 hours, or ideally 12-24 hours. This allows the flavors to penetrate the meat and the salt to begin its curing process.
- Step C — Safety Heat Step (Simple + Clear)
- Pre-Dry Heat Treatment: Before drying, you can perform a safety heat step to reduce potential bacteria. Preheat your oven to 160°F (71°C).
- Quick Bake: Arrange the marinated beef strips in a single layer on a wire rack set over a baking sheet. Bake for 10-15 minutes, or until the internal temperature of the meat reaches 160°F (71°C). Use an instant-read thermometer to check. This step is optional but highly recommended for food safety. Remove from oven and proceed to drying.
- Step D — Dry
- Set Up Your Equipment:
- Dehydrator: Arrange the beef strips on your dehydrator trays in a single layer, making sure they don't touch or overlap. Set the dehydrator temperature to 145°F (63°C).
- Oven: If using an oven with a convection setting, arrange the strips on a wire rack set over a baking sheet. Set the oven to its lowest temperature, typically around 140-170°F (60-77°C), and prop the door open slightly with a wooden spoon to allow moisture to escape. Use the convection setting if available, as it helps with airflow.
- Drying Time: Dry the Umncweba for 6-12 hours. The exact time will depend on your equipment, the thickness of your meat strips, and your desired level of dryness. Thinner strips will dry faster than thicker ones.
- "Done" Tests:
- Bend Test: A properly dried piece of Umncweba should bend without breaking and feel leathery, but not brittle.
- Surface Feel: The surface should be dry to the touch, not sticky or moist.
- Tear Test: Tear a piece in half. There should be no wet spots or moisture visible inside. If you see any, continue drying.
- Step E — Rest + Store
- Cool Down: Once dried to your liking, turn off your dehydrator or oven and let the Umncweba cool completely at room temperature for at least an hour. This helps prevent condensation during storage.
- Storage Options:
- Counter (Short Term): If your Umncweba is very dry and your environment is cool and low in humidity, it can be stored in an airtight container at room temperature for up to 1-2 weeks.
- Refrigerator (Mid Term): For longer storage, place the Umncweba in an airtight container or a vacuum-sealed bag in the refrigerator for up to 1-2 months.
- Freezer (Long Term): For the longest shelf life, freeze Umncweba in an airtight, freezer-safe bag or container for up to 6 months.
You may also like


Hey there! I’m just someone who seriously loves good food and believes that cooking doesn’t have to be complicated to be amazing. Whether it’s a quick weeknight dinner or a cozy weekend meal, I’m all about sharing easy, tasty recipes that actually work.


