
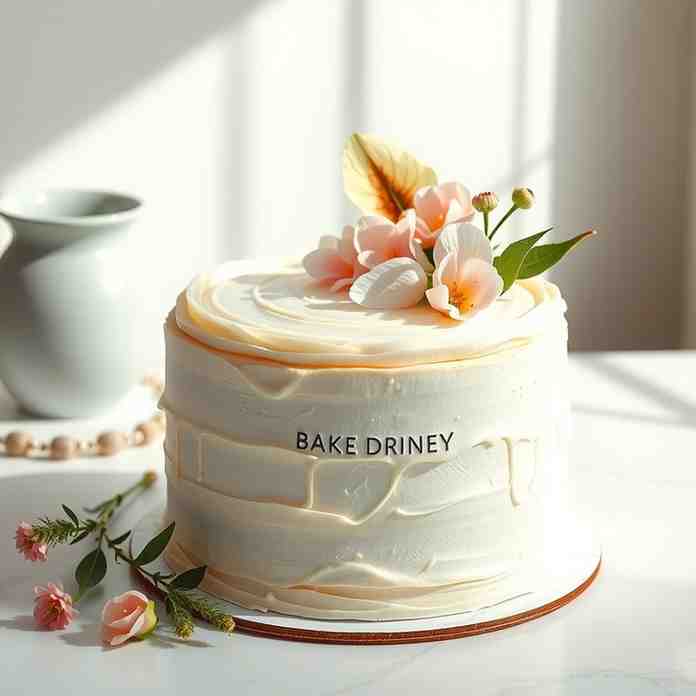
Bake Dream Vanilla Cream Cake - Jersey Luxury
Bake Dream Vanilla Cream Cake - Jersey Luxury
- Serves: 10 People
- Prepare Time: 60 minutes
- Cooking Time: 30-35 minut
- Calories: -
- Difficulty: Medium
Welcome to your new favorite celebration cake! If you’ve been dreaming of a truly luxurious vanilla cream cake that looks like it came straight from a fancy bakery but is totally doable at home, you’re in the right place. Our Jersey Cream Cake is a show-stopping dessert, featuring moist, fluffy vanilla butter cake layers, a decadent, thick vanilla cream filling, and a perfectly stable whipped cream frosting. Topped with vibrant fresh fruit, this fancy birthday cake is designed to impress and delight. Forget those overly sweet, heavy cakes – this recipe delivers elegance, balance, and a burst of fresh flavor. Whether you're making a fresh fruit birthday cake or simply indulging in a white birthday cake masterpiece, we'll guide you through every step to create a vanilla cake with cream cheese frosting (or our stable whipped cream version!) that will have everyone asking for seconds. Get ready to bake a truly unforgettable vanilla and cream cake!
Ingredients
Directions
- Bake the Vanilla Cake Layers
- Prep: Preheat your oven to 350°F (175°C). Grease and flour two 8-inch round cake pans. Line the bottoms with parchment paper circles.
- Dry Ingredients: In a large bowl, whisk together the sifted flour, granulated sugar, baking powder, and salt.
- Wet Ingredients: In a separate medium bowl, whisk together the softened butter, eggs, milk, and vanilla extract until well combined.
- Combine: Gradually add the wet ingredients to the dry ingredients, mixing on low speed with a hand or stand mixer until just combined. Do not overmix! Overmixing develops gluten, leading to a tough cake. Stop mixing once no dry streaks remain.
- Bake: Divide the batter evenly between the two prepared pans. Bake for 30-35 minutes, or until a toothpick inserted into the center comes out clean and the cakes spring back when lightly touched. The internal temperature should be around 200-210°F (93-99°C) if you're using a thermometer.
- Cool: Let the cakes cool in the pans for 10-15 minutes before inverting them onto a wire rack to cool completely. This is crucial! Attempting to frost warm cakes will melt your frosting.
- Make the Vanilla Cream Filling (Thick & Sliceable)
- Whisk Dry: In a medium saucepan, whisk together the granulated sugar, cornstarch, and salt.
- Combine Wet: In a separate bowl, whisk the egg yolks with a splash of the milk until smooth. Add the remaining milk to the saucepan with the dry ingredients.
- Cook Custard: Place the saucepan over medium heat, whisking constantly. Once it starts to warm, gradually whisk in the egg yolk mixture. Continue whisking constantly until the mixture thickens significantly and comes to a gentle boil, about 5-7 minutes. It should be thick enough to coat the back of a spoon. If you see any lumps, don't worry – you can strain it later.
- Finish: Remove from heat and stir in the butter and vanilla extract until smooth.
- Chill Correctly: Pour the cream filling into a clean bowl. Press plastic wrap directly onto the surface of the cream to prevent a skin from forming. Chill in the refrigerator for at least 2-3 hours, or until completely cold and firm.
- Make the Cream Frosting (Stable Enough for a Birthday Cake)
- Hydrate Gelatin (if using): In a small, microwave-safe bowl, sprinkle gelatin powder over 2 tablespoons of cold water. Let it sit for 5 minutes to bloom. Microwave for 10-15 seconds, or until completely dissolved and clear (do not boil). Let it cool slightly but ensure it remains liquid. (If using instant pudding mix, skip this step).
- Whip Cream: Ensure your heavy cream, bowl, and whisk attachment are all very cold (you can chill the bowl and whisk in the freezer for 15 minutes). Pour the very cold heavy cream into the chilled bowl of a stand mixer (or use a hand mixer).
- Whip to Soft Peaks: Begin whipping on medium-high speed. Once soft peaks form, gradually add the sifted powdered sugar and vanilla extract.
- Stabilize: While the mixer is still running on medium-high, slowly drizzle in the cooled, dissolved gelatin (or sprinkle in the instant pudding mix).
- Finish Whip: Continue whipping until stiff peaks form. The frosting should be thick and hold its shape. Be careful not to over whip! Overwhipping will cause it to become grainy or even separate into butter and buttermilk. If it accidentally goes too far and looks grainy, you can sometimes rescue it by adding a tablespoon or two of cold heavy cream and gently whisking by hand until smooth again.
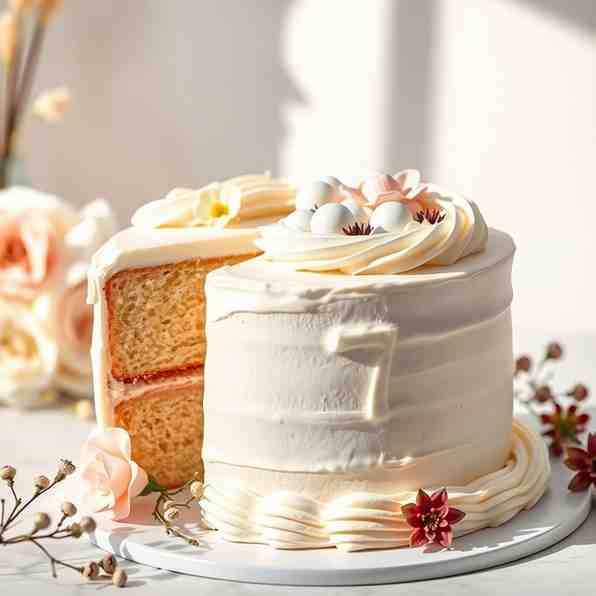
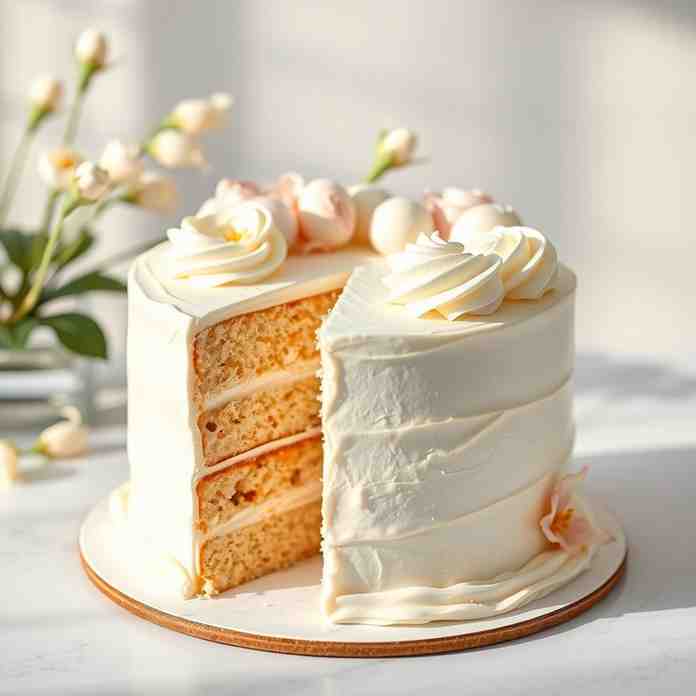
- Assemble the Cake (No Sliding, No Oozing)
- Level Layers: Once the cake layers are completely cool, use a serrated knife or a cake leveler to gently level the tops if they have domed.
- First Layer: Place one cake layer on your serving plate or cake stand. If using a turntable, this makes frosting much easier.
- Dam: Pipe a dam of frosting around the outer edge of the first cake layer (a simple border about ½ inch high). This will act as a barrier to hold the thick vanilla cream filling in place.
- Fill & Chill: Spoon the chilled vanilla cream filling into the center of the frosting dam and spread evenly. Place the second cake layer on top. Gently press down. Chill the filled cake in the refrigerator for at least 30 minutes to allow the filling to set firmly. This helps prevent sliding.
- Crumb Coat (Optional but Recommended): Apply a very thin layer of the stable cream frosting all over the cake. This "crumb coat" traps any loose crumbs, ensuring a smooth finish. Chill again for 15-20 minutes.
- Final Coat: Apply the remaining frosting to the top and sides of the cake, smoothing it out with an offset spatula or bench scraper.
- Final Chill: Chill the frosted cake for at least 30 minutes before topping with fruit.
- Fruit Topping That Stays Pretty
- Dry Fruit Well: Ensure all fresh fruit is thoroughly washed and completely dry. Excess moisture can make your cake top watery.
- Optional Glaze: If desired, gently brush the warmed and strained jam over the fresh fruit for a light shine and to help preserve the berries from drying out.
- Arrange: Artfully arrange the dry fruit on top of the chilled cake. To avoid a wet ring at the base of the fruit, you can place the fruit just before serving, or lightly dust the cake top with a tiny bit of powdered sugar before placing the fruit.
Bake Dream Vanilla Cream Cake - Jersey Luxury
- Serves: 10 People
- Prepare Time: 60 minutes
- Cooking Time: 30-35 minut
- Calories: -
- Difficulty: Medium
Welcome to your new favorite celebration cake! If you’ve been dreaming of a truly luxurious vanilla cream cake that looks like it came straight from a fancy bakery but is totally doable at home, you’re in the right place. Our Jersey Cream Cake is a show-stopping dessert, featuring moist, fluffy vanilla butter cake layers, a decadent, thick vanilla cream filling, and a perfectly stable whipped cream frosting. Topped with vibrant fresh fruit, this fancy birthday cake is designed to impress and delight. Forget those overly sweet, heavy cakes – this recipe delivers elegance, balance, and a burst of fresh flavor. Whether you're making a fresh fruit birthday cake or simply indulging in a white birthday cake masterpiece, we'll guide you through every step to create a vanilla cake with cream cheese frosting (or our stable whipped cream version!) that will have everyone asking for seconds. Get ready to bake a truly unforgettable vanilla and cream cake!
Ingredients
Directions
- Bake the Vanilla Cake Layers
- Prep: Preheat your oven to 350°F (175°C). Grease and flour two 8-inch round cake pans. Line the bottoms with parchment paper circles.
- Dry Ingredients: In a large bowl, whisk together the sifted flour, granulated sugar, baking powder, and salt.
- Wet Ingredients: In a separate medium bowl, whisk together the softened butter, eggs, milk, and vanilla extract until well combined.
- Combine: Gradually add the wet ingredients to the dry ingredients, mixing on low speed with a hand or stand mixer until just combined. Do not overmix! Overmixing develops gluten, leading to a tough cake. Stop mixing once no dry streaks remain.
- Bake: Divide the batter evenly between the two prepared pans. Bake for 30-35 minutes, or until a toothpick inserted into the center comes out clean and the cakes spring back when lightly touched. The internal temperature should be around 200-210°F (93-99°C) if you're using a thermometer.
- Cool: Let the cakes cool in the pans for 10-15 minutes before inverting them onto a wire rack to cool completely. This is crucial! Attempting to frost warm cakes will melt your frosting.
- Make the Vanilla Cream Filling (Thick & Sliceable)
- Whisk Dry: In a medium saucepan, whisk together the granulated sugar, cornstarch, and salt.
- Combine Wet: In a separate bowl, whisk the egg yolks with a splash of the milk until smooth. Add the remaining milk to the saucepan with the dry ingredients.
- Cook Custard: Place the saucepan over medium heat, whisking constantly. Once it starts to warm, gradually whisk in the egg yolk mixture. Continue whisking constantly until the mixture thickens significantly and comes to a gentle boil, about 5-7 minutes. It should be thick enough to coat the back of a spoon. If you see any lumps, don't worry – you can strain it later.
- Finish: Remove from heat and stir in the butter and vanilla extract until smooth.
- Chill Correctly: Pour the cream filling into a clean bowl. Press plastic wrap directly onto the surface of the cream to prevent a skin from forming. Chill in the refrigerator for at least 2-3 hours, or until completely cold and firm.
- Make the Cream Frosting (Stable Enough for a Birthday Cake)
- Hydrate Gelatin (if using): In a small, microwave-safe bowl, sprinkle gelatin powder over 2 tablespoons of cold water. Let it sit for 5 minutes to bloom. Microwave for 10-15 seconds, or until completely dissolved and clear (do not boil). Let it cool slightly but ensure it remains liquid. (If using instant pudding mix, skip this step).
- Whip Cream: Ensure your heavy cream, bowl, and whisk attachment are all very cold (you can chill the bowl and whisk in the freezer for 15 minutes). Pour the very cold heavy cream into the chilled bowl of a stand mixer (or use a hand mixer).
- Whip to Soft Peaks: Begin whipping on medium-high speed. Once soft peaks form, gradually add the sifted powdered sugar and vanilla extract.
- Stabilize: While the mixer is still running on medium-high, slowly drizzle in the cooled, dissolved gelatin (or sprinkle in the instant pudding mix).
- Finish Whip: Continue whipping until stiff peaks form. The frosting should be thick and hold its shape. Be careful not to over whip! Overwhipping will cause it to become grainy or even separate into butter and buttermilk. If it accidentally goes too far and looks grainy, you can sometimes rescue it by adding a tablespoon or two of cold heavy cream and gently whisking by hand until smooth again.
- Assemble the Cake (No Sliding, No Oozing)
- Level Layers: Once the cake layers are completely cool, use a serrated knife or a cake leveler to gently level the tops if they have domed.
- First Layer: Place one cake layer on your serving plate or cake stand. If using a turntable, this makes frosting much easier.
- Dam: Pipe a dam of frosting around the outer edge of the first cake layer (a simple border about ½ inch high). This will act as a barrier to hold the thick vanilla cream filling in place.
- Fill & Chill: Spoon the chilled vanilla cream filling into the center of the frosting dam and spread evenly. Place the second cake layer on top. Gently press down. Chill the filled cake in the refrigerator for at least 30 minutes to allow the filling to set firmly. This helps prevent sliding.
- Crumb Coat (Optional but Recommended): Apply a very thin layer of the stable cream frosting all over the cake. This "crumb coat" traps any loose crumbs, ensuring a smooth finish. Chill again for 15-20 minutes.
- Final Coat: Apply the remaining frosting to the top and sides of the cake, smoothing it out with an offset spatula or bench scraper.
- Final Chill: Chill the frosted cake for at least 30 minutes before topping with fruit.
- Fruit Topping That Stays Pretty
- Dry Fruit Well: Ensure all fresh fruit is thoroughly washed and completely dry. Excess moisture can make your cake top watery.
- Optional Glaze: If desired, gently brush the warmed and strained jam over the fresh fruit for a light shine and to help preserve the berries from drying out.
- Arrange: Artfully arrange the dry fruit on top of the chilled cake. To avoid a wet ring at the base of the fruit, you can place the fruit just before serving, or lightly dust the cake top with a tiny bit of powdered sugar before placing the fruit.
You may also like


Hey there! I’m just someone who seriously loves good food and believes that cooking doesn’t have to be complicated to be amazing. Whether it’s a quick weeknight dinner or a cozy weekend meal, I’m all about sharing easy, tasty recipes that actually work.


