Easy No-Bake Nanaimo Bars - Your Dream Chocolate Covered Coconut Bars
Easy No-Bake Nanaimo Bars - Your Dream Chocolate Covered Coconut Bars

- Serves: 16 People
- Prepare Time: 30 minutes
- Cooking Time: 10 minutes
- Calories: -
- Difficulty: Easy
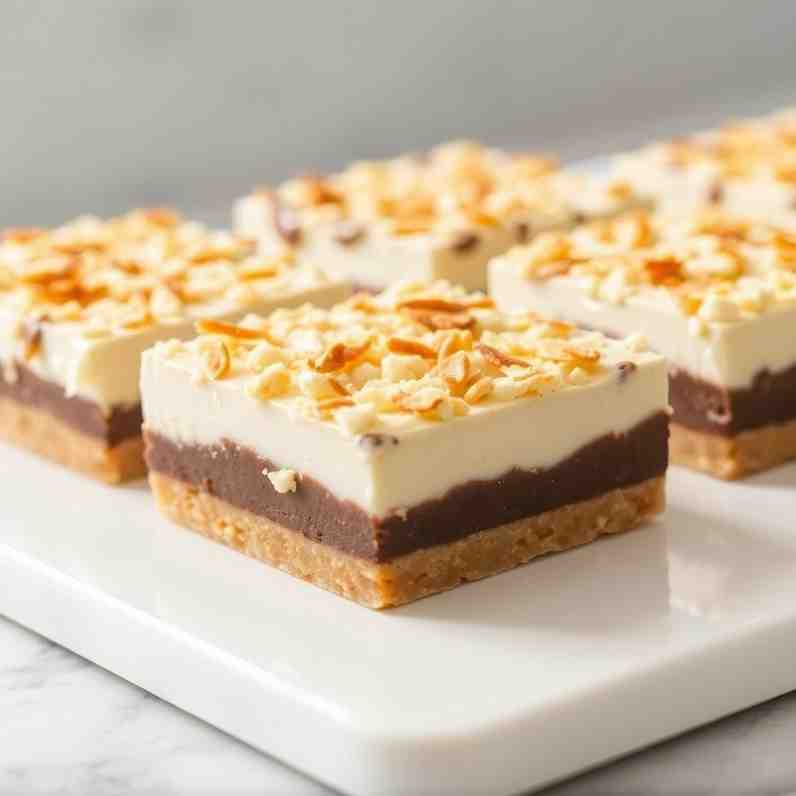
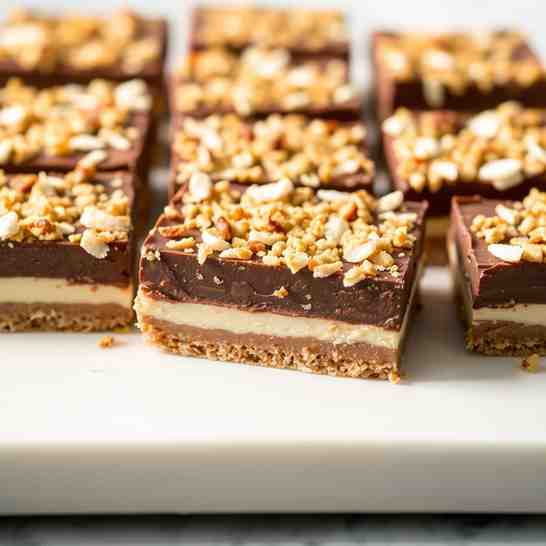
Get ready to meet your new favorite no-bake chocolate covered coconut bars! If you're a fan of rich, layered desserts that don't require an oven, you're in for a real treat. Nanaimo Bars are a classic Canadian dessert, named after Nanaimo, a city in British Columbia. Imagine a decadent three-layer bar: a fudgy chocolate-coconut-nut base, a luscious, creamy custard filling, and a snappy chocolate topping. It’s a richer, more sophisticated cousin to a brownie or magic bar, and absolutely perfect if you adore the combo of chocolate and coconut. This recipe is designed to be a quick and easy sweet treat that satisfies all your cravings for chocolate bars with a creamy filling, making it an ideal choice for parties, holidays, or just a delightful everyday indulgence. We've tested it with common American ingredients to ensure success every time, whether you're a beginner or an experienced baker.
Ingredients
Directions
- Prep the Pan Line your 8-inch or 9-inch square pan with parchment paper, making sure to leave an overhang on two sides. These "handles" will make lifting the finished bars out super easy! Lightly grease the pan first if your parchment doesn't want to stick.
- Make the Chocolate-Coconut Crumb Base In a medium saucepan or a heatproof bowl set over a pot of simmering water (a double boiler setup), gently melt the ½ cup butter, granulated sugar, and cocoa powder together. Stir until smooth and well combined. Remove from heat. In a separate small bowl, lightly beat the egg. To temper the egg and prevent scrambling, slowly whisk about ¼ cup of the warm chocolate mixture into the beaten egg, then quickly pour the egg mixture back into the saucepan with the remaining chocolate mixture. Return the pan to the gentle heat (or over simmering water) and cook, stirring constantly, for 1-2 minutes until the mixture thickens slightly and looks glossy. It should be hot and steamy. Remove from heat immediately. Stir in the graham cracker crumbs, shredded coconut, and chopped nuts until everything is evenly coated and the mixture resembles damp, clumpy sand. Press this mixture firmly and evenly into the bottom of your prepared pan. Use the bottom of a measuring cup or a flat spatula to get a really compact layer. Pop the pan into the fridge to chill while you prepare the filling; this helps it set and prevents the warm base from melting the custard.
- Mix the Creamy Custard Filling In a mixing bowl, beat the softened ½ cup butter with an electric mixer until light and creamy. Gradually beat in the powdered sugar, custard powder (or your chosen substitute), 2 tablespoons of milk (or cream), vanilla extract, and a tiny pinch of salt. Start with 2 tablespoons of milk and add the third only if needed to achieve a thick, fluffy, and easily spreadable consistency. The filling should be firm enough to hold its shape, not runny. If it’s too thick, add a tiny splash more milk; if too thin, add a spoonful of powdered sugar.
- Spread and Chill the Filling Evenly spread the creamy custard filling over the chilled chocolate-coconut base. Make sure to get it into all the corners for a uniform layer. Return the pan to the fridge and chill until the filling is set and slightly firm to the touch, which usually takes about 45-60 minutes.
- Make the Chocolate Topping While the filling chills, prepare the topping. In a clean heatproof bowl set over simmering water or in a microwave-safe bowl (using short 30-second bursts, stirring between each), melt the chocolate chips (or chopped bar) and 2 tablespoons of butter together. Stir until completely smooth. Let the chocolate mixture cool for a few minutes until it’s still pourable but no longer piping hot. This prevents it from melting the custard layer below and helps prevent cracking later. Carefully pour the slightly cooled chocolate topping over the chilled custard layer. Tilt the pan gently to spread it evenly, or use an offset spatula to smooth it out.
- Final Chill & Slicing Return the pan to the fridge and chill until the chocolate topping is fully set but not rock hard, typically 20-30 minutes. Once set, lift the entire slab of Nanaimo Bars out of the pan using the parchment paper handles. For the cleanest cuts, fill a tall glass with hot water, dip a sharp knife into it, wipe the blade completely dry, and then make your cut. Repeat this hot knife and wipe method between each slice. You can cut them into 16 larger bars (a 4x4 grid) or 25 smaller, bite-sized squares (a 5x5 grid), depending on how rich you want each serving to be!
Easy No-Bake Nanaimo Bars - Your Dream Chocolate Covered Coconut Bars
- Serves: 16 People
- Prepare Time: 30 minutes
- Cooking Time: 10 minutes
- Calories: -
- Difficulty: Easy
Get ready to meet your new favorite no-bake chocolate covered coconut bars! If you're a fan of rich, layered desserts that don't require an oven, you're in for a real treat. Nanaimo Bars are a classic Canadian dessert, named after Nanaimo, a city in British Columbia. Imagine a decadent three-layer bar: a fudgy chocolate-coconut-nut base, a luscious, creamy custard filling, and a snappy chocolate topping. It’s a richer, more sophisticated cousin to a brownie or magic bar, and absolutely perfect if you adore the combo of chocolate and coconut. This recipe is designed to be a quick and easy sweet treat that satisfies all your cravings for chocolate bars with a creamy filling, making it an ideal choice for parties, holidays, or just a delightful everyday indulgence. We've tested it with common American ingredients to ensure success every time, whether you're a beginner or an experienced baker.
Ingredients
Directions
- Prep the Pan Line your 8-inch or 9-inch square pan with parchment paper, making sure to leave an overhang on two sides. These "handles" will make lifting the finished bars out super easy! Lightly grease the pan first if your parchment doesn't want to stick.
- Make the Chocolate-Coconut Crumb Base In a medium saucepan or a heatproof bowl set over a pot of simmering water (a double boiler setup), gently melt the ½ cup butter, granulated sugar, and cocoa powder together. Stir until smooth and well combined. Remove from heat. In a separate small bowl, lightly beat the egg. To temper the egg and prevent scrambling, slowly whisk about ¼ cup of the warm chocolate mixture into the beaten egg, then quickly pour the egg mixture back into the saucepan with the remaining chocolate mixture. Return the pan to the gentle heat (or over simmering water) and cook, stirring constantly, for 1-2 minutes until the mixture thickens slightly and looks glossy. It should be hot and steamy. Remove from heat immediately. Stir in the graham cracker crumbs, shredded coconut, and chopped nuts until everything is evenly coated and the mixture resembles damp, clumpy sand. Press this mixture firmly and evenly into the bottom of your prepared pan. Use the bottom of a measuring cup or a flat spatula to get a really compact layer. Pop the pan into the fridge to chill while you prepare the filling; this helps it set and prevents the warm base from melting the custard.
- Mix the Creamy Custard Filling In a mixing bowl, beat the softened ½ cup butter with an electric mixer until light and creamy. Gradually beat in the powdered sugar, custard powder (or your chosen substitute), 2 tablespoons of milk (or cream), vanilla extract, and a tiny pinch of salt. Start with 2 tablespoons of milk and add the third only if needed to achieve a thick, fluffy, and easily spreadable consistency. The filling should be firm enough to hold its shape, not runny. If it’s too thick, add a tiny splash more milk; if too thin, add a spoonful of powdered sugar.
- Spread and Chill the Filling Evenly spread the creamy custard filling over the chilled chocolate-coconut base. Make sure to get it into all the corners for a uniform layer. Return the pan to the fridge and chill until the filling is set and slightly firm to the touch, which usually takes about 45-60 minutes.
- Make the Chocolate Topping While the filling chills, prepare the topping. In a clean heatproof bowl set over simmering water or in a microwave-safe bowl (using short 30-second bursts, stirring between each), melt the chocolate chips (or chopped bar) and 2 tablespoons of butter together. Stir until completely smooth. Let the chocolate mixture cool for a few minutes until it’s still pourable but no longer piping hot. This prevents it from melting the custard layer below and helps prevent cracking later. Carefully pour the slightly cooled chocolate topping over the chilled custard layer. Tilt the pan gently to spread it evenly, or use an offset spatula to smooth it out.
- Final Chill & Slicing Return the pan to the fridge and chill until the chocolate topping is fully set but not rock hard, typically 20-30 minutes. Once set, lift the entire slab of Nanaimo Bars out of the pan using the parchment paper handles. For the cleanest cuts, fill a tall glass with hot water, dip a sharp knife into it, wipe the blade completely dry, and then make your cut. Repeat this hot knife and wipe method between each slice. You can cut them into 16 larger bars (a 4x4 grid) or 25 smaller, bite-sized squares (a 5x5 grid), depending on how rich you want each serving to be!
You may also like


Hey there! I’m just someone who seriously loves good food and believes that cooking doesn’t have to be complicated to be amazing. Whether it’s a quick weeknight dinner or a cozy weekend meal, I’m all about sharing easy, tasty recipes that actually work.