
African Food Fufu Recipe - Make Water-Fufu
African Food Fufu Recipe - Make Water-Fufu
- Serves: 6 People
- Prepare Time: 60 minutes
- Cooking Time: 30 minutes
- Calories: -
- Difficulty: Medium
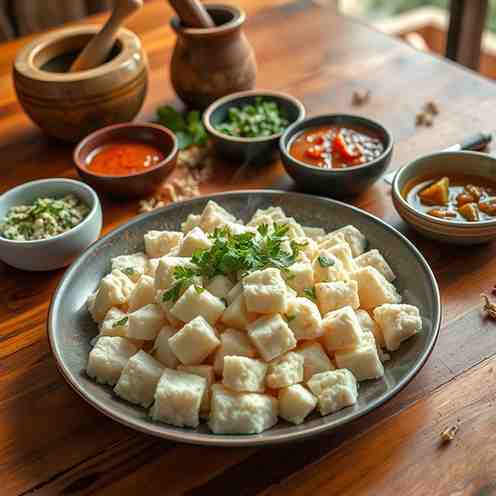
Welcome to the heart of Cameroonian cuisine! If you've ever dreamt of mastering the art of African food fufu, specifically the beloved Water-Fufu, you've come to the right place. This isn't just any recipe; it's your definitive guide to creating authentic Cameroonian Water-Fufu – a delicious staple that embodies tradition and comfort.
Water-fufu, or fermented cassava fufu, is truly special in Cameroon. It’s the classic, mildly tangy, stretchy accompaniment served with iconic dishes like Eru and Ndolé, offering a perfect balance to their rich flavors. Forget those quick fixes with flour; we’re diving deep into the traditional method of fermenting fresh cassava to achieve that unmistakable taste and texture.
In this comprehensive guide, you’ll learn everything from safely fermenting cassava, through the cooking process to achieve that perfect smooth, elastic texture, to understanding its cultural context and the best ways to enjoy it. We’ve tested this authentic African fufu recipe specifically for US home kitchens, ensuring you can bring a piece of Cameroon to your table with confidence, whether you're a beginner or an experienced cook ready for a new challenge. Get ready to impress your taste buds and explore the wonderful world of fufu and soup!
Ingredients
Directions
- Stage 1 – Peel and Prep the Cassava
- Peel Safely: Lay the cassava root flat on a cutting board. Trim off both ends. Using a sharp knife, make a shallow cut lengthwise through the skin, but not into the flesh. Carefully pry the skin off with your fingers or the knife, peeling it away from the flesh. Discard the thick, waxy skin.
- Remove Fibrous Core: Cut the peeled cassava into 2-3 inch pieces. If you notice a tough, stringy, fibrous core running through the center of the cassava, carefully remove it as you cut. This core can make your fufu stringy.
- Rinse Thoroughly: Place the cut cassava pieces in a large bowl and rinse them under cold running water. Agitate them gently to remove any dirt or excess starch.
- Stage 2 – Ferment the Cassava
- Set Up Fermentation: Transfer the rinsed cassava pieces to your large non-reactive bucket or container. Pour enough filtered water over the cassava to completely submerge all pieces, ensuring they are covered by at least 1-2 inches of water. If using, stir in the 1/2 teaspoon of baking soda now.
- Choose a Spot: Place the container in a cool, dark spot in your kitchen, ideally where the temperature stays between 70-80°F (21-27°C). Avoid direct sunlight or extreme temperature fluctuations.
- Daily Checks: This is crucial!
- Day 1-2: You might not see much change, but the water may start to look a little cloudy.
- Day 3-5 (or up to 7): You should see small bubbles forming on the surface, and the water will become noticeably cloudy. A mild, pleasantly sour, slightly yeasty smell (like sourdough starter or mild cheese) will develop. This is normal! The cassava pieces should also feel softer when gently pressed.
- When It’s Ready: The cassava is ready when it's very soft and can be easily broken apart with your fingers or a spoon. The fermentation time can vary from 3-7 days depending on your kitchen temperature – warmer kitchens ferment faster.
- “This is bad, throw it out” Cues: If you see any signs of mold (fuzzy black, green, or pink spots), a truly foul, rotten, or putrid smell (not just tangy), or if the water turns slimy and stringy, discard the entire batch immediately. This indicates spoilage, not fermentation.
- Stage 3 – Blend and Strain
- Drain & Blend: Carefully drain off the fermentation water from the softened cassava. Transfer the fermented cassava pieces to a blender or food processor. Add just enough fresh water (start with about 1/2 cup) to help the blades move. You want a thick, smooth puree, not a watery liquid.
- Blend in Batches: If you have a smaller blender, blend the cassava in batches to avoid overfilling and ensure a smooth consistency. Add minimal water each time.
- Remove Fibers: Once blended into a puree, you might still see some fine, stringy fibers. You can either pick these out by hand (they'll be more noticeable now) or pass the puree through a fine-mesh strainer to ensure ultimate smoothness. Avoid over-diluting the puree during this step, as it directly impacts your finished fufu texture.
- Stage 4 – Drain to Make Dough
- Prepare for Draining: Line a colander with a clean cheesecloth or sturdy kitchen towel, letting the edges hang over. Place the colander over a large bowl to catch the liquid.
- Pour & Squeeze: Pour the cassava puree into the cloth-lined colander. Gather the edges of the cloth and twist them tightly, squeezing out as much water as possible. You should end up with a firm, cohesive ball of cassava dough.
- Texture Check: The dough should clump like a ball and hold its shape, feeling dense and slightly damp, similar to play-doh.
- Optional Weighted Press: For hands-off draining, after squeezing, place a heavy object (like a cast iron pot or a few cans of food) on top of the dough ball in the colander and let it sit for a few hours, or even overnight in the fridge, to extract more moisture.
- Storing Raw Dough: If you're not cooking immediately, wrap the raw cassava dough tightly in plastic wrap and store it in the refrigerator for up to 3 days, or freeze it for up to 3 months.
- Stage 5 – Cook the Water-Fufu
- Prepare the Pot: Break the drained cassava dough into smaller pieces and place them in a heavy-bottomed pot. Add about 1/4 cup of fresh water.
- Dissolve Lumps (Cold): Before turning on the heat, use your sturdy wooden spoon or potato masher to thoroughly dissolve any lumps in the dough, mixing it with the water until it forms a smooth, thick paste. This prevents lumps in the final fufu.
- Gradual Heating & Stirring: Place the pot over medium-low heat. Begin stirring constantly and vigorously. As it heats, the mixture will start to thicken and become more opaque.
- Adding Water for Consistency: The fufu will become very stiff. Gradually add small splashes of hot water (1-2 tablespoons at a time) while continuing to stir and mash vigorously. This helps soften it and achieve the desired elasticity.
- Color Change & Doneness Cues: Continue stirring and mashing. The fufu will change from an opaque white to a more translucent, yellowish-white color. It will also become increasingly elastic, glossy, and smooth. It should pull away cleanly from the sides of the pot. Cook for at least 15-20 minutes after it starts to thicken to ensure all raw starch taste is gone. The finished fufu should be pliable, stretchy, and smooth, with no gritty texture.
- Shaping and Serving
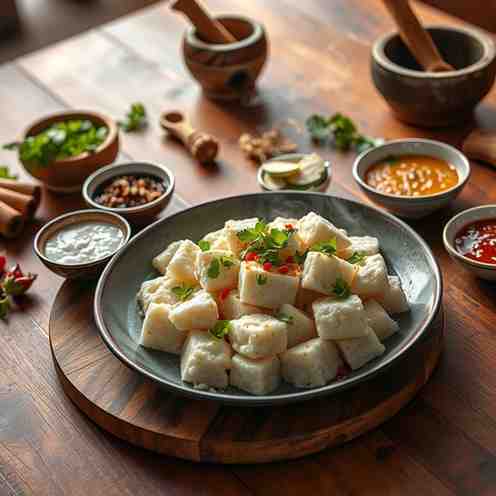
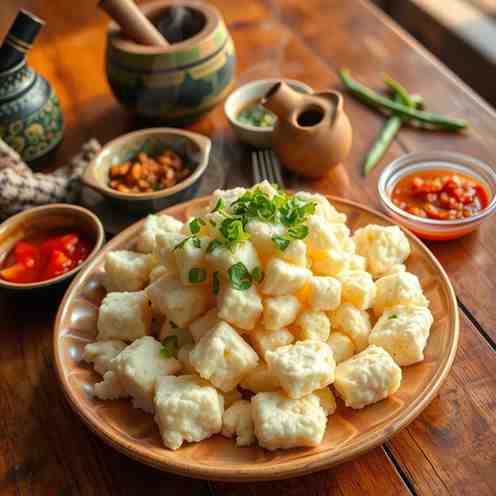
- Shape Portions: Once cooked, use your wooden spoon to scoop out portions of the hot fufu. Quickly shape them into smooth, round balls or elongated logs using your spoon or lightly oiled hands.
- Basic Serving Etiquette: Serve immediately with your favorite Cameroonian soup or stew. Traditionally, fufu is eaten with the right hand. Pinch off a small piece, form it into a scoop, and use it to dip into the soup. Enjoy!
African Food Fufu Recipe - Make Water-Fufu
- Serves: 6 People
- Prepare Time: 60 minutes
- Cooking Time: 30 minutes
- Calories: -
- Difficulty: Medium
Welcome to the heart of Cameroonian cuisine! If you've ever dreamt of mastering the art of African food fufu, specifically the beloved Water-Fufu, you've come to the right place. This isn't just any recipe; it's your definitive guide to creating authentic Cameroonian Water-Fufu – a delicious staple that embodies tradition and comfort.
Water-fufu, or fermented cassava fufu, is truly special in Cameroon. It’s the classic, mildly tangy, stretchy accompaniment served with iconic dishes like Eru and Ndolé, offering a perfect balance to their rich flavors. Forget those quick fixes with flour; we’re diving deep into the traditional method of fermenting fresh cassava to achieve that unmistakable taste and texture.
In this comprehensive guide, you’ll learn everything from safely fermenting cassava, through the cooking process to achieve that perfect smooth, elastic texture, to understanding its cultural context and the best ways to enjoy it. We’ve tested this authentic African fufu recipe specifically for US home kitchens, ensuring you can bring a piece of Cameroon to your table with confidence, whether you're a beginner or an experienced cook ready for a new challenge. Get ready to impress your taste buds and explore the wonderful world of fufu and soup!
Ingredients
Directions
- Stage 1 – Peel and Prep the Cassava
- Peel Safely: Lay the cassava root flat on a cutting board. Trim off both ends. Using a sharp knife, make a shallow cut lengthwise through the skin, but not into the flesh. Carefully pry the skin off with your fingers or the knife, peeling it away from the flesh. Discard the thick, waxy skin.
- Remove Fibrous Core: Cut the peeled cassava into 2-3 inch pieces. If you notice a tough, stringy, fibrous core running through the center of the cassava, carefully remove it as you cut. This core can make your fufu stringy.
- Rinse Thoroughly: Place the cut cassava pieces in a large bowl and rinse them under cold running water. Agitate them gently to remove any dirt or excess starch.
- Stage 2 – Ferment the Cassava
- Set Up Fermentation: Transfer the rinsed cassava pieces to your large non-reactive bucket or container. Pour enough filtered water over the cassava to completely submerge all pieces, ensuring they are covered by at least 1-2 inches of water. If using, stir in the 1/2 teaspoon of baking soda now.
- Choose a Spot: Place the container in a cool, dark spot in your kitchen, ideally where the temperature stays between 70-80°F (21-27°C). Avoid direct sunlight or extreme temperature fluctuations.
- Daily Checks: This is crucial!
- Day 1-2: You might not see much change, but the water may start to look a little cloudy.
- Day 3-5 (or up to 7): You should see small bubbles forming on the surface, and the water will become noticeably cloudy. A mild, pleasantly sour, slightly yeasty smell (like sourdough starter or mild cheese) will develop. This is normal! The cassava pieces should also feel softer when gently pressed.
- When It’s Ready: The cassava is ready when it's very soft and can be easily broken apart with your fingers or a spoon. The fermentation time can vary from 3-7 days depending on your kitchen temperature – warmer kitchens ferment faster.
- “This is bad, throw it out” Cues: If you see any signs of mold (fuzzy black, green, or pink spots), a truly foul, rotten, or putrid smell (not just tangy), or if the water turns slimy and stringy, discard the entire batch immediately. This indicates spoilage, not fermentation.
- Stage 3 – Blend and Strain
- Drain & Blend: Carefully drain off the fermentation water from the softened cassava. Transfer the fermented cassava pieces to a blender or food processor. Add just enough fresh water (start with about 1/2 cup) to help the blades move. You want a thick, smooth puree, not a watery liquid.
- Blend in Batches: If you have a smaller blender, blend the cassava in batches to avoid overfilling and ensure a smooth consistency. Add minimal water each time.
- Remove Fibers: Once blended into a puree, you might still see some fine, stringy fibers. You can either pick these out by hand (they'll be more noticeable now) or pass the puree through a fine-mesh strainer to ensure ultimate smoothness. Avoid over-diluting the puree during this step, as it directly impacts your finished fufu texture.
- Stage 4 – Drain to Make Dough
- Prepare for Draining: Line a colander with a clean cheesecloth or sturdy kitchen towel, letting the edges hang over. Place the colander over a large bowl to catch the liquid.
- Pour & Squeeze: Pour the cassava puree into the cloth-lined colander. Gather the edges of the cloth and twist them tightly, squeezing out as much water as possible. You should end up with a firm, cohesive ball of cassava dough.
- Texture Check: The dough should clump like a ball and hold its shape, feeling dense and slightly damp, similar to play-doh.
- Optional Weighted Press: For hands-off draining, after squeezing, place a heavy object (like a cast iron pot or a few cans of food) on top of the dough ball in the colander and let it sit for a few hours, or even overnight in the fridge, to extract more moisture.
- Storing Raw Dough: If you're not cooking immediately, wrap the raw cassava dough tightly in plastic wrap and store it in the refrigerator for up to 3 days, or freeze it for up to 3 months.
- Stage 5 – Cook the Water-Fufu
- Prepare the Pot: Break the drained cassava dough into smaller pieces and place them in a heavy-bottomed pot. Add about 1/4 cup of fresh water.
- Dissolve Lumps (Cold): Before turning on the heat, use your sturdy wooden spoon or potato masher to thoroughly dissolve any lumps in the dough, mixing it with the water until it forms a smooth, thick paste. This prevents lumps in the final fufu.
- Gradual Heating & Stirring: Place the pot over medium-low heat. Begin stirring constantly and vigorously. As it heats, the mixture will start to thicken and become more opaque.
- Adding Water for Consistency: The fufu will become very stiff. Gradually add small splashes of hot water (1-2 tablespoons at a time) while continuing to stir and mash vigorously. This helps soften it and achieve the desired elasticity.
- Color Change & Doneness Cues: Continue stirring and mashing. The fufu will change from an opaque white to a more translucent, yellowish-white color. It will also become increasingly elastic, glossy, and smooth. It should pull away cleanly from the sides of the pot. Cook for at least 15-20 minutes after it starts to thicken to ensure all raw starch taste is gone. The finished fufu should be pliable, stretchy, and smooth, with no gritty texture.
- Shaping and Serving
- Shape Portions: Once cooked, use your wooden spoon to scoop out portions of the hot fufu. Quickly shape them into smooth, round balls or elongated logs using your spoon or lightly oiled hands.
- Basic Serving Etiquette: Serve immediately with your favorite Cameroonian soup or stew. Traditionally, fufu is eaten with the right hand. Pinch off a small piece, form it into a scoop, and use it to dip into the soup. Enjoy!
You may also like


Hey there! I’m just someone who seriously loves good food and believes that cooking doesn’t have to be complicated to be amazing. Whether it’s a quick weeknight dinner or a cozy weekend meal, I’m all about sharing easy, tasty recipes that actually work.


