
Brew Authentic Guernsey Cider: Your Home Recipe
Brew Authentic Guernsey Cider: Your Home Recipe

- Serves: 5 People
- Prepare Time: 2-3 hours (
- Cooking Time: N/A (Fermen
- Calories: -
- Difficulty: Medium
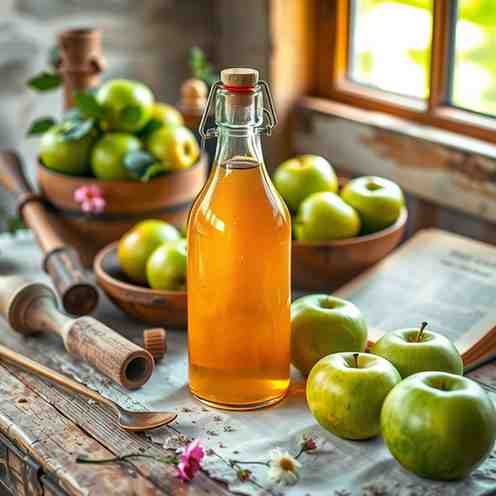
Ever dreamt of making your own cider, brimming with the taste of tradition? Look no further than Guernsey! This charming Channel Island boasts a rich, storied heritage of cider making, where the art of transforming humble apples into a crisp, refreshing beverage has been passed down through generations. While finding specific Guernsey apple varieties might be a challenge if you're not on the island, the spirit of their authentic cider-making tradition is something any passionate home brew cider recipe enthusiast can capture.
This guide isn't just about following a cider brewing recipe; it's about connecting with a unique piece of history. We'll walk you through everything you need to know to create your very own batch of home brew cider, from selecting the best apples to the magic of fermentation. Get ready to dive into the world of home cider making equipment and discover the simple joy of crafting a drink that embodies the true 'Taste of Tradition.' Whether you're a beginner or have some experience, our step-by-step instructions will make your apple cider making kit dreams a reality!
Ingredients
Directions
Authentic Guernsey Cider Step-by-Step Instructions
Making traditional Guernsey-style cider at home is a rewarding process that requires patience but is surprisingly simple. Follow these steps carefully for the best results.- Harvesting and Preparing the Apples
- Harvesting: Collect ripe apples, ideally those that have fallen naturally from the tree. Avoid any that are bruised, rotten, or show signs of mold. Gently pick any remaining apples from the tree.
- Sorting & Cleaning: Lay your apples out and carefully sort through them, removing any damaged fruit. Wash the apples thoroughly to remove dirt, leaves, and any insects. A gentle scrub brush can be helpful. Do not use soap.
- Milling/Chopping: Cut larger apples into quarters or smaller pieces that will fit into your apple crusher or mill. Remove any stems or leaves.
- Crushing and Pressing the Apples
- Crushing (Milling): Run your prepared apples through an apple crusher or mill. This process, called "milling," breaks the apples into a pulp known as "pomace." The finer the pomace, the more juice you'll extract.
- Pressing: Transfer the pomace into the pressing bag of your apple press. Apply pressure slowly and steadily, collecting the fresh apple juice (must) into a sanitized food-grade bucket or fermentation vessel. Continue pressing until no more juice can be extracted.
- Measure Specific Gravity: Use a hydrometer to measure the initial specific gravity (OG) of your apple juice. This will help you estimate the final alcohol content later. Record this reading.
- Fermentation Process
- Sulphiting (Optional but Recommended): For 5 gallons of juice, dissolve 5 Campden tablets (or the equivalent potassium metabisulphite powder) in a small amount of water and stir into the juice. This will kill off wild yeasts and bacteria, giving your cultured yeast a clean slate. Cover the vessel and let it sit for 24 hours.
- Pitching the Yeast: After 24 hours, sprinkle your chosen apple cider yeast onto the surface of the juice, or rehydrate it according to package directions before adding. If using, also add the yeast nutrient. Stir gently with a sanitized spoon.
- Primary Fermentation: Seal your fermentation vessel with an airlock. Place the vessel in a cool, dark place with a consistent temperature, ideally between 60-70°F (15-21°C). Fermentation will typically start within 24-48 hours, indicated by bubbling in the airlock. This primary stage usually lasts 1-2 weeks.
- Racking (Optional Secondary Fermentation): Once bubbling slows significantly (or stops), you can "rack" your cider. This means carefully siphoning the cider off the sediment (lees) at the bottom of the primary fermenter into a clean, sanitized secondary fermentation vessel. This helps clarify the cider and prevents off-flavors. Re-attach the airlock and allow it to ferment for another 2-4 weeks, or until fermentation is completely finished (specific gravity reaches 1.000 or below and remains stable for several days).
- Bottling and Storing the Cider
- Prepare Bottles: Thoroughly clean and sanitize your bottles for cider. Swing-top bottles or thick-walled beer bottles are best. Do not use thin glass bottles, as the carbonation can cause them to explode.
- Prepare Priming Sugar: Dissolve the priming sugar (e.g., 4 oz corn sugar for 5 gallons) in about 2 cups of hot water to create a syrup. Let it cool completely.
- Mix & Bottle: Gently pour the cooled priming sugar solution into a clean, sanitized bottling bucket. Carefully siphon your fermented cider from the fermentation vessel into the bottling bucket, avoiding splashing to prevent oxidation. The priming sugar will mix evenly with the cider.
- Fill Bottles: Using a bottling wand, fill each bottle, leaving about 1 inch of headspace. Cap or seal the bottles securely.
- Conditioning: Store the bottled cider in a cool, dark place (around 60-70°F or 15-21°C) for 1-3 weeks. During this "conditioning" period, the yeast will consume the priming sugar, creating natural carbonation.
- Storage: Once carbonated, move the cider to a cooler location (e.g., a refrigerator or cool cellar) to stop further carbonation and allow flavors to mellow. Your homemade Guernsey-style cider is now ready to enjoy!
Brew Authentic Guernsey Cider: Your Home Recipe

- Serves: 5 People
- Prepare Time: 2-3 hours (
- Cooking Time: N/A (Fermen
- Calories: -
- Difficulty: Medium
Ever dreamt of making your own cider, brimming with the taste of tradition? Look no further than Guernsey! This charming Channel Island boasts a rich, storied heritage of cider making, where the art of transforming humble apples into a crisp, refreshing beverage has been passed down through generations. While finding specific Guernsey apple varieties might be a challenge if you're not on the island, the spirit of their authentic cider-making tradition is something any passionate home brew cider recipe enthusiast can capture.
This guide isn't just about following a cider brewing recipe; it's about connecting with a unique piece of history. We'll walk you through everything you need to know to create your very own batch of home brew cider, from selecting the best apples to the magic of fermentation. Get ready to dive into the world of home cider making equipment and discover the simple joy of crafting a drink that embodies the true 'Taste of Tradition.' Whether you're a beginner or have some experience, our step-by-step instructions will make your apple cider making kit dreams a reality!
Ingredients
Directions
Authentic Guernsey Cider Step-by-Step Instructions
Making traditional Guernsey-style cider at home is a rewarding process that requires patience but is surprisingly simple. Follow these steps carefully for the best results.- Harvesting and Preparing the Apples
- Harvesting: Collect ripe apples, ideally those that have fallen naturally from the tree. Avoid any that are bruised, rotten, or show signs of mold. Gently pick any remaining apples from the tree.
- Sorting & Cleaning: Lay your apples out and carefully sort through them, removing any damaged fruit. Wash the apples thoroughly to remove dirt, leaves, and any insects. A gentle scrub brush can be helpful. Do not use soap.
- Milling/Chopping: Cut larger apples into quarters or smaller pieces that will fit into your apple crusher or mill. Remove any stems or leaves.
- Crushing and Pressing the Apples
- Crushing (Milling): Run your prepared apples through an apple crusher or mill. This process, called "milling," breaks the apples into a pulp known as "pomace." The finer the pomace, the more juice you'll extract.
- Pressing: Transfer the pomace into the pressing bag of your apple press. Apply pressure slowly and steadily, collecting the fresh apple juice (must) into a sanitized food-grade bucket or fermentation vessel. Continue pressing until no more juice can be extracted.
- Measure Specific Gravity: Use a hydrometer to measure the initial specific gravity (OG) of your apple juice. This will help you estimate the final alcohol content later. Record this reading.
- Fermentation Process
- Sulphiting (Optional but Recommended): For 5 gallons of juice, dissolve 5 Campden tablets (or the equivalent potassium metabisulphite powder) in a small amount of water and stir into the juice. This will kill off wild yeasts and bacteria, giving your cultured yeast a clean slate. Cover the vessel and let it sit for 24 hours.
- Pitching the Yeast: After 24 hours, sprinkle your chosen apple cider yeast onto the surface of the juice, or rehydrate it according to package directions before adding. If using, also add the yeast nutrient. Stir gently with a sanitized spoon.
- Primary Fermentation: Seal your fermentation vessel with an airlock. Place the vessel in a cool, dark place with a consistent temperature, ideally between 60-70°F (15-21°C). Fermentation will typically start within 24-48 hours, indicated by bubbling in the airlock. This primary stage usually lasts 1-2 weeks.
- Racking (Optional Secondary Fermentation): Once bubbling slows significantly (or stops), you can "rack" your cider. This means carefully siphoning the cider off the sediment (lees) at the bottom of the primary fermenter into a clean, sanitized secondary fermentation vessel. This helps clarify the cider and prevents off-flavors. Re-attach the airlock and allow it to ferment for another 2-4 weeks, or until fermentation is completely finished (specific gravity reaches 1.000 or below and remains stable for several days).
- Bottling and Storing the Cider
- Prepare Bottles: Thoroughly clean and sanitize your bottles for cider. Swing-top bottles or thick-walled beer bottles are best. Do not use thin glass bottles, as the carbonation can cause them to explode.
- Prepare Priming Sugar: Dissolve the priming sugar (e.g., 4 oz corn sugar for 5 gallons) in about 2 cups of hot water to create a syrup. Let it cool completely.
- Mix & Bottle: Gently pour the cooled priming sugar solution into a clean, sanitized bottling bucket. Carefully siphon your fermented cider from the fermentation vessel into the bottling bucket, avoiding splashing to prevent oxidation. The priming sugar will mix evenly with the cider.
- Fill Bottles: Using a bottling wand, fill each bottle, leaving about 1 inch of headspace. Cap or seal the bottles securely.
- Conditioning: Store the bottled cider in a cool, dark place (around 60-70°F or 15-21°C) for 1-3 weeks. During this "conditioning" period, the yeast will consume the priming sugar, creating natural carbonation.
- Storage: Once carbonated, move the cider to a cooler location (e.g., a refrigerator or cool cellar) to stop further carbonation and allow flavors to mellow. Your homemade Guernsey-style cider is now ready to enjoy!
You may also like


Hey there! I’m just someone who seriously loves good food and believes that cooking doesn’t have to be complicated to be amazing. Whether it’s a quick weeknight dinner or a cozy weekend meal, I’m all about sharing easy, tasty recipes that actually work.


