
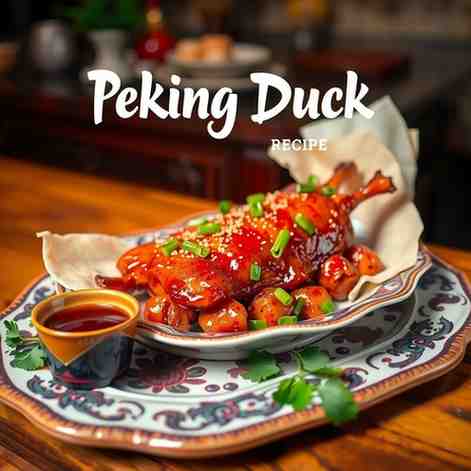
Peking Duck Recipe - Crispy Skin at Home
Peking Duck Recipe - Crispy Skin at Home

- Serves: 4 People
- Prepare Time: 1 hour 15 m
- Cooking Time: 2 hours 15
- Calories: -
- Difficulty: Medium
Ever dreamt of making that iconic peking duck dish with its impossibly crispy, lacquered skin, tender meat, and irresistible aroma right in your own kitchen? For years, the thought of recreating this restaurant-style masterpiece at home seemed like a distant fantasy. Traditional Peking duck involves special equipment like air pumps and hanging ovens, making it feel out of reach for the average home cook. But what if we told you it's not only possible but also an incredibly rewarding culinary adventure?
This isn't just another `chinese recipe easy` to dismiss. Our recipe keeps the spirit and key techniques of authentic Peking duck, adapting them for your regular home oven. We're talking truly crispy, lacquered skin that shatters with every bite, a clear 2-day timeline that makes the process manageable, and no need for any special restaurant equipment. You'll be able to serve this `main dish recipes` with classic Beijing-style pancakes, sweet bean sauce, and fresh julienned veggies, just like the pros. Get ready to impress your family and friends with this `easy to make recipes` version of a legendary `meat recipe easy` – it’s an `easy and delicious recipe` that brings the magic of `pee king duck` right to your dining table!
Ingredients
Directions
- Prep the Duck & Tighten the Skin (Day 1)
- Thaw & Clean: If using a frozen duck, ensure it's completely thawed in the refrigerator for 2-3 days. Remove the giblets and neck from the duck cavity. Reserve for soup if desired.
- Dry Thoroughly: Pat the duck thoroughly dry, inside and out, with paper towels. Any moisture will prevent crisping.
- Salt Rub: Rub 1 tablespoon of coarse sea salt evenly over the entire duck, inside and out. Place the duck on a wire rack set over a roasting pan and let it rest at room temperature for about 15-20 minutes.
- Tighten Skin: Carefully pour about 8-10 cups of boiling water evenly over the duck skin. You'll see the skin visibly tighten and smooth out. This crucial step helps render fat and create that signature crispness. Be very careful to avoid splashing.
- Pat Dry Again: Immediately after the boiling water bath, pat the duck completely dry with fresh paper towels. Ensure there's no moisture left on the skin.
- Brush the Syrup Lacquer (Day 1)
- Mix Lacquer: In a bowl, whisk together the maltose (or honey/corn syrup), hot water, and rice vinegar until well combined and smooth.
- Apply Lacquer: Using a basting brush, apply an even, thin coat of the lacquer mixture over the entire surface of the duck, ensuring full coverage.
- Optional Second Coat: Allow the first coat to dry for about 10-15 minutes, then apply a second thin coat for a deeper color and more intense flavor, if desired.
- Air-Dry Overnight: Place the lacquered duck, still on the wire rack over the roasting pan, uncovered, into your refrigerator. Air-dry for at least 12-24 hours. This is a critical step for achieving truly crispy skin, allowing the skin to dry out and tighten further.
- Bring to Room Temp & Stuff Aromatics (Day 2)
- Room Temperature: About 45-60 minutes before you plan to roast, remove the duck from the refrigerator. This allows it to come closer to room temperature for more even cooking.
- Stuff Aromatics: Stuff the duck cavity with the scallion pieces, smashed garlic, ginger slices, star anise pods, cinnamon stick, and optional apple/citrus.
- Secure Cavity: If needed, you can truss or use a skewer to secure the cavity opening to keep the aromatics inside during roasting.
- Roast the Duck (Two-Stage Oven Method)
- Preheat Oven: Preheat your oven to 375°F (190°C) for conventional ovens, or 350°F (175°C) for convection ovens. Position an oven rack in the middle.
- Set Up Roasting Pan: Place the duck, breast-side up, on the wire rack over the roasting pan. Optionally, you can add about 1/2 inch of water to the bottom of the roasting pan to help catch rendered fat and minimize smoke, though ensure the water doesn't touch the duck.
- Stage 1: Render Fat & Crisp (Higher Heat): Roast the duck for 1 hour at 375°F (190°C) conventional or 350°F (175°C) convection. This stage helps render a lot of the fat and begins the crisping process.
- Stage 2: Finish Cooking (Lower Heat): Reduce the oven temperature to 300°F (150°C) for conventional ovens, or 275°F (135°C) for convection. Continue roasting for another 1 hour to 1 hour 30 minutes, or until the internal temperature in the thickest part of the thigh reaches 165°F (74°C).
- Monitor Skin: If the skin starts to brown too quickly, especially on the wing tips or breast, loosely tent those areas with aluminum foil. If using a convection oven and the skin is browning too fast, you can reduce the fan speed if your oven has that option.
- Smoke Management: Duck can produce a fair amount of smoke. Keep your kitchen well-ventilated (open a window!) and ensure your roasting pan is clean. Adding water to the tray can help.
- Optional Final Crisp & Rest
- Final Crisp (Optional): If the skin isn't as crisp as you'd like, you can increase the oven temperature to 400°F (200°C) for 5-10 minutes, watching very carefully to prevent burning.
- Rest the Duck: Once cooked, remove the duck from the oven and let it rest on the wire rack for 15-20 minutes before carving. This allows the juices to redistribute throughout the meat, ensuring a tender and flavorful result, and helps the skin firm up.
- How to Carve & Serve Peking Roasted Duck
- Carving for Maximum Crisp Skin
- Prepare for Carving: Place the rested duck on a sturdy cutting board.
- Remove Legs & Wings: Carefully cut through the joint to remove the legs and wings. You can then separate the thighs from the drumsticks. Slice the meat and skin from these parts.
- Carve Breast: Make a long cut along one side of the breastbone. Carefully slice along the rib cage to remove the breast lobe, trying to keep the crispy skin attached. Repeat on the other side.
- Slice Across Grain: Place the breast lobes skin-side up and slice them across the grain into thin, bite-sized pieces, ensuring each slice has a bit of that glorious crispy skin.
- Classic vs. Home Serving: While traditional restaurants often serve mostly skin with a tiny bit of meat, at home, you'll typically serve a more generous portion of both skin and meat for a satisfying experience. Arrange all carved duck pieces on a warm platter.
- Warm the Pancakes & Prep the Table
- Warm Pancakes: For store-bought Mandarin pancakes, steam them gently in a bamboo steamer for 5-7 minutes, or microwave them wrapped in a damp paper towel for 30-60 seconds until warm and pliable. This prevents them from drying out.
- Arrange Condiments: Arrange the sweet bean/hoisin sauce, julienned cucumber, and julienned scallions (and any other optional garnishes) in separate small bowls or on a platter alongside the carved duck.
- How to Wrap & Eat (Mini Tutorial)
- Assemble Your Roll: Take one warm pancake and spread a thin layer of sweet bean or hoisin sauce in the center.Add Duck & Veg: Place one or two slices of Peking duck (with skin!) on top of the sauce. Add a few pieces of julienned cucumber and scallion.
- Roll It Up: Fold the bottom of the pancake up, then fold in the sides, creating a neat little roll.
- Enjoy! Eat immediately. For variations, try adding a tiny bit of pickled radish or a drizzle of chili oil for an extra kick!
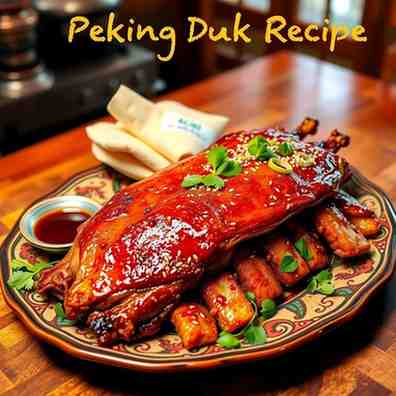
Peking Duck Recipe - Crispy Skin at Home
- Serves: 4 People
- Prepare Time: 1 hour 15 m
- Cooking Time: 2 hours 15
- Calories: -
- Difficulty: Medium
Ever dreamt of making that iconic peking duck dish with its impossibly crispy, lacquered skin, tender meat, and irresistible aroma right in your own kitchen? For years, the thought of recreating this restaurant-style masterpiece at home seemed like a distant fantasy. Traditional Peking duck involves special equipment like air pumps and hanging ovens, making it feel out of reach for the average home cook. But what if we told you it's not only possible but also an incredibly rewarding culinary adventure?
This isn't just another `chinese recipe easy` to dismiss. Our recipe keeps the spirit and key techniques of authentic Peking duck, adapting them for your regular home oven. We're talking truly crispy, lacquered skin that shatters with every bite, a clear 2-day timeline that makes the process manageable, and no need for any special restaurant equipment. You'll be able to serve this `main dish recipes` with classic Beijing-style pancakes, sweet bean sauce, and fresh julienned veggies, just like the pros. Get ready to impress your family and friends with this `easy to make recipes` version of a legendary `meat recipe easy` – it’s an `easy and delicious recipe` that brings the magic of `pee king duck` right to your dining table!
Ingredients
Directions
- Prep the Duck & Tighten the Skin (Day 1)
- Thaw & Clean: If using a frozen duck, ensure it's completely thawed in the refrigerator for 2-3 days. Remove the giblets and neck from the duck cavity. Reserve for soup if desired.
- Dry Thoroughly: Pat the duck thoroughly dry, inside and out, with paper towels. Any moisture will prevent crisping.
- Salt Rub: Rub 1 tablespoon of coarse sea salt evenly over the entire duck, inside and out. Place the duck on a wire rack set over a roasting pan and let it rest at room temperature for about 15-20 minutes.
- Tighten Skin: Carefully pour about 8-10 cups of boiling water evenly over the duck skin. You'll see the skin visibly tighten and smooth out. This crucial step helps render fat and create that signature crispness. Be very careful to avoid splashing.
- Pat Dry Again: Immediately after the boiling water bath, pat the duck completely dry with fresh paper towels. Ensure there's no moisture left on the skin.
- Brush the Syrup Lacquer (Day 1)
- Mix Lacquer: In a bowl, whisk together the maltose (or honey/corn syrup), hot water, and rice vinegar until well combined and smooth.
- Apply Lacquer: Using a basting brush, apply an even, thin coat of the lacquer mixture over the entire surface of the duck, ensuring full coverage.
- Optional Second Coat: Allow the first coat to dry for about 10-15 minutes, then apply a second thin coat for a deeper color and more intense flavor, if desired.
- Air-Dry Overnight: Place the lacquered duck, still on the wire rack over the roasting pan, uncovered, into your refrigerator. Air-dry for at least 12-24 hours. This is a critical step for achieving truly crispy skin, allowing the skin to dry out and tighten further.
- Bring to Room Temp & Stuff Aromatics (Day 2)
- Room Temperature: About 45-60 minutes before you plan to roast, remove the duck from the refrigerator. This allows it to come closer to room temperature for more even cooking.
- Stuff Aromatics: Stuff the duck cavity with the scallion pieces, smashed garlic, ginger slices, star anise pods, cinnamon stick, and optional apple/citrus.
- Secure Cavity: If needed, you can truss or use a skewer to secure the cavity opening to keep the aromatics inside during roasting.
- Roast the Duck (Two-Stage Oven Method)
- Preheat Oven: Preheat your oven to 375°F (190°C) for conventional ovens, or 350°F (175°C) for convection ovens. Position an oven rack in the middle.
- Set Up Roasting Pan: Place the duck, breast-side up, on the wire rack over the roasting pan. Optionally, you can add about 1/2 inch of water to the bottom of the roasting pan to help catch rendered fat and minimize smoke, though ensure the water doesn't touch the duck.
- Stage 1: Render Fat & Crisp (Higher Heat): Roast the duck for 1 hour at 375°F (190°C) conventional or 350°F (175°C) convection. This stage helps render a lot of the fat and begins the crisping process.
- Stage 2: Finish Cooking (Lower Heat): Reduce the oven temperature to 300°F (150°C) for conventional ovens, or 275°F (135°C) for convection. Continue roasting for another 1 hour to 1 hour 30 minutes, or until the internal temperature in the thickest part of the thigh reaches 165°F (74°C).
- Monitor Skin: If the skin starts to brown too quickly, especially on the wing tips or breast, loosely tent those areas with aluminum foil. If using a convection oven and the skin is browning too fast, you can reduce the fan speed if your oven has that option.
- Smoke Management: Duck can produce a fair amount of smoke. Keep your kitchen well-ventilated (open a window!) and ensure your roasting pan is clean. Adding water to the tray can help.
- Optional Final Crisp & Rest
- Final Crisp (Optional): If the skin isn't as crisp as you'd like, you can increase the oven temperature to 400°F (200°C) for 5-10 minutes, watching very carefully to prevent burning.
- Rest the Duck: Once cooked, remove the duck from the oven and let it rest on the wire rack for 15-20 minutes before carving. This allows the juices to redistribute throughout the meat, ensuring a tender and flavorful result, and helps the skin firm up.
- How to Carve & Serve Peking Roasted Duck
- Carving for Maximum Crisp Skin
- Prepare for Carving: Place the rested duck on a sturdy cutting board.
- Remove Legs & Wings: Carefully cut through the joint to remove the legs and wings. You can then separate the thighs from the drumsticks. Slice the meat and skin from these parts.
- Carve Breast: Make a long cut along one side of the breastbone. Carefully slice along the rib cage to remove the breast lobe, trying to keep the crispy skin attached. Repeat on the other side.
- Slice Across Grain: Place the breast lobes skin-side up and slice them across the grain into thin, bite-sized pieces, ensuring each slice has a bit of that glorious crispy skin.
- Classic vs. Home Serving: While traditional restaurants often serve mostly skin with a tiny bit of meat, at home, you'll typically serve a more generous portion of both skin and meat for a satisfying experience. Arrange all carved duck pieces on a warm platter.
- Warm the Pancakes & Prep the Table
- Warm Pancakes: For store-bought Mandarin pancakes, steam them gently in a bamboo steamer for 5-7 minutes, or microwave them wrapped in a damp paper towel for 30-60 seconds until warm and pliable. This prevents them from drying out.
- Arrange Condiments: Arrange the sweet bean/hoisin sauce, julienned cucumber, and julienned scallions (and any other optional garnishes) in separate small bowls or on a platter alongside the carved duck.
- How to Wrap & Eat (Mini Tutorial)
- Assemble Your Roll: Take one warm pancake and spread a thin layer of sweet bean or hoisin sauce in the center.Add Duck & Veg: Place one or two slices of Peking duck (with skin!) on top of the sauce. Add a few pieces of julienned cucumber and scallion.
- Roll It Up: Fold the bottom of the pancake up, then fold in the sides, creating a neat little roll.
- Enjoy! Eat immediately. For variations, try adding a tiny bit of pickled radish or a drizzle of chili oil for an extra kick!
You may also like


Hey there! I’m just someone who seriously loves good food and believes that cooking doesn’t have to be complicated to be amazing. Whether it’s a quick weeknight dinner or a cozy weekend meal, I’m all about sharing easy, tasty recipes that actually work.


