
Black Forest Fruit Cake Recipe - Holiday Dessert
Black Forest Fruit Cake Recipe - Holiday Dessert
- Serves: 14 People
- Prepare Time: 45 minutes
- Cooking Time: 35 minutes
- Calories: -
- Difficulty: Medium
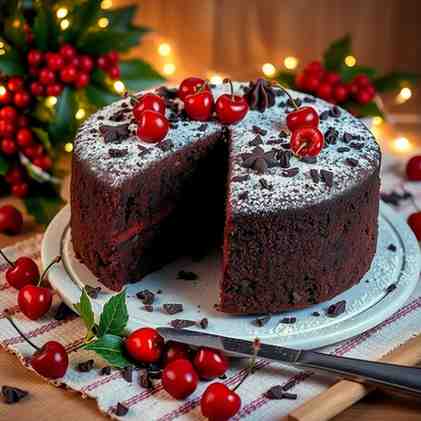
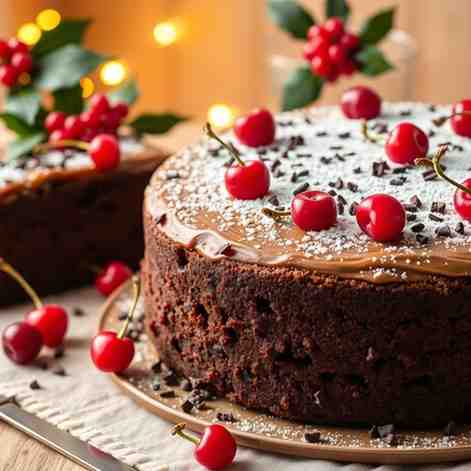
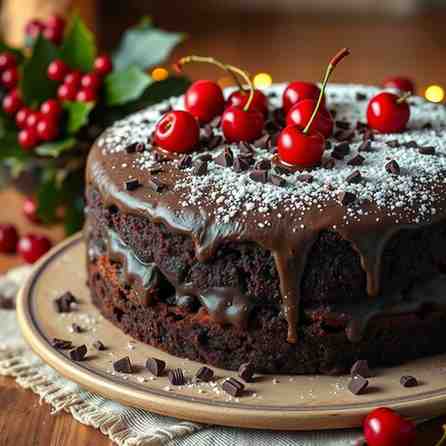
Looking for a show-stopping fruit cake recipe that’s anything but traditional? Get ready to bake our incredible Black Forest Fruit Cake! Forget those dense, heavy fruitcakes you might be used to; this is a rich, indulgent, yet surprisingly lighter chocolate cake loaded with juicy cherries and billows of fresh whipped cream. It’s essentially a chocolate fruit cake loaded with cherries and whipped cream, making it the perfect centerpiece for any special occasion, especially as a holiday / Christmas cake idea.
While it might sound fancy, this cake is totally manageable for home bakers, offering a delicious lighter alternative to dense traditional fruit cakes without sacrificing an ounce of richness. Its origins trace back to Germany, where it's known as Schwarzwälder Kirschtorte, a delightful creation often attributed to Josef Keller. Our version brings all that classic German charm with a friendly, easy-to-follow approach, making it the ultimate rich fruit cake experience. If you’ve been searching for a new rum and cake sensation or a truly memorable cake Christmas cake, your search ends here. Let's get baking!
Ingredients
Directions
- Make the Chocolate Sponge
- Preheat Oven & Prep Pans: Preheat your oven to 350°F (175°C). Grease and flour two 9-inch (23 cm) round cake pans or three 8-inch (20 cm) round cake pans. Line the bottoms with parchment paper rounds. This extra step ensures your cakes won't stick, making for easy release.
- Combine Dry Ingredients: In a large bowl, whisk together the flour, cocoa powder, baking soda, baking powder, and salt until thoroughly combined. This ensures even distribution of the leavening agents.
- Mix Wet Ingredients: In a separate medium bowl, whisk the buttermilk, vegetable oil, and vanilla extract. Set aside.
- Cream Butter & Sugar: In the bowl of a stand mixer fitted with the paddle attachment (or using a hand mixer), cream the softened butter and granulated sugar on medium-high speed until light and fluffy, about 3-5 minutes. Scrape down the sides of the bowl.
- Add Eggs: Add the eggs one at a time, beating well after each addition until fully incorporated. The mixture should look light and fluffy, reaching a "ribbon stage" where it falls in thick ribbons from the beaters.
- Combine Wet & Dry: Gradually add the dry ingredients to the butter mixture, alternating with the wet ingredients (buttermilk mixture), beginning and ending with the dry ingredients. Mix on low speed until just combined. Be careful not to overmix, as this can lead to a tough cake. The batter consistency should be smooth and pourable, but still thick enough to cling to the spoon.
- Bake: Divide the batter evenly between the prepared cake pans. Bake for 30-35 minutes for 9-inch pans, or 25-30 minutes for 8-inch pans, or until a wooden skewer inserted into the center comes out with a few moist crumbs attached and the top springs back when lightly touched.
- Cool: Let the cakes cool in the pans for 10-15 minutes before inverting them onto a wire rack to cool completely.
- Make the Cherry Rum (or Kirsch) Syrup
- Simmer Syrup: While the cakes cool, drain the canned cherries, reserving the syrup. In a small saucepan, combine the reserved cherry syrup and ¼ cup (50g) granulated sugar. Bring to a simmer over medium heat, stirring until the sugar dissolves. Continue to simmer gently for 5-7 minutes, until the syrup slightly thickens and coats the back of a spoon.
- Add Alcohol (or not!): Remove from heat. Stir in the dark rum or kirsch. For a non-alcoholic version, simply omit the alcohol and stir in ½ teaspoon of vanilla extract instead. Let the syrup cool completely.
- Prep the Cherries
- Drain & Pat Dry: If using canned or jarred cherries for the filling, drain them well and pat them lightly with a paper towel to remove excess moisture. This prevents them from making your cream runny. If you want a slightly thicker cherry layer, you can briefly simmer about ½ cup of the drained cherries with a tablespoon of their syrup until slightly thickened, then cool.
- Whip the Cream
- Chill Equipment: For the best whipped cream, chill your mixing bowl and beaters in the freezer for 10-15 minutes before you start. This helps the cream whip up faster and hold its shape.
- Whip Cream: Pour the very cold heavy cream into the chilled bowl. Add the powdered sugar and vanilla extract.
- Whip to Stiff Peaks: Beat on medium-high speed until soft peaks form, then continue to beat until you reach firm peaks. Stop when the cream holds its shape but is still smooth and not grainy. Be careful not to over-whip, or it will become lumpy and eventually turn into butter! If your cream accidentally gets a little over-whipped, you can sometimes fix it by gently stirring in a tablespoon or two of unwhipped cold cream.
- Level, Soak & Layer the Cakes
- Level Cakes: Once completely cool, if your cake layers have domed tops, use a serrated knife to carefully level them. A flat top ensures a stable, even cake.
- Soak Layers: Place one cake layer on your serving plate or cake stand. Brush the top evenly with about 3-4 tablespoons of the cooled cherry syrup. The cake should feel moist but not soggy.
- Fill First Layer: Spread about 1 ½ cups of whipped cream over the soaked cake layer, leaving a small border (about ½ inch) around the edge. Arrange half of your prepared cherries over the cream.
- Repeat & Stack: Place the second cake layer on top, brush with syrup, spread with another 1 ½ cups of cream, and add the remaining cherries. If you have a third layer, repeat the process.
- Frost & Decorate
- Crumb Coat: Place the final cake layer on top. Apply a very thin layer of whipped cream all over the sides and top of the cake. This is called a "crumb coat" and it traps any loose crumbs, ensuring a smooth final finish.
- Chill: Chill the cake in the refrigerator for 15-20 minutes to set the crumb coat.
- Final Frosting: Apply the remaining whipped cream to the sides and top of the cake, smoothing it with an offset spatula.
- Decorate: Decorate the cake in classic Black Forest style by pressing chocolate curls or shavings onto the sides and arranging the whole cherries (with stems) on top. You can also add optional holiday decoration ideas like sugared cranberries or small chocolate trees for a festive touch.
Black Forest Fruit Cake Recipe - Holiday Dessert
- Serves: 14 People
- Prepare Time: 45 minutes
- Cooking Time: 35 minutes
- Calories: -
- Difficulty: Medium
Looking for a show-stopping fruit cake recipe that’s anything but traditional? Get ready to bake our incredible Black Forest Fruit Cake! Forget those dense, heavy fruitcakes you might be used to; this is a rich, indulgent, yet surprisingly lighter chocolate cake loaded with juicy cherries and billows of fresh whipped cream. It’s essentially a chocolate fruit cake loaded with cherries and whipped cream, making it the perfect centerpiece for any special occasion, especially as a holiday / Christmas cake idea.
While it might sound fancy, this cake is totally manageable for home bakers, offering a delicious lighter alternative to dense traditional fruit cakes without sacrificing an ounce of richness. Its origins trace back to Germany, where it's known as Schwarzwälder Kirschtorte, a delightful creation often attributed to Josef Keller. Our version brings all that classic German charm with a friendly, easy-to-follow approach, making it the ultimate rich fruit cake experience. If you’ve been searching for a new rum and cake sensation or a truly memorable cake Christmas cake, your search ends here. Let's get baking!
Ingredients
Directions
- Make the Chocolate Sponge
- Preheat Oven & Prep Pans: Preheat your oven to 350°F (175°C). Grease and flour two 9-inch (23 cm) round cake pans or three 8-inch (20 cm) round cake pans. Line the bottoms with parchment paper rounds. This extra step ensures your cakes won't stick, making for easy release.
- Combine Dry Ingredients: In a large bowl, whisk together the flour, cocoa powder, baking soda, baking powder, and salt until thoroughly combined. This ensures even distribution of the leavening agents.
- Mix Wet Ingredients: In a separate medium bowl, whisk the buttermilk, vegetable oil, and vanilla extract. Set aside.
- Cream Butter & Sugar: In the bowl of a stand mixer fitted with the paddle attachment (or using a hand mixer), cream the softened butter and granulated sugar on medium-high speed until light and fluffy, about 3-5 minutes. Scrape down the sides of the bowl.
- Add Eggs: Add the eggs one at a time, beating well after each addition until fully incorporated. The mixture should look light and fluffy, reaching a "ribbon stage" where it falls in thick ribbons from the beaters.
- Combine Wet & Dry: Gradually add the dry ingredients to the butter mixture, alternating with the wet ingredients (buttermilk mixture), beginning and ending with the dry ingredients. Mix on low speed until just combined. Be careful not to overmix, as this can lead to a tough cake. The batter consistency should be smooth and pourable, but still thick enough to cling to the spoon.
- Bake: Divide the batter evenly between the prepared cake pans. Bake for 30-35 minutes for 9-inch pans, or 25-30 minutes for 8-inch pans, or until a wooden skewer inserted into the center comes out with a few moist crumbs attached and the top springs back when lightly touched.
- Cool: Let the cakes cool in the pans for 10-15 minutes before inverting them onto a wire rack to cool completely.
- Make the Cherry Rum (or Kirsch) Syrup
- Simmer Syrup: While the cakes cool, drain the canned cherries, reserving the syrup. In a small saucepan, combine the reserved cherry syrup and ¼ cup (50g) granulated sugar. Bring to a simmer over medium heat, stirring until the sugar dissolves. Continue to simmer gently for 5-7 minutes, until the syrup slightly thickens and coats the back of a spoon.
- Add Alcohol (or not!): Remove from heat. Stir in the dark rum or kirsch. For a non-alcoholic version, simply omit the alcohol and stir in ½ teaspoon of vanilla extract instead. Let the syrup cool completely.
- Prep the Cherries
- Drain & Pat Dry: If using canned or jarred cherries for the filling, drain them well and pat them lightly with a paper towel to remove excess moisture. This prevents them from making your cream runny. If you want a slightly thicker cherry layer, you can briefly simmer about ½ cup of the drained cherries with a tablespoon of their syrup until slightly thickened, then cool.
- Whip the Cream
- Chill Equipment: For the best whipped cream, chill your mixing bowl and beaters in the freezer for 10-15 minutes before you start. This helps the cream whip up faster and hold its shape.
- Whip Cream: Pour the very cold heavy cream into the chilled bowl. Add the powdered sugar and vanilla extract.
- Whip to Stiff Peaks: Beat on medium-high speed until soft peaks form, then continue to beat until you reach firm peaks. Stop when the cream holds its shape but is still smooth and not grainy. Be careful not to over-whip, or it will become lumpy and eventually turn into butter! If your cream accidentally gets a little over-whipped, you can sometimes fix it by gently stirring in a tablespoon or two of unwhipped cold cream.
- Level, Soak & Layer the Cakes
- Level Cakes: Once completely cool, if your cake layers have domed tops, use a serrated knife to carefully level them. A flat top ensures a stable, even cake.
- Soak Layers: Place one cake layer on your serving plate or cake stand. Brush the top evenly with about 3-4 tablespoons of the cooled cherry syrup. The cake should feel moist but not soggy.
- Fill First Layer: Spread about 1 ½ cups of whipped cream over the soaked cake layer, leaving a small border (about ½ inch) around the edge. Arrange half of your prepared cherries over the cream.
- Repeat & Stack: Place the second cake layer on top, brush with syrup, spread with another 1 ½ cups of cream, and add the remaining cherries. If you have a third layer, repeat the process.
- Frost & Decorate
- Crumb Coat: Place the final cake layer on top. Apply a very thin layer of whipped cream all over the sides and top of the cake. This is called a "crumb coat" and it traps any loose crumbs, ensuring a smooth final finish.
- Chill: Chill the cake in the refrigerator for 15-20 minutes to set the crumb coat.
- Final Frosting: Apply the remaining whipped cream to the sides and top of the cake, smoothing it with an offset spatula.
- Decorate: Decorate the cake in classic Black Forest style by pressing chocolate curls or shavings onto the sides and arranging the whole cherries (with stems) on top. You can also add optional holiday decoration ideas like sugared cranberries or small chocolate trees for a festive touch.
You may also like


Hey there! I’m just someone who seriously loves good food and believes that cooking doesn’t have to be complicated to be amazing. Whether it’s a quick weeknight dinner or a cozy weekend meal, I’m all about sharing easy, tasty recipes that actually work.


