
Chilean Fruit Cake Recipe - Bake Pan de Pascua Today
Chilean Fruit Cake Recipe - Bake Pan de Pascua Today

- Serves: 14 People
- Prepare Time: 45 minutes
- Cooking Time: 75 minutes
- Calories: -
- Difficulty: Easy
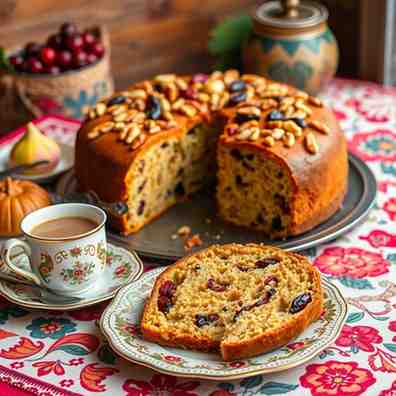
Welcome to the ultimate guide for baking Pan de Pascua, Chile's beloved Christmas fruit cake recipe! If you're searching for a truly authentic taste of Chilean holidays, look no further. This isn't just any fruit cake recipe; Pan de Pascua is a unique sweet bread, rich with warm spices, citrus, nuts, and a delightful mix of dried and candied fruit for fruit cake. While its name, "Easter Bread," might be a little confusing, this festive bake is a Christmas and New Year's staple across Chile, traditionally enjoyed with a glass of cola de mono.
You might have heard tales of dry, dense fruitcakes, but this recipe is here to change your mind. We've adapted a definitive, traditional Chilean Pan de Pascua recipe for your US home kitchen, ensuring a moist, flavorful loaf that gets even better with age. Whether you're a seasoned baker or trying your hand at homemade sweet bread for the first time, our step-by-step instructions will guide you to a perfect Pan de Pascua, ready to become a new holiday tradition. Get ready to bake a delicious, sliceable fruit cake that will impress everyone!
Ingredients
Directions
- Day 1 – Soak the Fruits
- In a large bowl, combine your dried and candied fruits, chopped nuts, citrus zest, and all the spices.
- Pour in your chosen soaking liquid (rum, pisco, brandy, or juice). Stir everything together until the fruit and nuts are well coated.
- Cover the bowl tightly with plastic wrap and let it soak overnight at room temperature (or in the fridge if your kitchen is very warm). This step is crucial for flavor and moisture!
- If you forgot to soak overnight: Don't worry! Warm the soaking liquid gently in a microwave or small saucepan until warm (not hot). Pour it over the fruit mixture and let it soak for 30-60 minutes. Pat the fruit dry with a paper towel if it seems excessively wet before proceeding.
- Day 2 – Prepare the Pan & Preheat
- Grease your chosen pan(s) thoroughly. For a traditional loaf, use a 9x5-inch loaf pan. For a round cake, an 8 or 9-inch round cake pan works well. Line the bottom with parchment paper, leaving an overhang on the sides to help with unmolding.
- Preheat your oven to 325°F (160°C). If you have one, place an oven thermometer inside to ensure accuracy – this is key for fruitcake baking!
- Make the Batter
- In a large mixing bowl (or the bowl of a stand mixer fitted with the paddle attachment), cream together the softened butter and brown sugar. Beat on medium speed for 3-5 minutes until the mixture is pale, light, and fluffy. Scrape down the sides of the bowl as needed.
- Add the eggs one at a time, beating well after each addition until fully incorporated. The mixture might look slightly curdled at first, but keep mixing until it comes back together.
- Stir in the molasses or chancaca syrup until it's fully combined and the batter is smooth.
- Combine Dry Ingredients & Finish the Batter
- In a separate medium bowl, whisk together the all-purpose flour, baking powder, and salt until thoroughly combined.
- Gradually add the dry ingredients to the wet ingredients, mixing on low speed until just combined. Be careful not to overmix, as this can lead to a tough cake. If the batter seems too stiff, you can add a tablespoon or two of the soaking liquid (if you have any leftover) to loosen it slightly.
- Now, it's time for the soaked fruit and nuts! For an extra tip to prevent sinking, toss the soaked fruit and nuts with a spoonful or two of the flour mixture before folding them into the batter. This helps coat them and suspend them evenly.
- Fold the fruit and nut mixture into the batter using a spatula until evenly distributed. The final batter should be thick and heavy.
- Bake
- Pour the batter into your prepared pan(s), smoothing the top with a spatula.
- Bake for approximately 60-90 minutes, depending on your oven and pan size. A loaf pan typically takes longer than a round cake pan.
- To test for doneness:
- Insert a wooden skewer or toothpick into the center of the cake. It should come out clean.
- For advanced bakers, the internal temperature should reach 200-210°F (93-99°C).
- If the top is browning too quickly, loosely tent the pan with aluminum foil for the remaining bake time.
- Cool, Wrap & Rest
- Once baked, let the Pan de Pascua cool in the pan for about 15-20 minutes.
- Carefully unmold the cake onto a wire cooling rack and remove the parchment paper.
- Allow the cake to cool completely to room temperature. This is crucial before wrapping.
- Once cool, wrap the Pan de Pascua tightly in plastic wrap, then again in aluminum foil.
- Recommended resting time is 24-72 hours (1-3 days) before slicing. This allows the flavors to meld and the cake to become moister and easier to slice. For the absolute best flavor, let it rest for a week!
Chilean Fruit Cake Recipe - Bake Pan de Pascua Today

- Serves: 14 People
- Prepare Time: 45 minutes
- Cooking Time: 75 minutes
- Calories: -
- Difficulty: Easy
Welcome to the ultimate guide for baking Pan de Pascua, Chile's beloved Christmas fruit cake recipe! If you're searching for a truly authentic taste of Chilean holidays, look no further. This isn't just any fruit cake recipe; Pan de Pascua is a unique sweet bread, rich with warm spices, citrus, nuts, and a delightful mix of dried and candied fruit for fruit cake. While its name, "Easter Bread," might be a little confusing, this festive bake is a Christmas and New Year's staple across Chile, traditionally enjoyed with a glass of cola de mono.
You might have heard tales of dry, dense fruitcakes, but this recipe is here to change your mind. We've adapted a definitive, traditional Chilean Pan de Pascua recipe for your US home kitchen, ensuring a moist, flavorful loaf that gets even better with age. Whether you're a seasoned baker or trying your hand at homemade sweet bread for the first time, our step-by-step instructions will guide you to a perfect Pan de Pascua, ready to become a new holiday tradition. Get ready to bake a delicious, sliceable fruit cake that will impress everyone!
Ingredients
Directions
- Day 1 – Soak the Fruits
- In a large bowl, combine your dried and candied fruits, chopped nuts, citrus zest, and all the spices.
- Pour in your chosen soaking liquid (rum, pisco, brandy, or juice). Stir everything together until the fruit and nuts are well coated.
- Cover the bowl tightly with plastic wrap and let it soak overnight at room temperature (or in the fridge if your kitchen is very warm). This step is crucial for flavor and moisture!
- If you forgot to soak overnight: Don't worry! Warm the soaking liquid gently in a microwave or small saucepan until warm (not hot). Pour it over the fruit mixture and let it soak for 30-60 minutes. Pat the fruit dry with a paper towel if it seems excessively wet before proceeding.
- Day 2 – Prepare the Pan & Preheat
- Grease your chosen pan(s) thoroughly. For a traditional loaf, use a 9x5-inch loaf pan. For a round cake, an 8 or 9-inch round cake pan works well. Line the bottom with parchment paper, leaving an overhang on the sides to help with unmolding.
- Preheat your oven to 325°F (160°C). If you have one, place an oven thermometer inside to ensure accuracy – this is key for fruitcake baking!
- Make the Batter
- In a large mixing bowl (or the bowl of a stand mixer fitted with the paddle attachment), cream together the softened butter and brown sugar. Beat on medium speed for 3-5 minutes until the mixture is pale, light, and fluffy. Scrape down the sides of the bowl as needed.
- Add the eggs one at a time, beating well after each addition until fully incorporated. The mixture might look slightly curdled at first, but keep mixing until it comes back together.
- Stir in the molasses or chancaca syrup until it's fully combined and the batter is smooth.
- Combine Dry Ingredients & Finish the Batter
- In a separate medium bowl, whisk together the all-purpose flour, baking powder, and salt until thoroughly combined.
- Gradually add the dry ingredients to the wet ingredients, mixing on low speed until just combined. Be careful not to overmix, as this can lead to a tough cake. If the batter seems too stiff, you can add a tablespoon or two of the soaking liquid (if you have any leftover) to loosen it slightly.
- Now, it's time for the soaked fruit and nuts! For an extra tip to prevent sinking, toss the soaked fruit and nuts with a spoonful or two of the flour mixture before folding them into the batter. This helps coat them and suspend them evenly.
- Fold the fruit and nut mixture into the batter using a spatula until evenly distributed. The final batter should be thick and heavy.
- Bake
- Pour the batter into your prepared pan(s), smoothing the top with a spatula.
- Bake for approximately 60-90 minutes, depending on your oven and pan size. A loaf pan typically takes longer than a round cake pan.
- To test for doneness:
- Insert a wooden skewer or toothpick into the center of the cake. It should come out clean.
- For advanced bakers, the internal temperature should reach 200-210°F (93-99°C).
- If the top is browning too quickly, loosely tent the pan with aluminum foil for the remaining bake time.
- Cool, Wrap & Rest
- Once baked, let the Pan de Pascua cool in the pan for about 15-20 minutes.
- Carefully unmold the cake onto a wire cooling rack and remove the parchment paper.
- Allow the cake to cool completely to room temperature. This is crucial before wrapping.
- Once cool, wrap the Pan de Pascua tightly in plastic wrap, then again in aluminum foil.
- Recommended resting time is 24-72 hours (1-3 days) before slicing. This allows the flavors to meld and the cake to become moister and easier to slice. For the absolute best flavor, let it rest for a week!
You may also like


Hey there! I’m just someone who seriously loves good food and believes that cooking doesn’t have to be complicated to be amazing. Whether it’s a quick weeknight dinner or a cozy weekend meal, I’m all about sharing easy, tasty recipes that actually work.


