
Classic Victoria Sponge Cake Recipe | Bake Today
Classic Victoria Sponge Cake Recipe | Bake Today
- Serves: 8 People
- Prepare Time: 20 minutes
- Cooking Time: 25 minutes
- Calories: -
- Difficulty: Medium
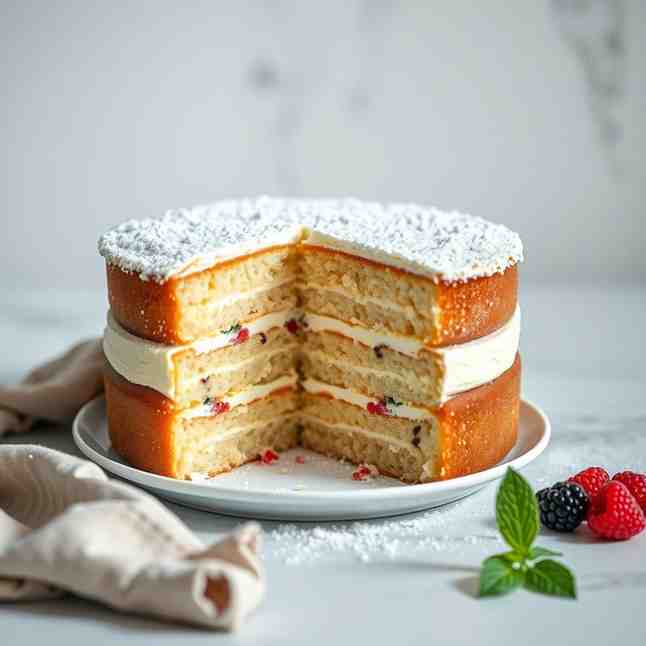
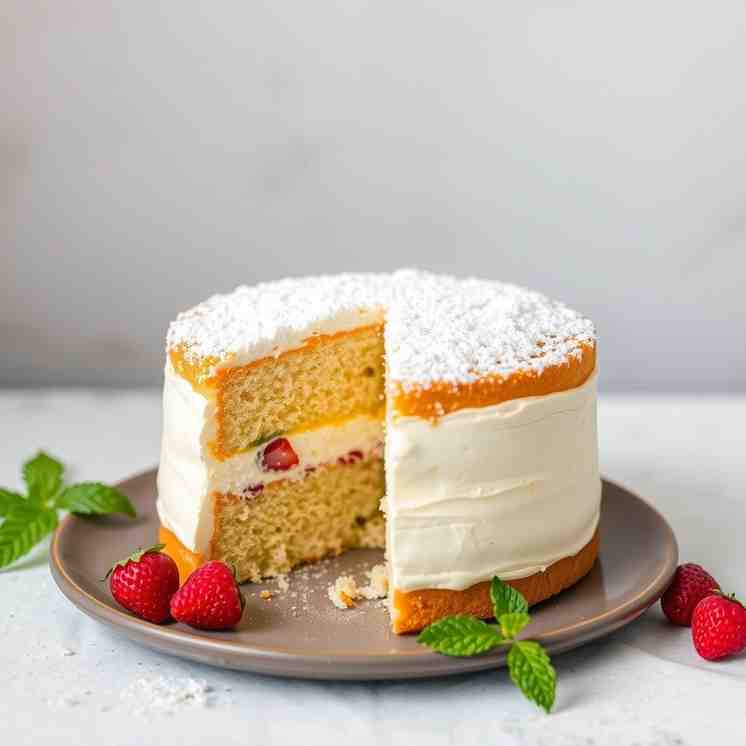
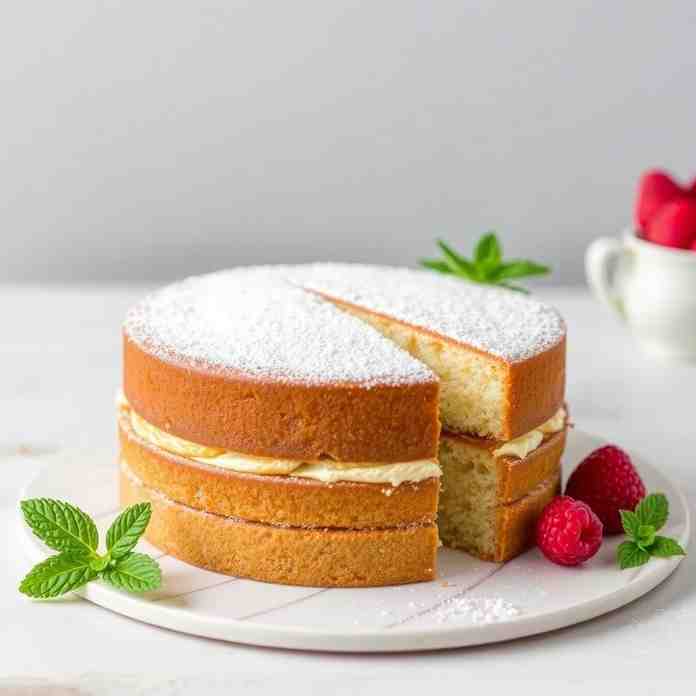
Get ready to bake a true taste of Britain right in your own kitchen! The `Victoria Sponge Cake`, also known as Victoria Sandwich, is a timeless `classic British tea cake` that’s surprisingly simple to master. Forget fussy frostings – this elegant dessert celebrates the pure joy of two `light sponge` layers, generously filled with sweet `raspberry jam` (or strawberry!) and billowy `whipped cream`. It’s the perfect treat for any occasion, from afternoon tea to a simple family gathering, promising a delightful, unfussy experience that’s utterly delicious.
Ingredients
Directions
- Prep Your Pans & Preheat: Preheat your oven to 350°F (175°C). Lightly grease and flour two 8-inch round cake pans. For best results, line the bottoms with parchment paper. This helps prevent sticking and makes removal a breeze.
- Cream Butter & Sugar: In a large bowl, using an electric hand mixer or stand mixer, beat the softened butter and superfine granulated sugar together. Start on low speed, then increase to medium-high. Beat for 3-5 minutes until the mixture is very pale in color, light, and fluffy. This step is crucial for incorporating air into your sponge, giving it that classic light texture.
- Add Eggs Gradually: Crack the eggs into a separate small bowl. With the mixer on medium speed, add the eggs one at a time, beating well after each addition until fully incorporated. If the mixture looks a little curdled, don't panic! Add a tablespoon of the sifted flour (from your total amount) and continue mixing; this often helps bring it back together.
- Fold in Flour (and Milk if Needed): Sift the self-rising flour (or your DIY mix) over the butter and egg mixture. Using a rubber spatula, gently fold the flour into the batter until just combined. Be careful not to overmix, as this can develop the gluten too much and lead to a tough cake. If the batter seems too stiff, add 1-2 tablespoons of milk, a little at a time, until it reaches a soft, dropping consistency.
- Divide, Level & Bake: Divide the batter evenly between the two prepared cake pans. A kitchen scale is highly recommended for this to ensure even layers (aim for about 300g-320g per pan). Gently smooth the tops with the back of a spoon or spatula. Bake for 20-25 minutes, or until the cakes are golden brown, spring back when lightly touched in the center, and the edges are just starting to pull away from the sides of the pan. A toothpick inserted into the center should come out with a few moist crumbs, but not wet batter.
- Cool Properly: Once baked, remove the cakes from the oven and let them cool in their pans for 5-10 minutes. This prevents them from collapsing. Then, carefully invert them onto a wire cooling rack, remove the parchment paper, and let them cool completely before assembling. Trying to fill warm cakes will result in melted jam and cream!
- Whip the Cream: While the cakes cool, pour the chilled heavy whipping cream into a clean, cold bowl (metal bowls chilled in the freezer work best!). Using an electric mixer, beat the cream on medium-high speed until it forms soft peaks. If you prefer a slightly sweeter cream, you can add 1-2 tablespoons of powdered sugar during whipping. Be careful not to overmix, or it will become grainy and eventually turn into butter.
- Assemble Your Sponge: Once the cakes are completely cool, place one sponge layer onto your serving plate. Spread the jam evenly over the top, leaving a small border around the edge. Next, spoon or pipe the whipped cream over the jam. Gently place the second sponge layer on top.
- Dust & Chill (Optional): Lightly dust the top of the cake with powdered sugar using a fine-mesh sieve. For neater slices, you can chill the assembled cake in the refrigerator for about 15-30 minutes before serving. Enjoy your homemade Classic Victoria Sponge!
Classic Victoria Sponge Cake Recipe | Bake Today
- Serves: 8 People
- Prepare Time: 20 minutes
- Cooking Time: 25 minutes
- Calories: -
- Difficulty: Medium
Get ready to bake a true taste of Britain right in your own kitchen! The `Victoria Sponge Cake`, also known as Victoria Sandwich, is a timeless `classic British tea cake` that’s surprisingly simple to master. Forget fussy frostings – this elegant dessert celebrates the pure joy of two `light sponge` layers, generously filled with sweet `raspberry jam` (or strawberry!) and billowy `whipped cream`. It’s the perfect treat for any occasion, from afternoon tea to a simple family gathering, promising a delightful, unfussy experience that’s utterly delicious.
Ingredients
Directions
- Prep Your Pans & Preheat: Preheat your oven to 350°F (175°C). Lightly grease and flour two 8-inch round cake pans. For best results, line the bottoms with parchment paper. This helps prevent sticking and makes removal a breeze.
- Cream Butter & Sugar: In a large bowl, using an electric hand mixer or stand mixer, beat the softened butter and superfine granulated sugar together. Start on low speed, then increase to medium-high. Beat for 3-5 minutes until the mixture is very pale in color, light, and fluffy. This step is crucial for incorporating air into your sponge, giving it that classic light texture.
- Add Eggs Gradually: Crack the eggs into a separate small bowl. With the mixer on medium speed, add the eggs one at a time, beating well after each addition until fully incorporated. If the mixture looks a little curdled, don't panic! Add a tablespoon of the sifted flour (from your total amount) and continue mixing; this often helps bring it back together.
- Fold in Flour (and Milk if Needed): Sift the self-rising flour (or your DIY mix) over the butter and egg mixture. Using a rubber spatula, gently fold the flour into the batter until just combined. Be careful not to overmix, as this can develop the gluten too much and lead to a tough cake. If the batter seems too stiff, add 1-2 tablespoons of milk, a little at a time, until it reaches a soft, dropping consistency.
- Divide, Level & Bake: Divide the batter evenly between the two prepared cake pans. A kitchen scale is highly recommended for this to ensure even layers (aim for about 300g-320g per pan). Gently smooth the tops with the back of a spoon or spatula. Bake for 20-25 minutes, or until the cakes are golden brown, spring back when lightly touched in the center, and the edges are just starting to pull away from the sides of the pan. A toothpick inserted into the center should come out with a few moist crumbs, but not wet batter.
- Cool Properly: Once baked, remove the cakes from the oven and let them cool in their pans for 5-10 minutes. This prevents them from collapsing. Then, carefully invert them onto a wire cooling rack, remove the parchment paper, and let them cool completely before assembling. Trying to fill warm cakes will result in melted jam and cream!
- Whip the Cream: While the cakes cool, pour the chilled heavy whipping cream into a clean, cold bowl (metal bowls chilled in the freezer work best!). Using an electric mixer, beat the cream on medium-high speed until it forms soft peaks. If you prefer a slightly sweeter cream, you can add 1-2 tablespoons of powdered sugar during whipping. Be careful not to overmix, or it will become grainy and eventually turn into butter.
- Assemble Your Sponge: Once the cakes are completely cool, place one sponge layer onto your serving plate. Spread the jam evenly over the top, leaving a small border around the edge. Next, spoon or pipe the whipped cream over the jam. Gently place the second sponge layer on top.
- Dust & Chill (Optional): Lightly dust the top of the cake with powdered sugar using a fine-mesh sieve. For neater slices, you can chill the assembled cake in the refrigerator for about 15-30 minutes before serving. Enjoy your homemade Classic Victoria Sponge!
You may also like


Hey there! I’m just someone who seriously loves good food and believes that cooking doesn’t have to be complicated to be amazing. Whether it’s a quick weeknight dinner or a cozy weekend meal, I’m all about sharing easy, tasty recipes that actually work.


