
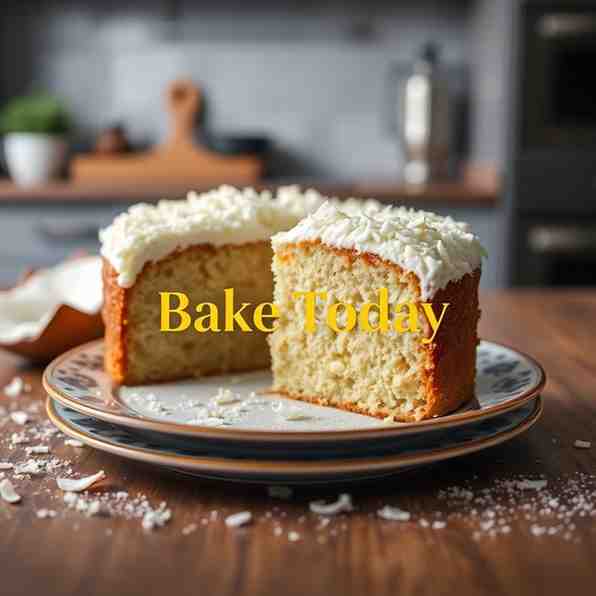
Easy Coconut Gluten-Free Cake Recipe | Bake Today
Easy Coconut Gluten-Free Cake Recipe | Bake Today


- Serves: 9 People
- Prepare Time: 20 minutes
- Cooking Time: 50 minutes
- Calories: -
- Difficulty: Easy
Ever dreamt of a dessert that’s not only incredibly delicious but also fits perfectly into your dietary needs? Look no further! Our Tapioca Cake: Sweet Cassava and Coconut Dessert is here to make those dreams a reality. This isn’t just any cake; it’s a delightfully chewy, rich, and utterly coconutty creation that you can easily slice into perfect snack bars. It’s the ultimate coconut gluten-free cake that tastes like a tropical escape in every bite!
What makes this recipe a true winner? For starters, it’s incredibly beginner-friendly, requiring just one bowl and no fancy mixer. Plus, it relies on pantry staples, making it a quick gluten free recipe you’ll turn to again and again. We’re talking about a dessert that delivers on all fronts: it’s naturally gluten-free, grain-free, egg-free, and lactose-free. So, whether you’re exploring gluten free egg free recipes or need a satisfying lactose free gluten free dessert, this gluten free cassava cake has got you covered. Get ready to bake a gluten free baked good that everyone will adore!
Best Served: Slightly warm for a soft, comforting bite, or chilled for a firmer, refreshing treat.
Where "Tapioca" Fits In: The tapioca starch used in this recipe is derived from cassava, which is the main ingredient!
Ingredients
Directions
Tapioca Cake: Sweet Cassava and Coconut Dessert Step-by-Step Instructions
Baking this gluten-free cassava cake is easier than you think! Follow these steps for a perfect, chewy, and delicious dessert.Before You Start: Cassava Prep That Prevents FailureThis step is critical for a perfectly set, not-too-wet cake!Thaw Fully: Ensure your frozen grated cassava is completely thawed. You can leave it in the fridge overnight or on the counter for a few hours.Drain 10 Minutes: Place the thawed cassava in a fine-mesh strainer set over a bowl. Let it sit and drain for at least 10 minutes. You’ll be surprised how much liquid comes out!Press Lightly: After draining, gently press the cassava with the back of a spoon or your hands until it stops dripping. Don't wring it dry aggressively, as you still want some moisture, but remove excess water."Right Texture": The cassava should feel moist but not waterlogged. It should be loose and crumbly, not a solid, wet mass.Prep- Heat Oven: Preheat your oven to 375°F (190°C).
- Line Pan: Line an 8x8 or 9x9 inch baking pan with parchment paper, leaving an overhang on two sides. This creates "handles" for easy lifting of the baked cake, making slicing much simpler. The pan size determines your cake's thickness – an 8x8 will yield a thicker bar, while a 9x9 will be slightly thinner.
- Wet Ingredients: In a large mixing bowl, whisk together the full-fat coconut milk, coconut cream, granulated sugar, vanilla extract, and salt until the sugar is mostly dissolved.
- Add Cassava: Stir in the prepared (thawed and drained) grated cassava. Mix well to combine.
- Incorporate Starch: Sprinkle the tapioca starch over the mixture. Mix thoroughly until there are no dry pockets of starch visible. The mixture will be thick.
- Fold in Coconut: Gently fold in the unsweetened shredded coconut until evenly distributed.
- Spread Batter: Transfer the batter to your prepared baking pan. Spread it evenly using a spatula, ensuring the top is relatively smooth.
- Bake: Bake for 45-55 minutes, or until the edges are beautifully golden brown and the center is set with only a slight jiggle when gently shaken.
- Stovetop Prep: While the cake is baking (or just after it comes out), combine the ½ cup coconut cream, 2 tablespoons sugar, pinch of salt, and 1 tablespoon tapioca starch in a small saucepan. Whisk constantly over medium-low heat until the mixture thickens slightly, about 3-5 minutes. It should be like a pourable custard.
- Apply Topping: Once the cake is out of the oven, immediately spread the warm coconut cream topping evenly over the hot cake.
- Broil to Brown: Return the cake to the oven (or turn on your broiler). Broil for 1-3 minutes, keeping a very close eye on it, until the topping is beautifully golden and slightly caramelized. Broilers vary, so watch it constantly to prevent burning!
- Cool Completely: This is the most crucial step for a well-set cake! Let the cake cool completely in the pan on a wire rack. This can take 1-2 hours, or even longer. For best results, you can even chill it in the refrigerator for an hour or two once it's cooled to room temperature. This allows the tapioca starch to fully set, giving you that perfect chewy texture.
- Slice: Once completely cool and set, use the parchment paper overhang to lift the cake out of the pan. Slice into desired bars or squares.
- Center: The center should be mostly set with only a very slight, almost imperceptible jiggle when the pan is gently shaken.
- Toothpick Test: A toothpick inserted into the center may not come out "bone dry" (due to the moist nature of cassava and coconut milk), but it should not have wet batter clinging to it. Small, moist crumbs are fine.
- Edges: The edges will be visibly browned and may pull slightly away from the sides of the pan.
- Optional Internal Temp: For absolute certainty, an internal thermometer inserted into the center should read around 200-210°F (93-99°C).
Easy Coconut Gluten-Free Cake Recipe | Bake Today
- Serves: 9 People
- Prepare Time: 20 minutes
- Cooking Time: 50 minutes
- Calories: -
- Difficulty: Easy
Ever dreamt of a dessert that’s not only incredibly delicious but also fits perfectly into your dietary needs? Look no further! Our Tapioca Cake: Sweet Cassava and Coconut Dessert is here to make those dreams a reality. This isn’t just any cake; it’s a delightfully chewy, rich, and utterly coconutty creation that you can easily slice into perfect snack bars. It’s the ultimate coconut gluten-free cake that tastes like a tropical escape in every bite!
What makes this recipe a true winner? For starters, it’s incredibly beginner-friendly, requiring just one bowl and no fancy mixer. Plus, it relies on pantry staples, making it a quick gluten free recipe you’ll turn to again and again. We’re talking about a dessert that delivers on all fronts: it’s naturally gluten-free, grain-free, egg-free, and lactose-free. So, whether you’re exploring gluten free egg free recipes or need a satisfying lactose free gluten free dessert, this gluten free cassava cake has got you covered. Get ready to bake a gluten free baked good that everyone will adore!
Best Served: Slightly warm for a soft, comforting bite, or chilled for a firmer, refreshing treat.
Where "Tapioca" Fits In: The tapioca starch used in this recipe is derived from cassava, which is the main ingredient!
Ingredients
Directions
Tapioca Cake: Sweet Cassava and Coconut Dessert Step-by-Step Instructions
Baking this gluten-free cassava cake is easier than you think! Follow these steps for a perfect, chewy, and delicious dessert.Before You Start: Cassava Prep That Prevents FailureThis step is critical for a perfectly set, not-too-wet cake!Thaw Fully: Ensure your frozen grated cassava is completely thawed. You can leave it in the fridge overnight or on the counter for a few hours.Drain 10 Minutes: Place the thawed cassava in a fine-mesh strainer set over a bowl. Let it sit and drain for at least 10 minutes. You’ll be surprised how much liquid comes out!Press Lightly: After draining, gently press the cassava with the back of a spoon or your hands until it stops dripping. Don't wring it dry aggressively, as you still want some moisture, but remove excess water."Right Texture": The cassava should feel moist but not waterlogged. It should be loose and crumbly, not a solid, wet mass.Prep- Heat Oven: Preheat your oven to 375°F (190°C).
- Line Pan: Line an 8x8 or 9x9 inch baking pan with parchment paper, leaving an overhang on two sides. This creates "handles" for easy lifting of the baked cake, making slicing much simpler. The pan size determines your cake's thickness – an 8x8 will yield a thicker bar, while a 9x9 will be slightly thinner.
- Wet Ingredients: In a large mixing bowl, whisk together the full-fat coconut milk, coconut cream, granulated sugar, vanilla extract, and salt until the sugar is mostly dissolved.
- Add Cassava: Stir in the prepared (thawed and drained) grated cassava. Mix well to combine.
- Incorporate Starch: Sprinkle the tapioca starch over the mixture. Mix thoroughly until there are no dry pockets of starch visible. The mixture will be thick.
- Fold in Coconut: Gently fold in the unsweetened shredded coconut until evenly distributed.
- Spread Batter: Transfer the batter to your prepared baking pan. Spread it evenly using a spatula, ensuring the top is relatively smooth.
- Bake: Bake for 45-55 minutes, or until the edges are beautifully golden brown and the center is set with only a slight jiggle when gently shaken.
- Stovetop Prep: While the cake is baking (or just after it comes out), combine the ½ cup coconut cream, 2 tablespoons sugar, pinch of salt, and 1 tablespoon tapioca starch in a small saucepan. Whisk constantly over medium-low heat until the mixture thickens slightly, about 3-5 minutes. It should be like a pourable custard.
- Apply Topping: Once the cake is out of the oven, immediately spread the warm coconut cream topping evenly over the hot cake.
- Broil to Brown: Return the cake to the oven (or turn on your broiler). Broil for 1-3 minutes, keeping a very close eye on it, until the topping is beautifully golden and slightly caramelized. Broilers vary, so watch it constantly to prevent burning!
- Cool Completely: This is the most crucial step for a well-set cake! Let the cake cool completely in the pan on a wire rack. This can take 1-2 hours, or even longer. For best results, you can even chill it in the refrigerator for an hour or two once it's cooled to room temperature. This allows the tapioca starch to fully set, giving you that perfect chewy texture.
- Slice: Once completely cool and set, use the parchment paper overhang to lift the cake out of the pan. Slice into desired bars or squares.
- Center: The center should be mostly set with only a very slight, almost imperceptible jiggle when the pan is gently shaken.
- Toothpick Test: A toothpick inserted into the center may not come out "bone dry" (due to the moist nature of cassava and coconut milk), but it should not have wet batter clinging to it. Small, moist crumbs are fine.
- Edges: The edges will be visibly browned and may pull slightly away from the sides of the pan.
- Optional Internal Temp: For absolute certainty, an internal thermometer inserted into the center should read around 200-210°F (93-99°C).
You may also like

Hey there! I’m just someone who seriously loves good food and believes that cooking doesn’t have to be complicated to be amazing. Whether it’s a quick weeknight dinner or a cozy weekend meal, I’m all about sharing easy, tasty recipes that actually work.


