
Daifuku Mochi Recipe - Make Traditional Japanese Sweets at Home
Daifuku Mochi Recipe - Make Traditional Japanese Sweets at Home

- Serves: 10 People
- Prepare Time: 45 minutes
- Cooking Time: 2 hours 15
- Calories: -
- Difficulty: Medium
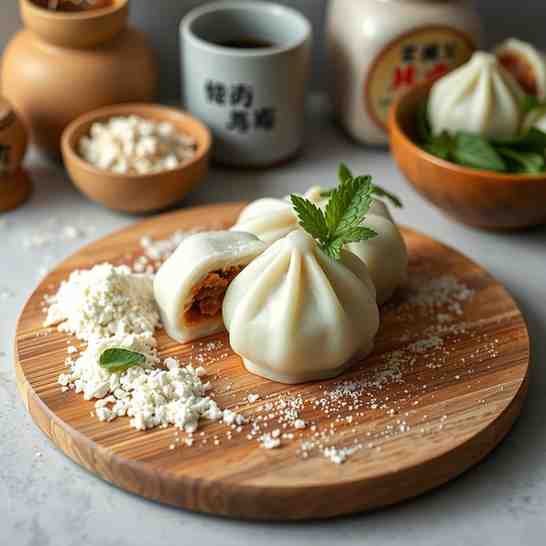
Have you ever dreamed of making your own traditional Japanese food recipes right in your kitchen? If you're looking to dive into the wonderful world of authentic Japanese food recipes, you've come to the right place! Today, we're making Daifuku Mochi – those delightful, soft, and chewy rice cakes stuffed with sweet red bean paste, known as Anko. This simple Japanese food recipe is perfect for first-time wagashi makers. We've designed this guide to be completely foolproof, with clear cues and zero guesswork, so you can enjoy the satisfaction of creating this beautiful traditional Japanese sweet at home. Get ready to impress yourself and your taste buds with this Japanese home cooking recipe!
Wagashi are traditional Japanese confections, often served with green tea during Japanese tea ceremonies. Unlike many Western-style sweets, wagashi are typically less sweet, allowing the natural flavors of their ingredients, like beans and grains, to shine. Daifuku Mochi is a beloved member of the wagashi family, known for its soft, chewy texture and delicious sweet red bean paste filling. It's often enjoyed during special occasions, celebrations, or simply as a seasonal treat.
Ingredients
Directions
- Cook the Azuki Beans Until Truly Soft
- Rinse: Place the dried azuki beans in a fine mesh strainer and rinse them thoroughly under cold running water. Pick out any small stones or debris.
- Initial Boil (Optional but Recommended): Place the rinsed beans in a medium pot and cover with about 3 cups of water. Bring to a boil over high heat, then reduce heat and simmer for 5 minutes. Drain the water and rinse the beans again. This helps remove bitterness and impurities.
- Simmer: Return the beans to the clean pot and add fresh water, covering the beans by about 2-3 inches (about 4-5 cups). Bring to a boil, then reduce the heat to low, cover, and simmer for 1 to 1.5 hours, or until the beans are very soft.
- Doneness Cues: The beans are done when you can easily crush one between your thumb and forefinger with very little resistance. They should be completely tender, almost mushy. If they're still firm, keep simmering, adding more hot water if needed to keep them submerged.
- Sweeten and Reduce into Anko You Can Shape
- Drain (Partially): Once the beans are soft, drain most of the cooking liquid, leaving just enough to barely cover the beans (about ½ cup). This liquid helps create a smooth paste.
- Sweeten: Add the granulated sugar and a pinch of salt to the pot with the beans.
- Reduce & Mash: Return the pot to medium-low heat. Using a rubber spatula or a potato masher, gently mash the beans while stirring constantly. The sugar will dissolve and the mixture will start to thicken.
- Control Thickness: Continue to cook and stir, scraping the bottom of the pot to prevent sticking. The goal is to evaporate excess moisture. If you prefer chunky anko, mash less. For a smoother paste, mash more thoroughly.
- "Ready" Cues: The anko is ready when it pulls away from the bottom of the pot, forms a soft mound, and holds its shape. When you drag your spatula through it, it should leave a visible trail for a few seconds. It will also thicken further as it cools. Remove from heat and transfer to a bowl or plate to cool completely.
- Portion the Filling (This Prevents Chaos)
- Chill Briefly: Once the anko has cooled to room temperature (or slightly chilled in the fridge for 30 minutes), it will be much easier to handle.
- Roll into Equal Balls: Divide the anko into 10-12 equal portions (about 1.5 tablespoons each). Roll each portion into a smooth, tight ball. Set aside.
- Make the Mochi Dough (Your Chosen Single Cooking Method: Microwave)
- Mix: In a microwave-safe bowl, combine the sweet rice flour and sugar. Whisk them together until well combined.
- Add Water: Gradually add the water to the flour mixture, stirring constantly with a rubber spatula until you have a smooth, lump-free batter.
- Cook (Microwave Method):
- Cover the bowl loosely with plastic wrap (leave a small vent).
- Microwave on high for 1 minute.
- Remove the bowl, stir the dough vigorously with your spatula, scraping down the sides. It will start to look lumpy and translucent in spots.
- Cover and microwave for another 1 minute.
- Stir again. The dough will be thicker and more translucent.
- Cover and microwave for a final 30 seconds to 1 minute, or until the dough is uniformly translucent and very sticky.
- How to Know It’s Done: The mochi dough is done when it's completely translucent, extremely sticky, and has a glossy appearance. There should be no white, opaque spots left. It will be thick and stretchy.
- Shape + Fill (Daifuku Assembly)
- Prepare Work Surface: Dust your work surface generously with potato starch or cornstarch. Also, dust your hands lightly. This is key to preventing the mochi from sticking.
- Transfer Mochi: Carefully scrape the hot mochi dough onto the dusted surface. The dough will be very hot, so be careful!
- Dust & Handle: Dust the top of the mochi dough with more starch. Using a bench scraper or a knife, divide the mochi into 10-12 equal pieces.
- Flatten, Fill, Pinch, Seal:
- Take one piece of mochi dough and gently flatten it into a disc about 3-4 inches in diameter. Try to make the edges thinner than the center.
- Place one anko ball in the center of the mochi disc.
- Carefully bring the edges of the mochi up and around the anko ball, pinching them together at the top to seal completely.
- Gently roll the daifuku between your palms to smooth out any seams and create a nice round shape.
- How to Prevent Tearing and Leaks:
- Generous Dusting: Don't be shy with the starch! It's your best friend here.
- Warm Mochi: Work with the mochi while it's still warm and pliable. If it cools too much, it becomes harder to stretch and more prone to tearing.
- Gentle Stretching: Stretch the mochi evenly around the anko. Avoid pulling too hard in one spot.
- Seal Tightly: Ensure the seam at the bottom is completely sealed to prevent the sweet red bean paste from leaking out.
Daifuku Mochi Recipe - Make Traditional Japanese Sweets at Home
- Serves: 10 People
- Prepare Time: 45 minutes
- Cooking Time: 2 hours 15
- Calories: -
- Difficulty: Medium
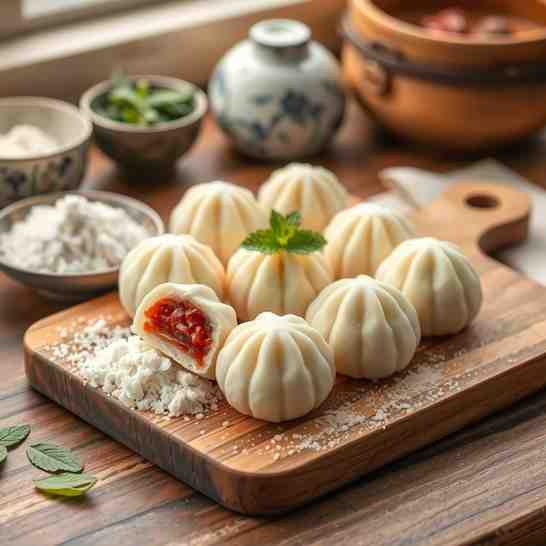
Have you ever dreamed of making your own traditional Japanese food recipes right in your kitchen? If you're looking to dive into the wonderful world of authentic Japanese food recipes, you've come to the right place! Today, we're making Daifuku Mochi – those delightful, soft, and chewy rice cakes stuffed with sweet red bean paste, known as Anko. This simple Japanese food recipe is perfect for first-time wagashi makers. We've designed this guide to be completely foolproof, with clear cues and zero guesswork, so you can enjoy the satisfaction of creating this beautiful traditional Japanese sweet at home. Get ready to impress yourself and your taste buds with this Japanese home cooking recipe!
Wagashi are traditional Japanese confections, often served with green tea during Japanese tea ceremonies. Unlike many Western-style sweets, wagashi are typically less sweet, allowing the natural flavors of their ingredients, like beans and grains, to shine. Daifuku Mochi is a beloved member of the wagashi family, known for its soft, chewy texture and delicious sweet red bean paste filling. It's often enjoyed during special occasions, celebrations, or simply as a seasonal treat.
Ingredients
Directions
- Cook the Azuki Beans Until Truly Soft
- Rinse: Place the dried azuki beans in a fine mesh strainer and rinse them thoroughly under cold running water. Pick out any small stones or debris.
- Initial Boil (Optional but Recommended): Place the rinsed beans in a medium pot and cover with about 3 cups of water. Bring to a boil over high heat, then reduce heat and simmer for 5 minutes. Drain the water and rinse the beans again. This helps remove bitterness and impurities.
- Simmer: Return the beans to the clean pot and add fresh water, covering the beans by about 2-3 inches (about 4-5 cups). Bring to a boil, then reduce the heat to low, cover, and simmer for 1 to 1.5 hours, or until the beans are very soft.
- Doneness Cues: The beans are done when you can easily crush one between your thumb and forefinger with very little resistance. They should be completely tender, almost mushy. If they're still firm, keep simmering, adding more hot water if needed to keep them submerged.
- Sweeten and Reduce into Anko You Can Shape
- Drain (Partially): Once the beans are soft, drain most of the cooking liquid, leaving just enough to barely cover the beans (about ½ cup). This liquid helps create a smooth paste.
- Sweeten: Add the granulated sugar and a pinch of salt to the pot with the beans.
- Reduce & Mash: Return the pot to medium-low heat. Using a rubber spatula or a potato masher, gently mash the beans while stirring constantly. The sugar will dissolve and the mixture will start to thicken.
- Control Thickness: Continue to cook and stir, scraping the bottom of the pot to prevent sticking. The goal is to evaporate excess moisture. If you prefer chunky anko, mash less. For a smoother paste, mash more thoroughly.
- "Ready" Cues: The anko is ready when it pulls away from the bottom of the pot, forms a soft mound, and holds its shape. When you drag your spatula through it, it should leave a visible trail for a few seconds. It will also thicken further as it cools. Remove from heat and transfer to a bowl or plate to cool completely.
- Portion the Filling (This Prevents Chaos)
- Chill Briefly: Once the anko has cooled to room temperature (or slightly chilled in the fridge for 30 minutes), it will be much easier to handle.
- Roll into Equal Balls: Divide the anko into 10-12 equal portions (about 1.5 tablespoons each). Roll each portion into a smooth, tight ball. Set aside.
- Make the Mochi Dough (Your Chosen Single Cooking Method: Microwave)
- Mix: In a microwave-safe bowl, combine the sweet rice flour and sugar. Whisk them together until well combined.
- Add Water: Gradually add the water to the flour mixture, stirring constantly with a rubber spatula until you have a smooth, lump-free batter.
- Cook (Microwave Method):
- Cover the bowl loosely with plastic wrap (leave a small vent).
- Microwave on high for 1 minute.
- Remove the bowl, stir the dough vigorously with your spatula, scraping down the sides. It will start to look lumpy and translucent in spots.
- Cover and microwave for another 1 minute.
- Stir again. The dough will be thicker and more translucent.
- Cover and microwave for a final 30 seconds to 1 minute, or until the dough is uniformly translucent and very sticky.
- How to Know It’s Done: The mochi dough is done when it's completely translucent, extremely sticky, and has a glossy appearance. There should be no white, opaque spots left. It will be thick and stretchy.
- Shape + Fill (Daifuku Assembly)
- Prepare Work Surface: Dust your work surface generously with potato starch or cornstarch. Also, dust your hands lightly. This is key to preventing the mochi from sticking.
- Transfer Mochi: Carefully scrape the hot mochi dough onto the dusted surface. The dough will be very hot, so be careful!
- Dust & Handle: Dust the top of the mochi dough with more starch. Using a bench scraper or a knife, divide the mochi into 10-12 equal pieces.
- Flatten, Fill, Pinch, Seal:
- Take one piece of mochi dough and gently flatten it into a disc about 3-4 inches in diameter. Try to make the edges thinner than the center.
- Place one anko ball in the center of the mochi disc.
- Carefully bring the edges of the mochi up and around the anko ball, pinching them together at the top to seal completely.
- Gently roll the daifuku between your palms to smooth out any seams and create a nice round shape.
- How to Prevent Tearing and Leaks:
- Generous Dusting: Don't be shy with the starch! It's your best friend here.
- Warm Mochi: Work with the mochi while it's still warm and pliable. If it cools too much, it becomes harder to stretch and more prone to tearing.
- Gentle Stretching: Stretch the mochi evenly around the anko. Avoid pulling too hard in one spot.
- Seal Tightly: Ensure the seam at the bottom is completely sealed to prevent the sweet red bean paste from leaking out.
You may also like


Hey there! I’m just someone who seriously loves good food and believes that cooking doesn’t have to be complicated to be amazing. Whether it’s a quick weeknight dinner or a cozy weekend meal, I’m all about sharing easy, tasty recipes that actually work.


