
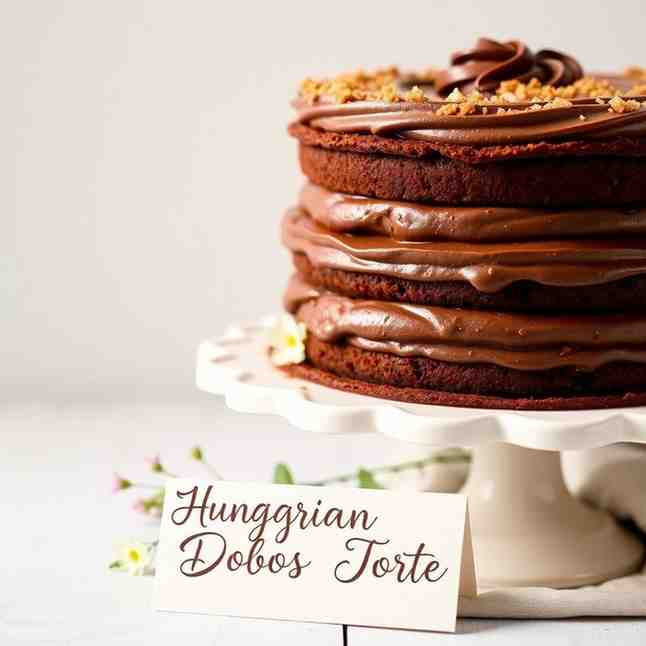
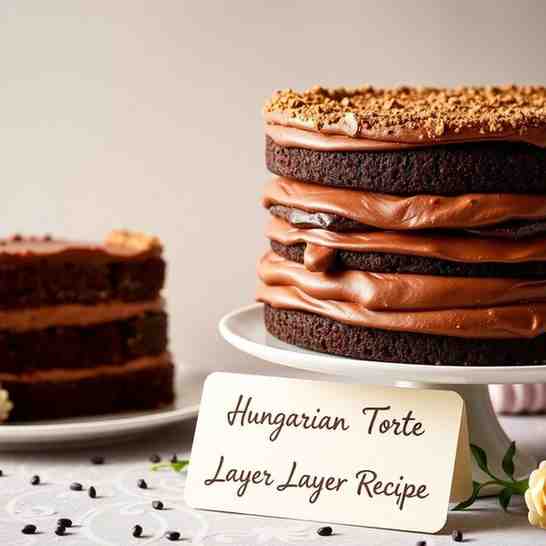
Hungarian Dobos Torte - Chocolate Layer Cake Recipe
Hungarian Dobos Torte - Chocolate Layer Cake Recipe

- Serves: 12 People
- Prepare Time: 1 hour 15 m
- Cooking Time: 45 minutes
- Calories: -
- Difficulty: Easy
Get ready to bake something truly spectacular: the Hungarian Dobos Torte! This isn't just any chocolate layer cake; it's a masterpiece of delicate flavors and textures. Imagine incredibly thin, airy sponge cake layers, generously filled with a rich, velvety chocolate for pastry buttercream, all crowned with a stunning, crisp caramel layer cake topping. It's a showstopper that tastes as incredible as it looks, and definitely worth the effort!
What makes a Dobos Torte so special? It's all about the contrast. You'll bite into light, almost melt-in-your-mouth sponge layers, followed by the luxurious creaminess of a rich buttercream frosting made with real chocolate. Then comes the glorious crunch of the caramel topping, offering a delightful textural surprise. While it might look intimidating, we're here to guide you through every step, ensuring your Dobos Torte is a decadent delight. This recipe falls into the "Advanced Medium" difficulty level, meaning it takes a bit of time and precision, but the results are absolutely worth it. Let's get baking!
Before you dive into the deliciousness, gather your tools. Having everything ready makes the process smooth and enjoyable!
8–9 inch round cake pans or sheet pans (you'll need several or bake in batches)
Parchment paper + marker (for tracing perfect circles!)
Offset spatula (essential for spreading thin layers evenly)
Digital scale (strongly recommended for accuracy in baking)
Stand mixer or a good hand mixer
Bench scraper (for super clean buttercream sides)
Candy thermometer (strongly recommended for perfect caramel)
Sharp chef’s knife (for cutting those beautiful caramel wedges)
You can definitely tackle parts of this cake ahead of time to reduce stress on the big day!
Make ahead: The thin sponge layers can be baked, cooled, and even frozen. The chocolate buttercream can also be made a day or two in advance and stored in the fridge. Just bring it to room temperature and re-whip before using.
Last-minute: The stunning caramel topping must be made and applied shortly before serving to ensure it stays crisp and beautiful.
Ingredients
Directions
- Prep Your Templates & Pans
- Grab your 8 or 9-inch round cake pans or sheet pans. On parchment paper, trace 8-10 circles using the bottom of one of your cake pans as a guide. Flip the parchment paper over so the ink doesn't transfer to your cake.
- Lightly grease your pans (or the back of the parchment if using sheet pans) and then press the parchment circles firmly onto the greased surface. This "grease strategy" ensures your delicate layers won't stick and will release cleanly after baking.
- Make the Sponge Batter
- In a clean, dry bowl, whip the egg whites with half of the granulated sugar (100g) until they form soft to medium peaks. Set aside.
- In a separate bowl, beat the egg yolks with the remaining half of the granulated sugar (100g) until the mixture is pale yellow and thick, almost like a ribbon. Stir in the vanilla extract.
- Gently fold about one-third of the whipped egg whites into the yolk mixture to lighten it. Then, carefully fold in the remaining egg whites until just combined, being careful not to deflate them too much. This gentle folding is key for an airy sponge!
- Sift the flour (and cocoa powder, if using) over the egg mixture. Gently fold it in until just combined, stopping as soon as no dry streaks remain.
- Finally, fold in the melted and cooled butter. Again, be gentle! This adds a lovely "buttery sponge" feel.
- Bake the Thin Layers (The Core Technique Section)
- Weigh your total batter and divide it evenly by the number of layers you plan to bake (typically 8-10 layers for a classic Dobos Torte). Aim for approximately 60-70 grams of batter per layer for an 8-inch cake.
- Dollop the measured batter onto each prepared parchment circle. Using your offset spatula, spread the batter very thinly and evenly to the edges of the circle. Consistency is crucial here for uniform layers.
- Bake each layer in a preheated oven at 400°F (200°C) for 5-7 minutes. They bake fast! Look for visual cues: the edges will be lightly golden, and the center will spring back slightly when gently touched.
- Immediately after baking, carefully peel the warm sponge layer off the parchment paper. Place it on a wire rack to cool completely. Once cool, you can use a round cutter or the bottom of your cake pan as a guide to trim any uneven edges, ensuring perfectly round layers.
- For the Chocolate Buttercream Ingredients
- 5 large egg yolks
- 1/2 cup (100g) granulated sugar
- 1/4 cup (60ml) water
- 1 1/2 cups (340g) unsalted butter, softened
- 6 ounces (170g) good quality semi-sweet or bittersweet chocolate for pastry, melted and cooled
- 2 tablespoons (15g) unsweetened cocoa powder (optional, for deeper flavor)
- 1/4 teaspoon salt
- 1 teaspoon vanilla extract
- For the Chocolate Buttercream Step-by-Step Instructions
- Make the Chocolate Buttercream
- In a heatproof bowl set over a saucepan of simmering water (double boiler), whisk together the egg yolks, granulated sugar, and water. Cook gently, whisking constantly, until the mixture thickens and reaches 160°F (71°C) on a candy thermometer. This cooks the egg yolks and creates a stable base for your rich buttercream frosting.
- Remove from heat and continue whisking occasionally until the mixture cools to room temperature. This can take a while, but it's important to prevent the butter from melting.
- In a stand mixer with the paddle attachment (or using a hand mixer), beat the softened unsalted butter until it's light and fluffy.
- Gradually add the cooled egg yolk mixture to the butter, beating well after each addition until fully combined and fluffy.
- Beat in the melted and cooled chocolate, cocoa powder (if using), salt, and vanilla extract until the buttercream is smooth, glossy, and well combined.
- Texture target: Your buttercream should be light, airy, and spreadable. If it's too soft, chill it for 15-20 minutes and re-whip. If it's too stiff, beat it for a few more minutes or add a tiny splash of warm milk (1/2 teaspoon at a time) until it reaches the desired consistency. This isn't your average confectioners sugar frosting; it's a true European-style buttercream!For the Caramel Topping Ingredients
- 1 1/2 cups (300g) granulated sugar
- 1/4 cup (60ml) water
- Optional: a tiny amount (1/4 tsp) of butter, lemon juice, or white vinegar (helps prevent crystallization)
- For the Caramel Topping Step-by-Step Instructions
- Make the Caramel Topping & Cut Wedges
- Mise en place is crucial here! Have your prettiest sponge layer ready on a heatproof surface (like a silicone mat or parchment paper on a cutting board). Lightly grease a sharp chef's knife. Have your workspace clear and ready for quick action.
- In a heavy-bottomed saucepan, combine the sugar and water (and optional butter/lemon/vinegar). Cook over medium heat, stirring just until the sugar dissolves. Once it boils, stop stirring.
- Continue to cook without stirring (you can swirl the pan gently if needed) until the sugar syrup turns a beautiful, deep amber color. This is where your candy thermometer comes in handy; aim for around 320-340°F (160-170°C). Watch it closely, as caramel can go from perfect to burnt very quickly!
- Immediately pour the hot caramel over your chosen sponge layer. Working very quickly, use an offset spatula to spread the caramel evenly to the edges.
- Let it set for just a few seconds until it's firm but still pliable. Then, using your greased sharp chef's knife, score the caramel into 12-16 wedges. You don't want to cut all the way through yet, just score the lines.
- Let the caramel cool completely until it's hard and brittle. Once fully cooled, use your sharp knife to carefully cut along the scored lines, pressing firmly and cleanly to separate the caramel wedges. This is the iconic caramel layer cake topping!
- For the Assembly & Garnish
- Finely ground toasted hazelnuts (optional, for the sides)
- How to Assemble the Cake (Many Layers, No Chaos)
- Assemble the Cake
- Choose your prettiest sponge layer and set it aside; this will be your caramel-topped layer.
- Place one sponge layer on your serving plate or cake stand. Spread a thin, even layer of chocolate buttercream over it using your offset spatula.
- Repeat with the remaining sponge layers, stacking them neatly and ensuring each layer has an even amount of buttercream.
- Once all layers are stacked, apply a thin "crumb coat" of buttercream all over the cake – sides and top. This traps any loose crumbs. Chill the cake in the refrigerator for 15-20 minutes until the crumb coat is firm.
- After chilling, apply the final coat of buttercream, smoothing the sides and top with your offset spatula and bench scraper for a clean finish.
- If using, gently press finely ground toasted hazelnuts onto the sides of the cake.
- Decorate the Top the Classic Way
- Pipe small dollops of buttercream around the edge of the cake's top. These will act as "anchors" for your caramel wedges.
- Carefully stand the caramel wedges upright in a fan pattern on top of the cake, leaning them against the buttercream anchors.
Hungarian Dobos Torte - Chocolate Layer Cake Recipe
- Serves: 12 People
- Prepare Time: 1 hour 15 m
- Cooking Time: 45 minutes
- Calories: -
- Difficulty: Easy
Get ready to bake something truly spectacular: the Hungarian Dobos Torte! This isn't just any chocolate layer cake; it's a masterpiece of delicate flavors and textures. Imagine incredibly thin, airy sponge cake layers, generously filled with a rich, velvety chocolate for pastry buttercream, all crowned with a stunning, crisp caramel layer cake topping. It's a showstopper that tastes as incredible as it looks, and definitely worth the effort!
What makes a Dobos Torte so special? It's all about the contrast. You'll bite into light, almost melt-in-your-mouth sponge layers, followed by the luxurious creaminess of a rich buttercream frosting made with real chocolate. Then comes the glorious crunch of the caramel topping, offering a delightful textural surprise. While it might look intimidating, we're here to guide you through every step, ensuring your Dobos Torte is a decadent delight. This recipe falls into the "Advanced Medium" difficulty level, meaning it takes a bit of time and precision, but the results are absolutely worth it. Let's get baking!
Before you dive into the deliciousness, gather your tools. Having everything ready makes the process smooth and enjoyable!
8–9 inch round cake pans or sheet pans (you'll need several or bake in batches)
Parchment paper + marker (for tracing perfect circles!)
Offset spatula (essential for spreading thin layers evenly)
Digital scale (strongly recommended for accuracy in baking)
Stand mixer or a good hand mixer
Bench scraper (for super clean buttercream sides)
Candy thermometer (strongly recommended for perfect caramel)
Sharp chef’s knife (for cutting those beautiful caramel wedges)
You can definitely tackle parts of this cake ahead of time to reduce stress on the big day!
Make ahead: The thin sponge layers can be baked, cooled, and even frozen. The chocolate buttercream can also be made a day or two in advance and stored in the fridge. Just bring it to room temperature and re-whip before using.
Last-minute: The stunning caramel topping must be made and applied shortly before serving to ensure it stays crisp and beautiful.
Ingredients
Directions
- Prep Your Templates & Pans
- Grab your 8 or 9-inch round cake pans or sheet pans. On parchment paper, trace 8-10 circles using the bottom of one of your cake pans as a guide. Flip the parchment paper over so the ink doesn't transfer to your cake.
- Lightly grease your pans (or the back of the parchment if using sheet pans) and then press the parchment circles firmly onto the greased surface. This "grease strategy" ensures your delicate layers won't stick and will release cleanly after baking.
- Make the Sponge Batter
- In a clean, dry bowl, whip the egg whites with half of the granulated sugar (100g) until they form soft to medium peaks. Set aside.
- In a separate bowl, beat the egg yolks with the remaining half of the granulated sugar (100g) until the mixture is pale yellow and thick, almost like a ribbon. Stir in the vanilla extract.
- Gently fold about one-third of the whipped egg whites into the yolk mixture to lighten it. Then, carefully fold in the remaining egg whites until just combined, being careful not to deflate them too much. This gentle folding is key for an airy sponge!
- Sift the flour (and cocoa powder, if using) over the egg mixture. Gently fold it in until just combined, stopping as soon as no dry streaks remain.
- Finally, fold in the melted and cooled butter. Again, be gentle! This adds a lovely "buttery sponge" feel.
- Bake the Thin Layers (The Core Technique Section)
- Weigh your total batter and divide it evenly by the number of layers you plan to bake (typically 8-10 layers for a classic Dobos Torte). Aim for approximately 60-70 grams of batter per layer for an 8-inch cake.
- Dollop the measured batter onto each prepared parchment circle. Using your offset spatula, spread the batter very thinly and evenly to the edges of the circle. Consistency is crucial here for uniform layers.
- Bake each layer in a preheated oven at 400°F (200°C) for 5-7 minutes. They bake fast! Look for visual cues: the edges will be lightly golden, and the center will spring back slightly when gently touched.
- Immediately after baking, carefully peel the warm sponge layer off the parchment paper. Place it on a wire rack to cool completely. Once cool, you can use a round cutter or the bottom of your cake pan as a guide to trim any uneven edges, ensuring perfectly round layers.
- For the Chocolate Buttercream Ingredients
- 5 large egg yolks
- 1/2 cup (100g) granulated sugar
- 1/4 cup (60ml) water
- 1 1/2 cups (340g) unsalted butter, softened
- 6 ounces (170g) good quality semi-sweet or bittersweet chocolate for pastry, melted and cooled
- 2 tablespoons (15g) unsweetened cocoa powder (optional, for deeper flavor)
- 1/4 teaspoon salt
- 1 teaspoon vanilla extract
- For the Chocolate Buttercream Step-by-Step Instructions
- Make the Chocolate Buttercream
- In a heatproof bowl set over a saucepan of simmering water (double boiler), whisk together the egg yolks, granulated sugar, and water. Cook gently, whisking constantly, until the mixture thickens and reaches 160°F (71°C) on a candy thermometer. This cooks the egg yolks and creates a stable base for your rich buttercream frosting.
- Remove from heat and continue whisking occasionally until the mixture cools to room temperature. This can take a while, but it's important to prevent the butter from melting.
- In a stand mixer with the paddle attachment (or using a hand mixer), beat the softened unsalted butter until it's light and fluffy.
- Gradually add the cooled egg yolk mixture to the butter, beating well after each addition until fully combined and fluffy.
- Beat in the melted and cooled chocolate, cocoa powder (if using), salt, and vanilla extract until the buttercream is smooth, glossy, and well combined.
- Texture target: Your buttercream should be light, airy, and spreadable. If it's too soft, chill it for 15-20 minutes and re-whip. If it's too stiff, beat it for a few more minutes or add a tiny splash of warm milk (1/2 teaspoon at a time) until it reaches the desired consistency. This isn't your average confectioners sugar frosting; it's a true European-style buttercream!For the Caramel Topping Ingredients
- 1 1/2 cups (300g) granulated sugar
- 1/4 cup (60ml) water
- Optional: a tiny amount (1/4 tsp) of butter, lemon juice, or white vinegar (helps prevent crystallization)
- For the Caramel Topping Step-by-Step Instructions
- Make the Caramel Topping & Cut Wedges
- Mise en place is crucial here! Have your prettiest sponge layer ready on a heatproof surface (like a silicone mat or parchment paper on a cutting board). Lightly grease a sharp chef's knife. Have your workspace clear and ready for quick action.
- In a heavy-bottomed saucepan, combine the sugar and water (and optional butter/lemon/vinegar). Cook over medium heat, stirring just until the sugar dissolves. Once it boils, stop stirring.
- Continue to cook without stirring (you can swirl the pan gently if needed) until the sugar syrup turns a beautiful, deep amber color. This is where your candy thermometer comes in handy; aim for around 320-340°F (160-170°C). Watch it closely, as caramel can go from perfect to burnt very quickly!
- Immediately pour the hot caramel over your chosen sponge layer. Working very quickly, use an offset spatula to spread the caramel evenly to the edges.
- Let it set for just a few seconds until it's firm but still pliable. Then, using your greased sharp chef's knife, score the caramel into 12-16 wedges. You don't want to cut all the way through yet, just score the lines.
- Let the caramel cool completely until it's hard and brittle. Once fully cooled, use your sharp knife to carefully cut along the scored lines, pressing firmly and cleanly to separate the caramel wedges. This is the iconic caramel layer cake topping!
- For the Assembly & Garnish
- Finely ground toasted hazelnuts (optional, for the sides)
- How to Assemble the Cake (Many Layers, No Chaos)
- Assemble the Cake
- Choose your prettiest sponge layer and set it aside; this will be your caramel-topped layer.
- Place one sponge layer on your serving plate or cake stand. Spread a thin, even layer of chocolate buttercream over it using your offset spatula.
- Repeat with the remaining sponge layers, stacking them neatly and ensuring each layer has an even amount of buttercream.
- Once all layers are stacked, apply a thin "crumb coat" of buttercream all over the cake – sides and top. This traps any loose crumbs. Chill the cake in the refrigerator for 15-20 minutes until the crumb coat is firm.
- After chilling, apply the final coat of buttercream, smoothing the sides and top with your offset spatula and bench scraper for a clean finish.
- If using, gently press finely ground toasted hazelnuts onto the sides of the cake.
- Decorate the Top the Classic Way
- Pipe small dollops of buttercream around the edge of the cake's top. These will act as "anchors" for your caramel wedges.
- Carefully stand the caramel wedges upright in a fan pattern on top of the cake, leaning them against the buttercream anchors.
You may also like


Hey there! I’m just someone who seriously loves good food and believes that cooking doesn’t have to be complicated to be amazing. Whether it’s a quick weeknight dinner or a cozy weekend meal, I’m all about sharing easy, tasty recipes that actually work.


