
Bake Delicious Dabo Bread - Easy Homemade Milk & Honey Recipe
Bake Delicious Dabo Bread - Easy Homemade Milk & Honey Recipe
- Serves: 12 People
- Prepare Time: 40 minutes
- Cooking Time: 55-65 minut
- Calories: -
- Difficulty: Easy
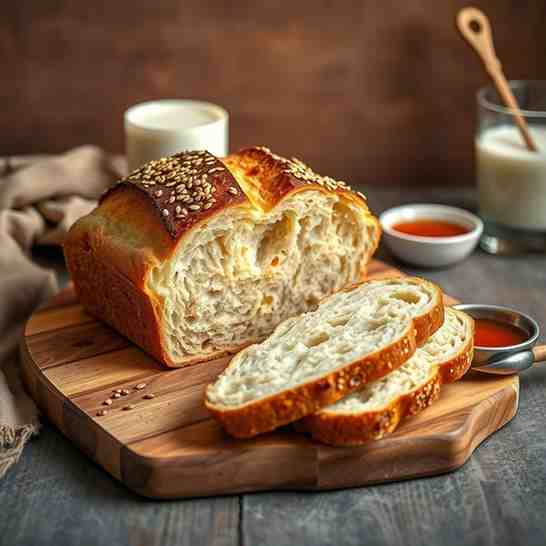
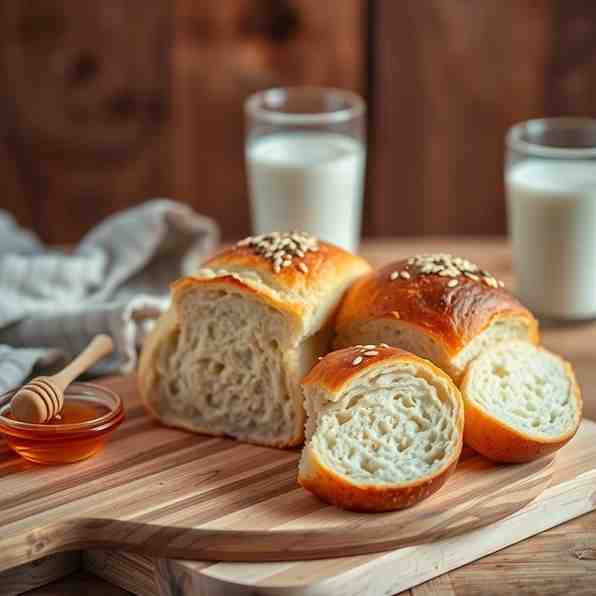
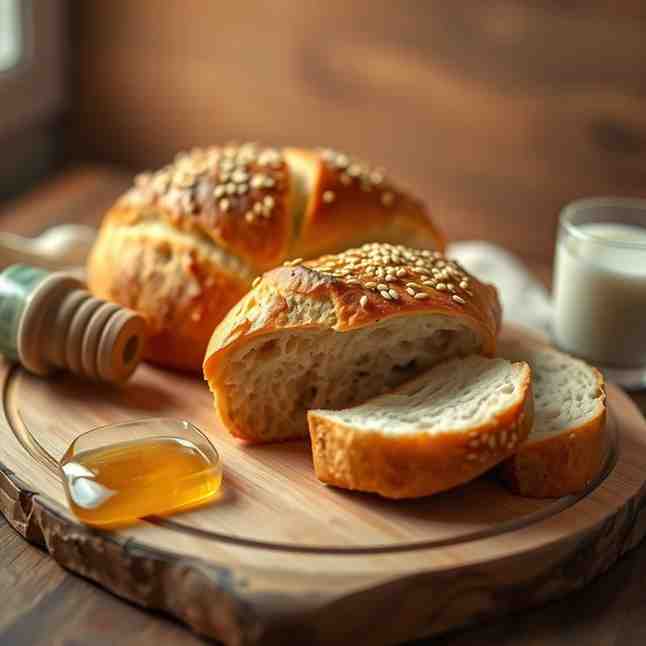
Get ready to embark on a delicious journey with an easy homemade bread recipe that will fill your kitchen with the most inviting aromas! If you've been looking for a truly special loaf to master, our authentic Ethiopian Dabo bread, known as Yemarina Yewotet Dabo, is exactly what you need. This isn't just any bread; it's a milk-and-honey spiced delight, infused with warm, comforting flavors that make every bite feel like a hug. It's the perfect introduction to baking bread at home, offering a uniquely tender crumb and a subtly sweet taste.
Our recipe is designed to be completely beginner-friendly, taking all the guesswork out of the process. We’ll show you how to achieve a perfectly soft, tender loaf every single time, thanks to a clever trick: baking it in a covered pan. Say goodbye to dense, dry loaves and hello to your new favorite homemade bread with yeast recipe!
This Ethiopian milk-and-honey bread, known as Yemarina Yewotet Dabo, is a soft, sweet, and warmly spiced loaf that’s perfect for any occasion. It’s a comforting treat with notes of cardamom and ginger, a hint of honey, and a texture that’s wonderfully tender. Our recipe is designed to be beginner-friendly, with no guesswork, and baked in a covered pan for a soft, tender loaf every time.
"Dabo" is a general term for bread in Ethiopia, encompassing a wide variety of loaves. However, this particular recipe focuses on Yemarina Yewotet Dabo, which specifically translates to "milk-and-honey bread." While there are many delicious Ethiopian breads, this recipe celebrates the unique sweetness and spice of this beloved version.
Traditionally, Dabo bread was often baked in a clay pot, sometimes lined with banana leaves, which helped create a moist, steamy environment. This technique is key to achieving Dabo's signature soft, tender crust and crumb. For your home kitchen, we'll mimic this by baking in a covered pot (like a Dutch oven) or a deep pan, ensuring your loaf stays beautifully moist and holds its shape perfectly.
Ingredients
Directions
- Bloom the yeast In a small bowl, combine the warm water (target 105-115°F / 40-46°C) and 1 teaspoon of granulated sugar. Sprinkle the active dry yeast over the top and let it sit for 5-10 minutes. What it should look like when ready: The mixture should become foamy and bubbly, indicating the yeast is active and ready to work its magic!
- Mix the dough In a large mixing bowl, whisk together the all-purpose flour, whole wheat flour, salt, ground cardamom, ground ginger, and mahlab (if using). In a separate medium bowl, combine the warmed milk, honey, melted butter (or oil), and the room-temperature egg. Pour the foamy yeast mixture and the wet ingredients into the dry ingredients. Mix with a sturdy spoon or a stand mixer with a dough hook until a shaggy dough forms. Dough consistency checkpoint: The dough should be tacky and soft, but not soupy or overly wet. If it's too dry, add a teaspoon of milk at a time; if too wet, a tablespoon of flour.
- Develop strength Turn the dough out onto a lightly floured surface. Knead the dough for about 5-7 minutes. This method is friendly to beginners, even if the dough is a bit sticky: knead for 2 minutes, then let it rest for 5 minutes. Repeat this process 2-3 times. The short rests allow the gluten to relax, making the dough easier to handle. Checkpoint: The dough should become smoother, more elastic, and less sticky, passing the "windowpane test" (stretching a small piece thin enough to see light through without tearing).
- First rise Lightly grease a large bowl with oil. Place the dough in the bowl, turning it once to coat. Cover the bowl tightly with plastic wrap or a damp kitchen towel. Let the dough rise in a warm, draft-free place for 1.5 to 2 hours, or until doubled in size. "Doubled" cues: The surface of the dough will appear domed, and when lightly poked, it will feel airy and slightly spring back.
- Prepare the pan + lining (banana leaves or parchment) While the dough is on its first rise, prepare your baking vessel. Lightly grease a 9-inch round Dutch oven, deep oven-safe pot, or springform pan. If using banana leaves, carefully line the bottom and sides, allowing them to extend slightly over the rim. For parchment paper, cut a circle for the bottom and a strip for the sides, then grease them lightly. This lining helps prevent sticking and adds moisture.
- Shape Gently punch down the risen dough to release the air. Turn it out onto a lightly floured surface and shape it into a taut, smooth round. Place the shaped dough into your prepared lined pan. Cover the pan loosely with plastic wrap or a clean kitchen towel. Let it proof in a warm spot for another 45-60 minutes. What "proofed enough" looks like: The dough should have visibly expanded, and when gently poked with a floured finger, it should spring back slowly, leaving a slight indentation.
- Bake covered, then finish Preheat your oven to 375°F (190°C) with the rack in the middle. Place the covered pan (with its lid or foil securely covering it) into the preheated oven. Bake covered for 30 minutes. After 30 minutes, carefully remove the lid or foil and continue baking for another 25-35 minutes, or until the top is golden brown. Doneness: The bread should have an internal temperature of 200-210°F (93-99°C) when measured with a thermometer. Visual cues include a deep golden-brown crust and a hollow sound when tapped on the bottom. Cooling guidance: Transfer the Dabo bread to a wire rack immediately after removing it from the oven. Allow it to cool completely for at least 1-2 hours before slicing. This allows the crumb to set properly, preventing a gummy texture.
Bake Delicious Dabo Bread - Easy Homemade Milk & Honey Recipe
- Serves: 12 People
- Prepare Time: 40 minutes
- Cooking Time: 55-65 minut
- Calories: -
- Difficulty: Easy
Get ready to embark on a delicious journey with an easy homemade bread recipe that will fill your kitchen with the most inviting aromas! If you've been looking for a truly special loaf to master, our authentic Ethiopian Dabo bread, known as Yemarina Yewotet Dabo, is exactly what you need. This isn't just any bread; it's a milk-and-honey spiced delight, infused with warm, comforting flavors that make every bite feel like a hug. It's the perfect introduction to baking bread at home, offering a uniquely tender crumb and a subtly sweet taste.
Our recipe is designed to be completely beginner-friendly, taking all the guesswork out of the process. We’ll show you how to achieve a perfectly soft, tender loaf every single time, thanks to a clever trick: baking it in a covered pan. Say goodbye to dense, dry loaves and hello to your new favorite homemade bread with yeast recipe!
This Ethiopian milk-and-honey bread, known as Yemarina Yewotet Dabo, is a soft, sweet, and warmly spiced loaf that’s perfect for any occasion. It’s a comforting treat with notes of cardamom and ginger, a hint of honey, and a texture that’s wonderfully tender. Our recipe is designed to be beginner-friendly, with no guesswork, and baked in a covered pan for a soft, tender loaf every time.
"Dabo" is a general term for bread in Ethiopia, encompassing a wide variety of loaves. However, this particular recipe focuses on Yemarina Yewotet Dabo, which specifically translates to "milk-and-honey bread." While there are many delicious Ethiopian breads, this recipe celebrates the unique sweetness and spice of this beloved version.
Traditionally, Dabo bread was often baked in a clay pot, sometimes lined with banana leaves, which helped create a moist, steamy environment. This technique is key to achieving Dabo's signature soft, tender crust and crumb. For your home kitchen, we'll mimic this by baking in a covered pot (like a Dutch oven) or a deep pan, ensuring your loaf stays beautifully moist and holds its shape perfectly.
Ingredients
Directions
- Bloom the yeast In a small bowl, combine the warm water (target 105-115°F / 40-46°C) and 1 teaspoon of granulated sugar. Sprinkle the active dry yeast over the top and let it sit for 5-10 minutes. What it should look like when ready: The mixture should become foamy and bubbly, indicating the yeast is active and ready to work its magic!
- Mix the dough In a large mixing bowl, whisk together the all-purpose flour, whole wheat flour, salt, ground cardamom, ground ginger, and mahlab (if using). In a separate medium bowl, combine the warmed milk, honey, melted butter (or oil), and the room-temperature egg. Pour the foamy yeast mixture and the wet ingredients into the dry ingredients. Mix with a sturdy spoon or a stand mixer with a dough hook until a shaggy dough forms. Dough consistency checkpoint: The dough should be tacky and soft, but not soupy or overly wet. If it's too dry, add a teaspoon of milk at a time; if too wet, a tablespoon of flour.
- Develop strength Turn the dough out onto a lightly floured surface. Knead the dough for about 5-7 minutes. This method is friendly to beginners, even if the dough is a bit sticky: knead for 2 minutes, then let it rest for 5 minutes. Repeat this process 2-3 times. The short rests allow the gluten to relax, making the dough easier to handle. Checkpoint: The dough should become smoother, more elastic, and less sticky, passing the "windowpane test" (stretching a small piece thin enough to see light through without tearing).
- First rise Lightly grease a large bowl with oil. Place the dough in the bowl, turning it once to coat. Cover the bowl tightly with plastic wrap or a damp kitchen towel. Let the dough rise in a warm, draft-free place for 1.5 to 2 hours, or until doubled in size. "Doubled" cues: The surface of the dough will appear domed, and when lightly poked, it will feel airy and slightly spring back.
- Prepare the pan + lining (banana leaves or parchment) While the dough is on its first rise, prepare your baking vessel. Lightly grease a 9-inch round Dutch oven, deep oven-safe pot, or springform pan. If using banana leaves, carefully line the bottom and sides, allowing them to extend slightly over the rim. For parchment paper, cut a circle for the bottom and a strip for the sides, then grease them lightly. This lining helps prevent sticking and adds moisture.
- Shape Gently punch down the risen dough to release the air. Turn it out onto a lightly floured surface and shape it into a taut, smooth round. Place the shaped dough into your prepared lined pan. Cover the pan loosely with plastic wrap or a clean kitchen towel. Let it proof in a warm spot for another 45-60 minutes. What "proofed enough" looks like: The dough should have visibly expanded, and when gently poked with a floured finger, it should spring back slowly, leaving a slight indentation.
- Bake covered, then finish Preheat your oven to 375°F (190°C) with the rack in the middle. Place the covered pan (with its lid or foil securely covering it) into the preheated oven. Bake covered for 30 minutes. After 30 minutes, carefully remove the lid or foil and continue baking for another 25-35 minutes, or until the top is golden brown. Doneness: The bread should have an internal temperature of 200-210°F (93-99°C) when measured with a thermometer. Visual cues include a deep golden-brown crust and a hollow sound when tapped on the bottom. Cooling guidance: Transfer the Dabo bread to a wire rack immediately after removing it from the oven. Allow it to cool completely for at least 1-2 hours before slicing. This allows the crumb to set properly, preventing a gummy texture.
You may also like


Hey there! I’m just someone who seriously loves good food and believes that cooking doesn’t have to be complicated to be amazing. Whether it’s a quick weeknight dinner or a cozy weekend meal, I’m all about sharing easy, tasty recipes that actually work.


